- Subsites without entries not shown
- Category:
- Post Type = post
Can’t access a Google Drive File?
If your computer is blocking access to a Google Drive file and is asking you to send a view / edit request to our servers then there is a problem with your School / Organisation blocking the request. Try signing into Google using a personal email address instead and it should let you (or contact your school IT Manager and ask them to fix it). We never block access to any files 🙂
Welcome to WordPress. This is your first post. Edit or delete it, then start writing!
Microbit RGB LED Tutorial
In this tutorial we will show you how to wire and code an RGB LED using the Microbit. This is a great cheap Microbit project that teachers can do with their students, and it’s also very educational! It teachers the basics of wiring up external outputs, as well as how RGB colours are made.
You will need:

Wiring Diagram
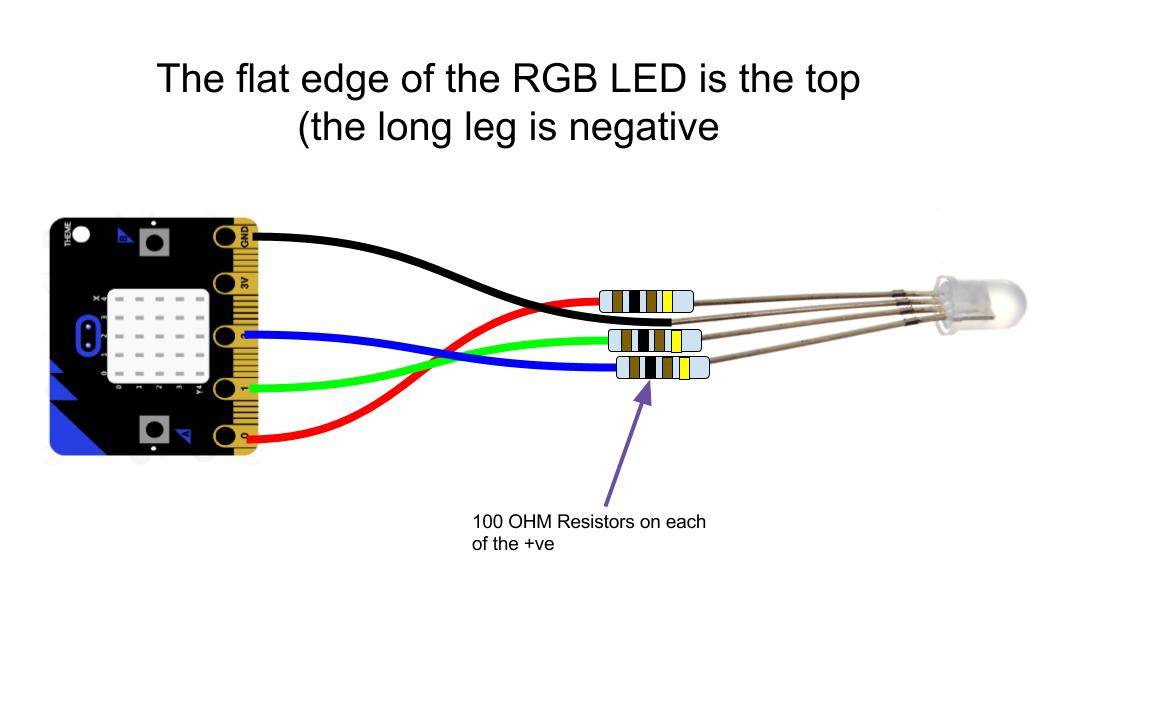
Click to enlarge
Wiring up the LED is nice is nice and simple. Each of the outputs run from the Microbit, through a 100 ohm resistor and on to LED.
Wiring Example
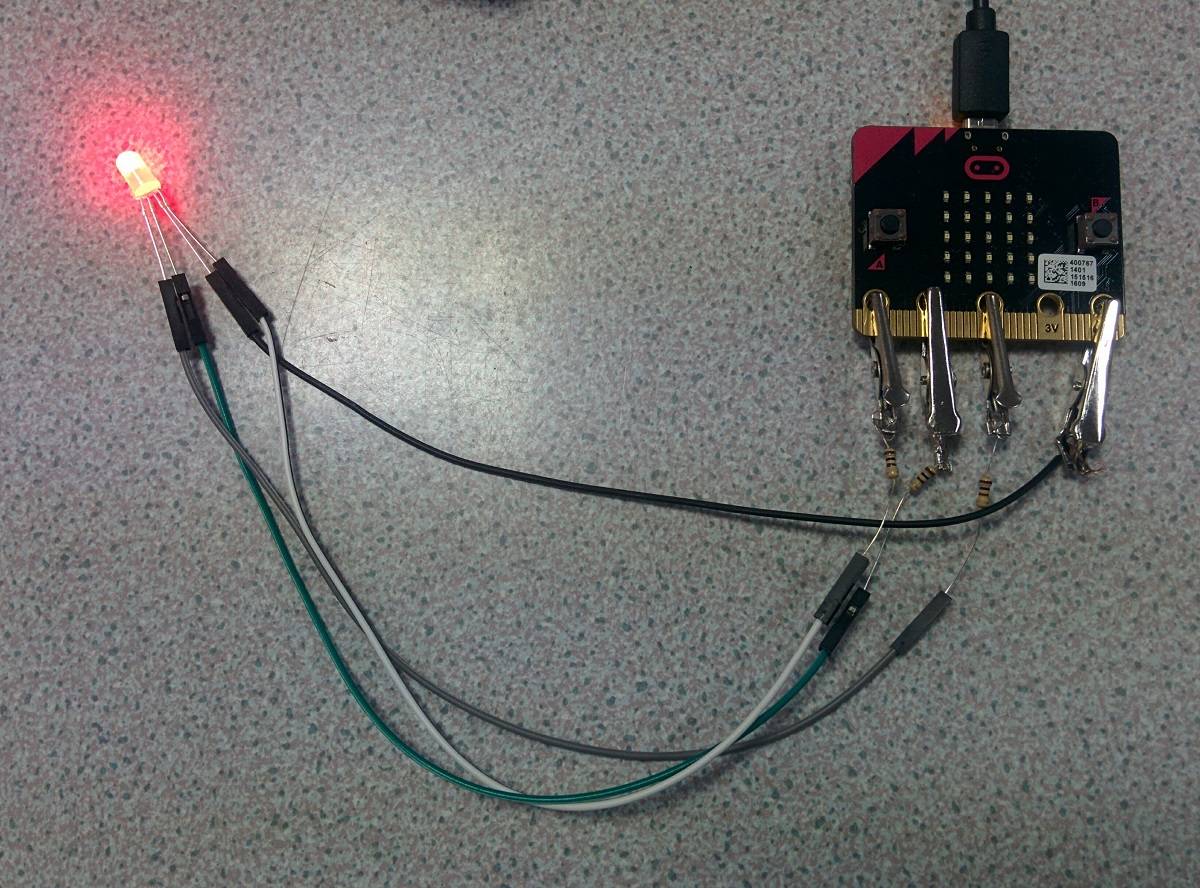
Click to enlarge
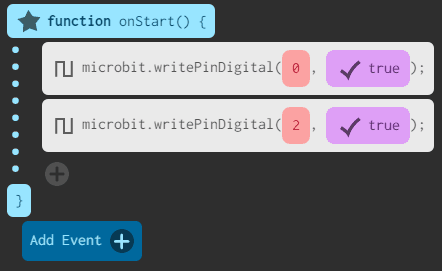
Test code 1 – 3 alternative colours

Click to enlarge
The simplest way to test if your setup is working is to simply turn each output on one by one.
Test code 2 – composite colour
Click to enlarge
What about combining colors? Well, this is where the RGB comes in to play.
A simple example is Red + Blue , which makes a purpley pink colour.
Here we simply turn 2 outputs on at the same time!
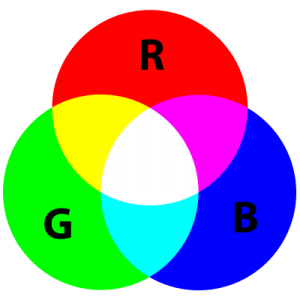
RGB Color Generator
RGB colors are generated by a mix of three elements, with the brightness of each(luminosity) varying from 0 to 100%.
Have a go at moving the sliders below to see what colours you can generate.
Microbit RGB LED Tutorial Challenges
Challenge 1 – Traffic Light LED
Write a script that mimics the functioning of a traffic light, triggered when you press a button on the Microbit.
Challenge 2 – Random colour LED
Write a script that outputs a random colour from the LED
Challenge 3 – Pulsing LED
Write a script that allows the LED to pulse on and off
Challenge 4 – Blended colours
Write a script that blends slowly from one green to blue and back again.
- Introduction
- Hardware
- Sender code: Digital
- Receiver code: Digital
- Sender unit code : Analogue
- Receiver code: Analogue
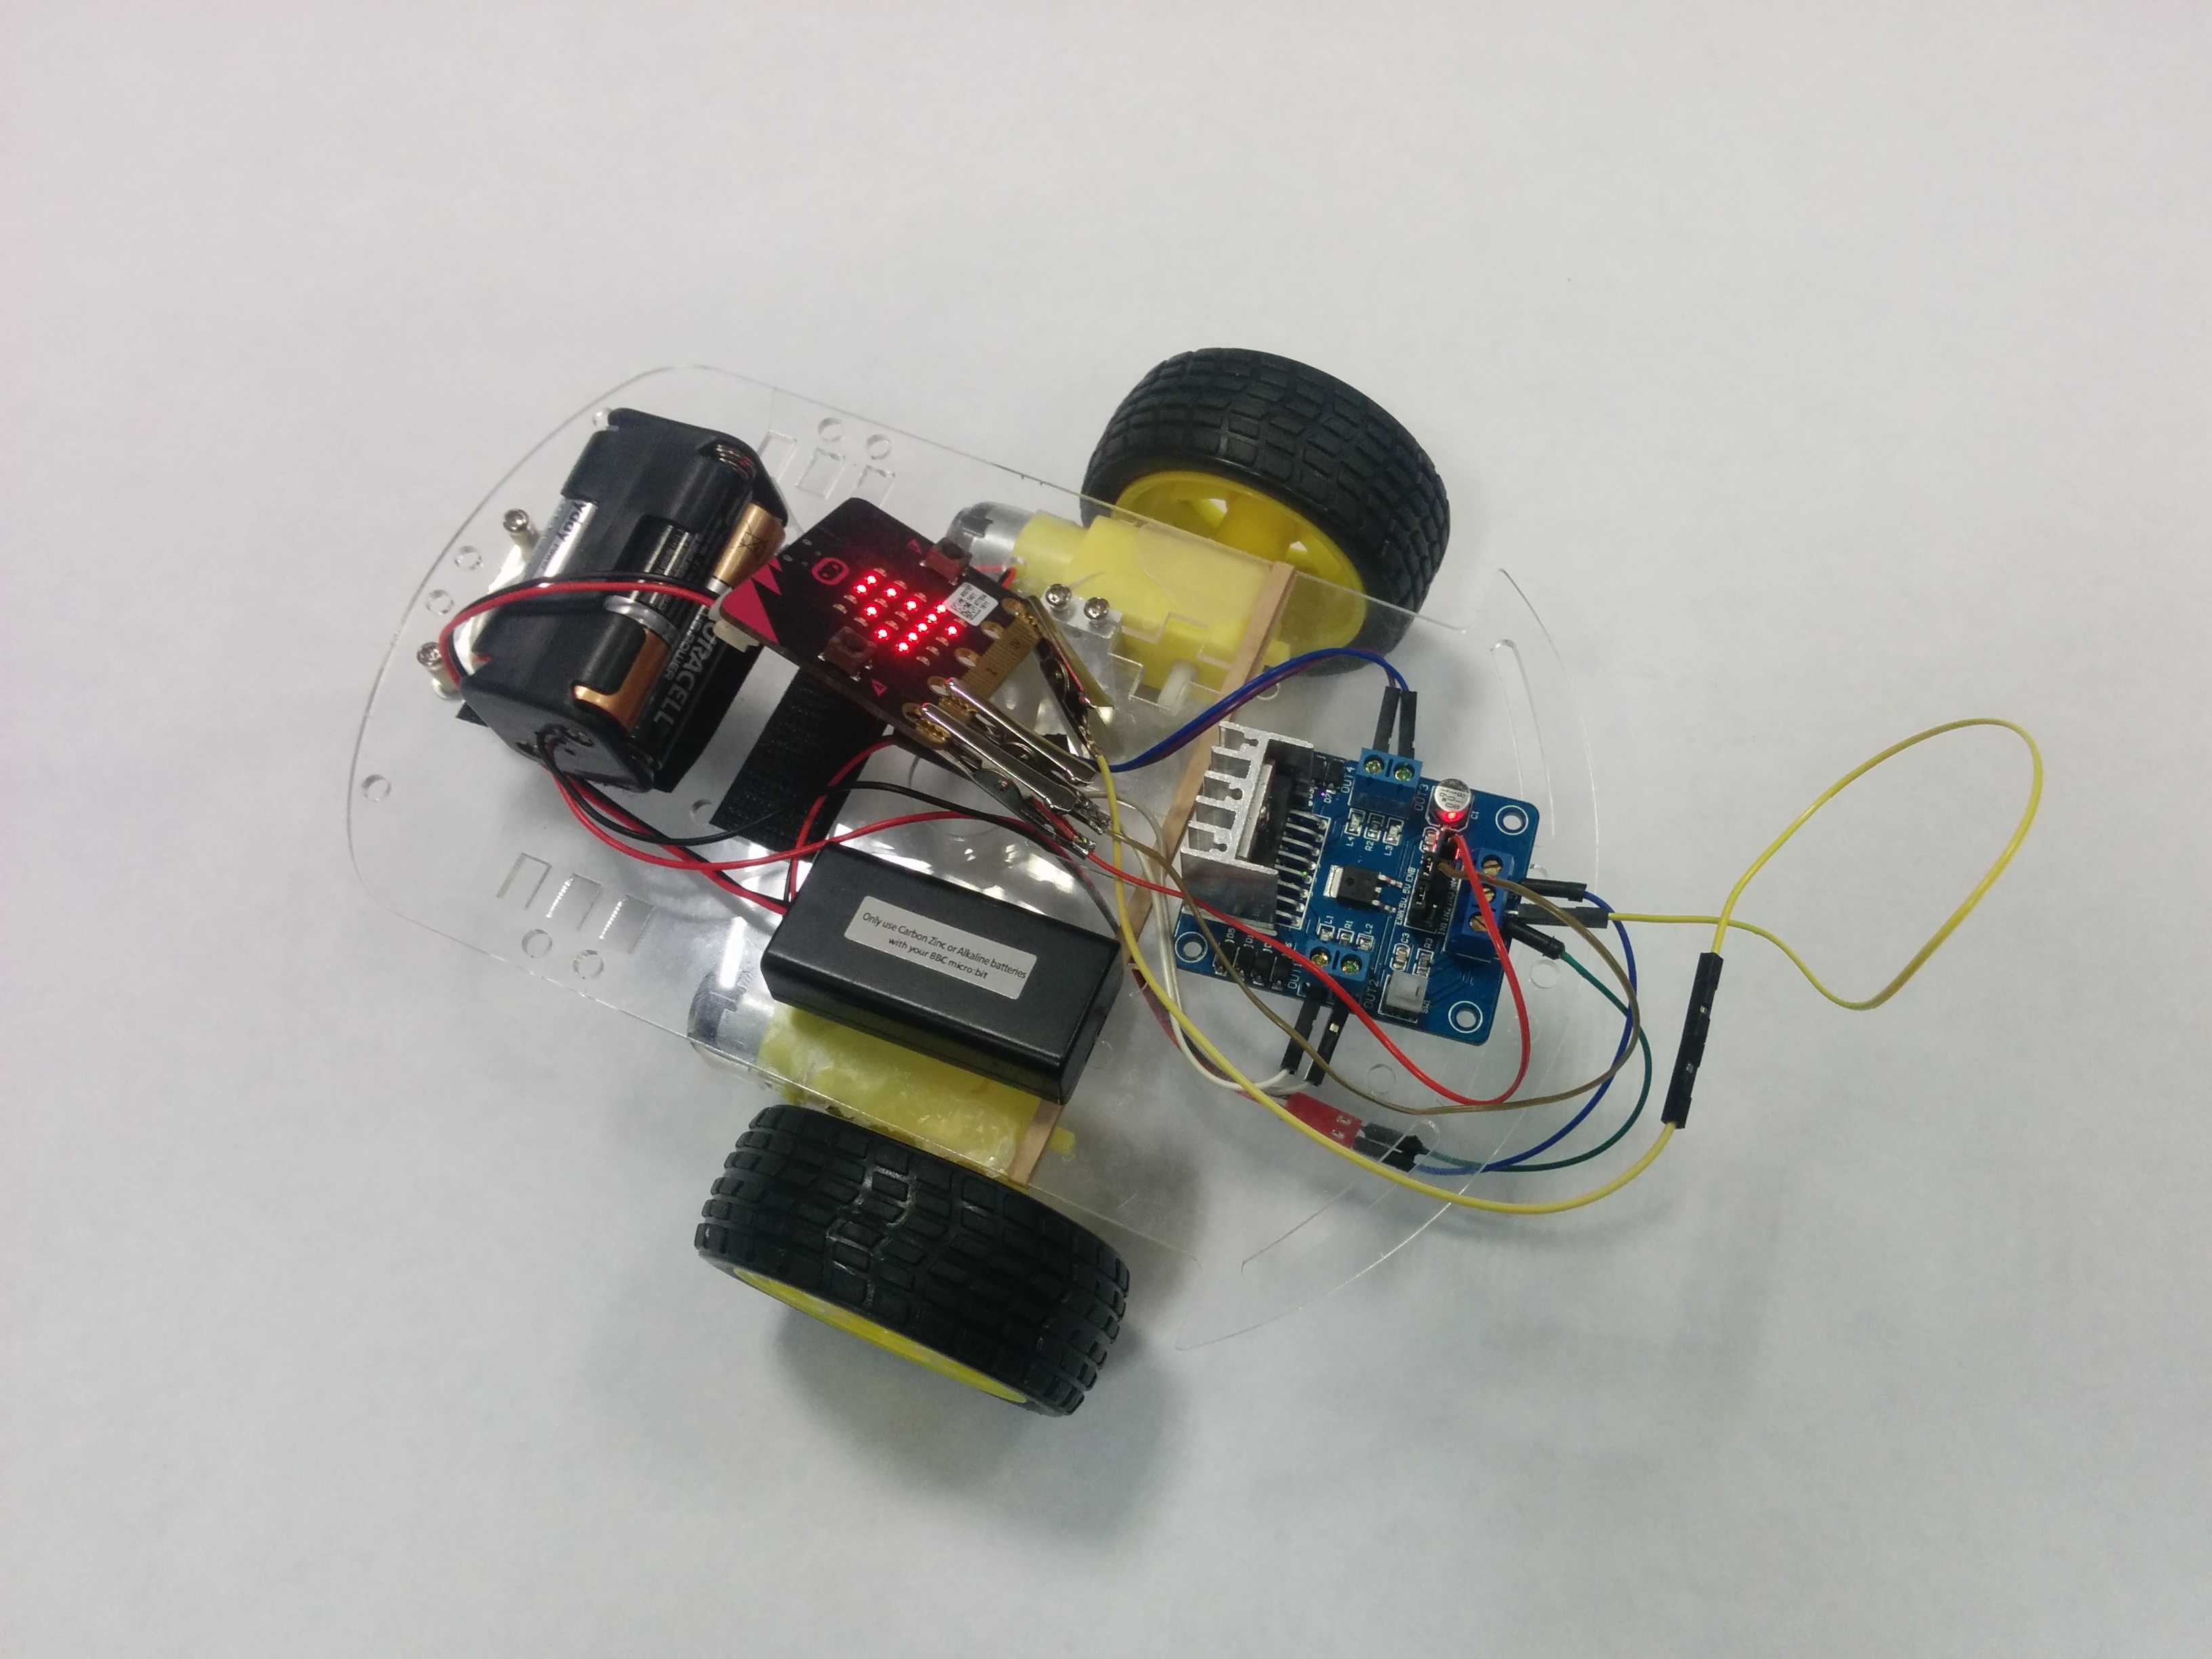
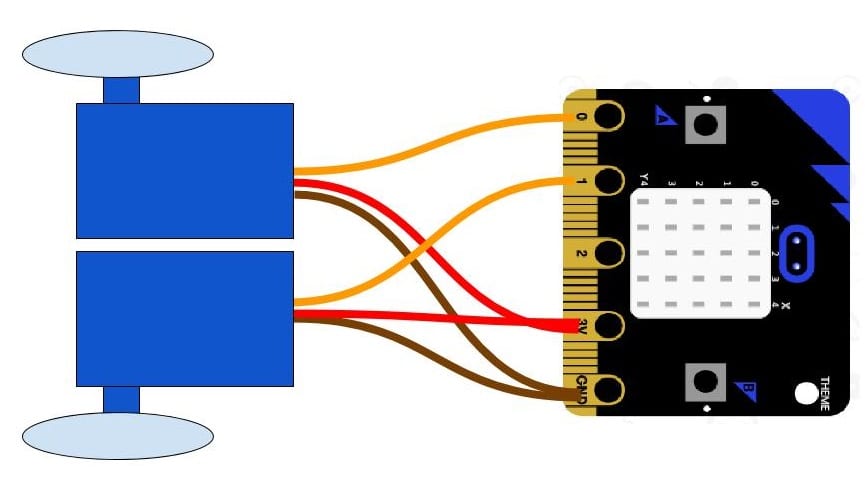
Microbit radio controlled car tutorial with L298 Motorboard
In this tutorial will we show you how to make a radio controlled car using two Micro-bits and a robot car kit (using a motorboard).
- The first Microbit will using the tilt sensor (accelerometer) to control whether to turn left or right
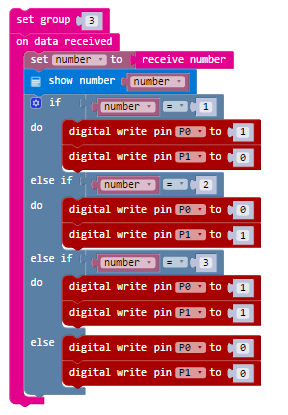
- The second Microbit will act as a receiver, sending the control signal to the motor-board.
Ingredients
Wiring up the Microbit radio controlled car
Setting up the hardware is easy, though it will vary depending on the motor-board that you have bought.
On the board I have used:
- The Microbit output pin 0 is connected to the motor-board input pin 2
- The Microbit ouput pin 1 is connect to the motor-board input pin 4
- The Microbit GND is connected to the Motor-board GND
Do not connect the 3V Microbit to the VCC on the motorboard!!! I did this with the first Microbit I wired up – smoke came out of the Microbit and now it is dead. RIP Microbit

The wiring setup Microbit and L298 Motorboard
My fully assembled setup
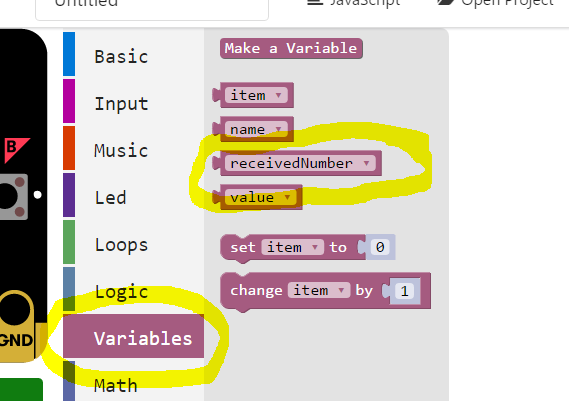
For this tutorial we will be using the CodeTheMicrobit.com site, as JavaScript CodeKindgoms doesn’t support Bluetooth directly.
CodeTheMicrobit.com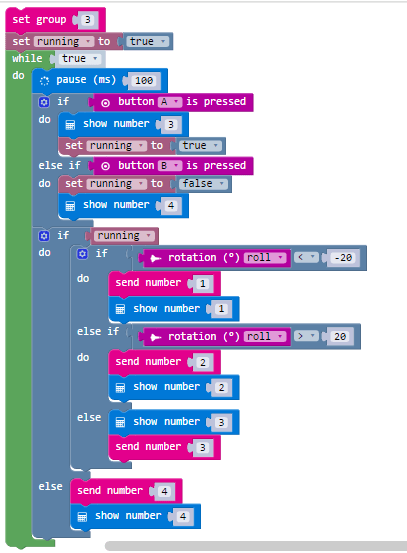
Please note that Microsoft have updated the pxt website. To find the receive number block, you need to look under the Variables menu.

Microbit plant moisture detector tutorial
In this tutorial we will be learning how to make a moisture detector, which can be used to detect when plants need watering. We will be using some cheap and easy to assemble components for this great little project!
Ingredients
![IMG_20160706_153146[1]](https://learnlearn.uk/microbit/wp-content/uploads/sites/2/2016/07/IMG_20160706_1531461.jpg)
You are going to need:
- 1 Microbit + USB Cable (for coding)
- 1 Microbit battery pack
- 4 Crocodile clips and cables
- 1 10,000 Ohm variable resistor
- 1 Plant pot with soil.
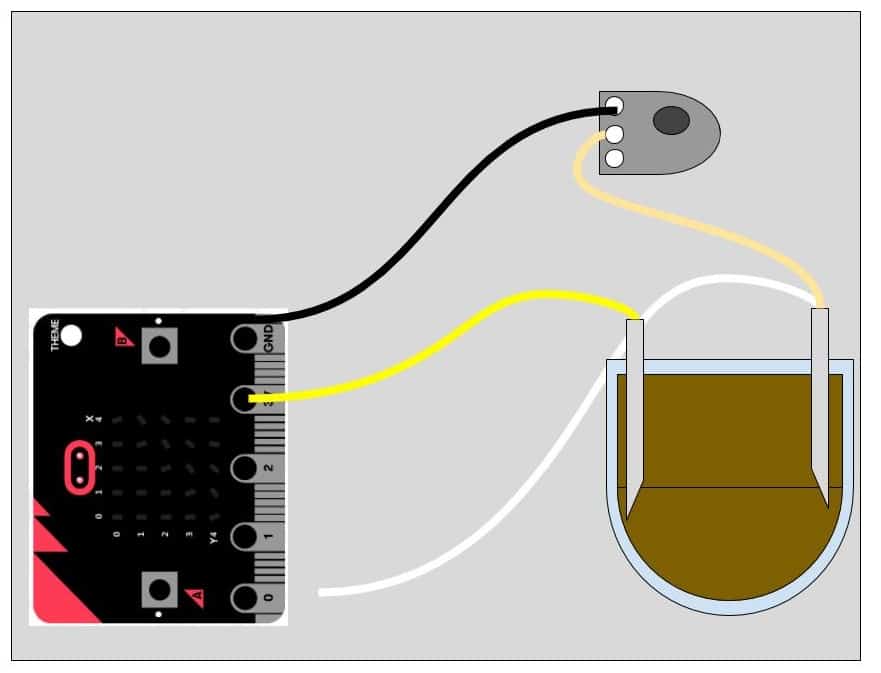
Wire up the Microbit plant moisture detector
Wiring up the Moisture detector is easy! Just wire up your project as below. If you don’t have an organic plant pot like mine you might want to clip your crocodile clips to a couple of nails or metal pegs. Choosing the correct setting on the variable will take a bit of trial and error, but just test it out until the test code triggers at the correct moisture level.
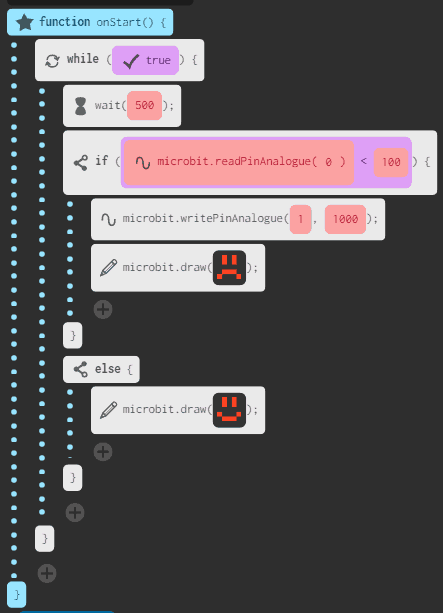
Here is the complete code you will need in order to code your Microbit Moisture level detector. This version of the project checks the moisture level and is great for making sure that your project if working correctly. If you are going to use your moisture level detector connected to a battery pack then it would be a good idea to check this value to something like 360000 (1 hour) so that you increase the Micro-bit’s battery life!
- Adapt your code so that the Microbit only checks every 30 minutes instead of every half a second.
- Add a manual code check function so that if the user presses A it immediately checks the moisture level.
- Add a buzzer/speaker to your setup so that the user is alerted when the moisture level is too low.
The aim of the this project is to find out how good a friend your friend is, by asking them a number of questions. The Microbit keeps track of their answer each time and will give them a friendship score percentage at the end
In this program we will be using Python coding.
You can access the Python Microbit ‘Create Code’ link below.
Micropython Microbit Create Code# This project is designed to test how good a friend you are # by asking you a number of questions about your friend. from microbit import * questions = \ [["Is my favourite colour A - red or B - green?","B"], ["Is my favourite food A - Pizza or B - Spaghetti?","B"], ["Is my cat's name A - Meg or B - Smeg","A"]] score = 0 for question in questions: display.scroll(question[0]) while True: if button_a.is_pressed(): guess = "A" break elif button_b.is_pressed(): guess = "B" break elif accelerometer.was_gesture("shake"): display.scroll(question[0]) sleep(10) if guess == question[1]: display.scroll("Correct...") score += 1 else: display.scroll("Wrong....") display.scroll("Score:" + str(score)) display.scroll("Your friendship score is " + str((score/len(questions))*100) + "%" )
Microbit truth or dare game tutorial
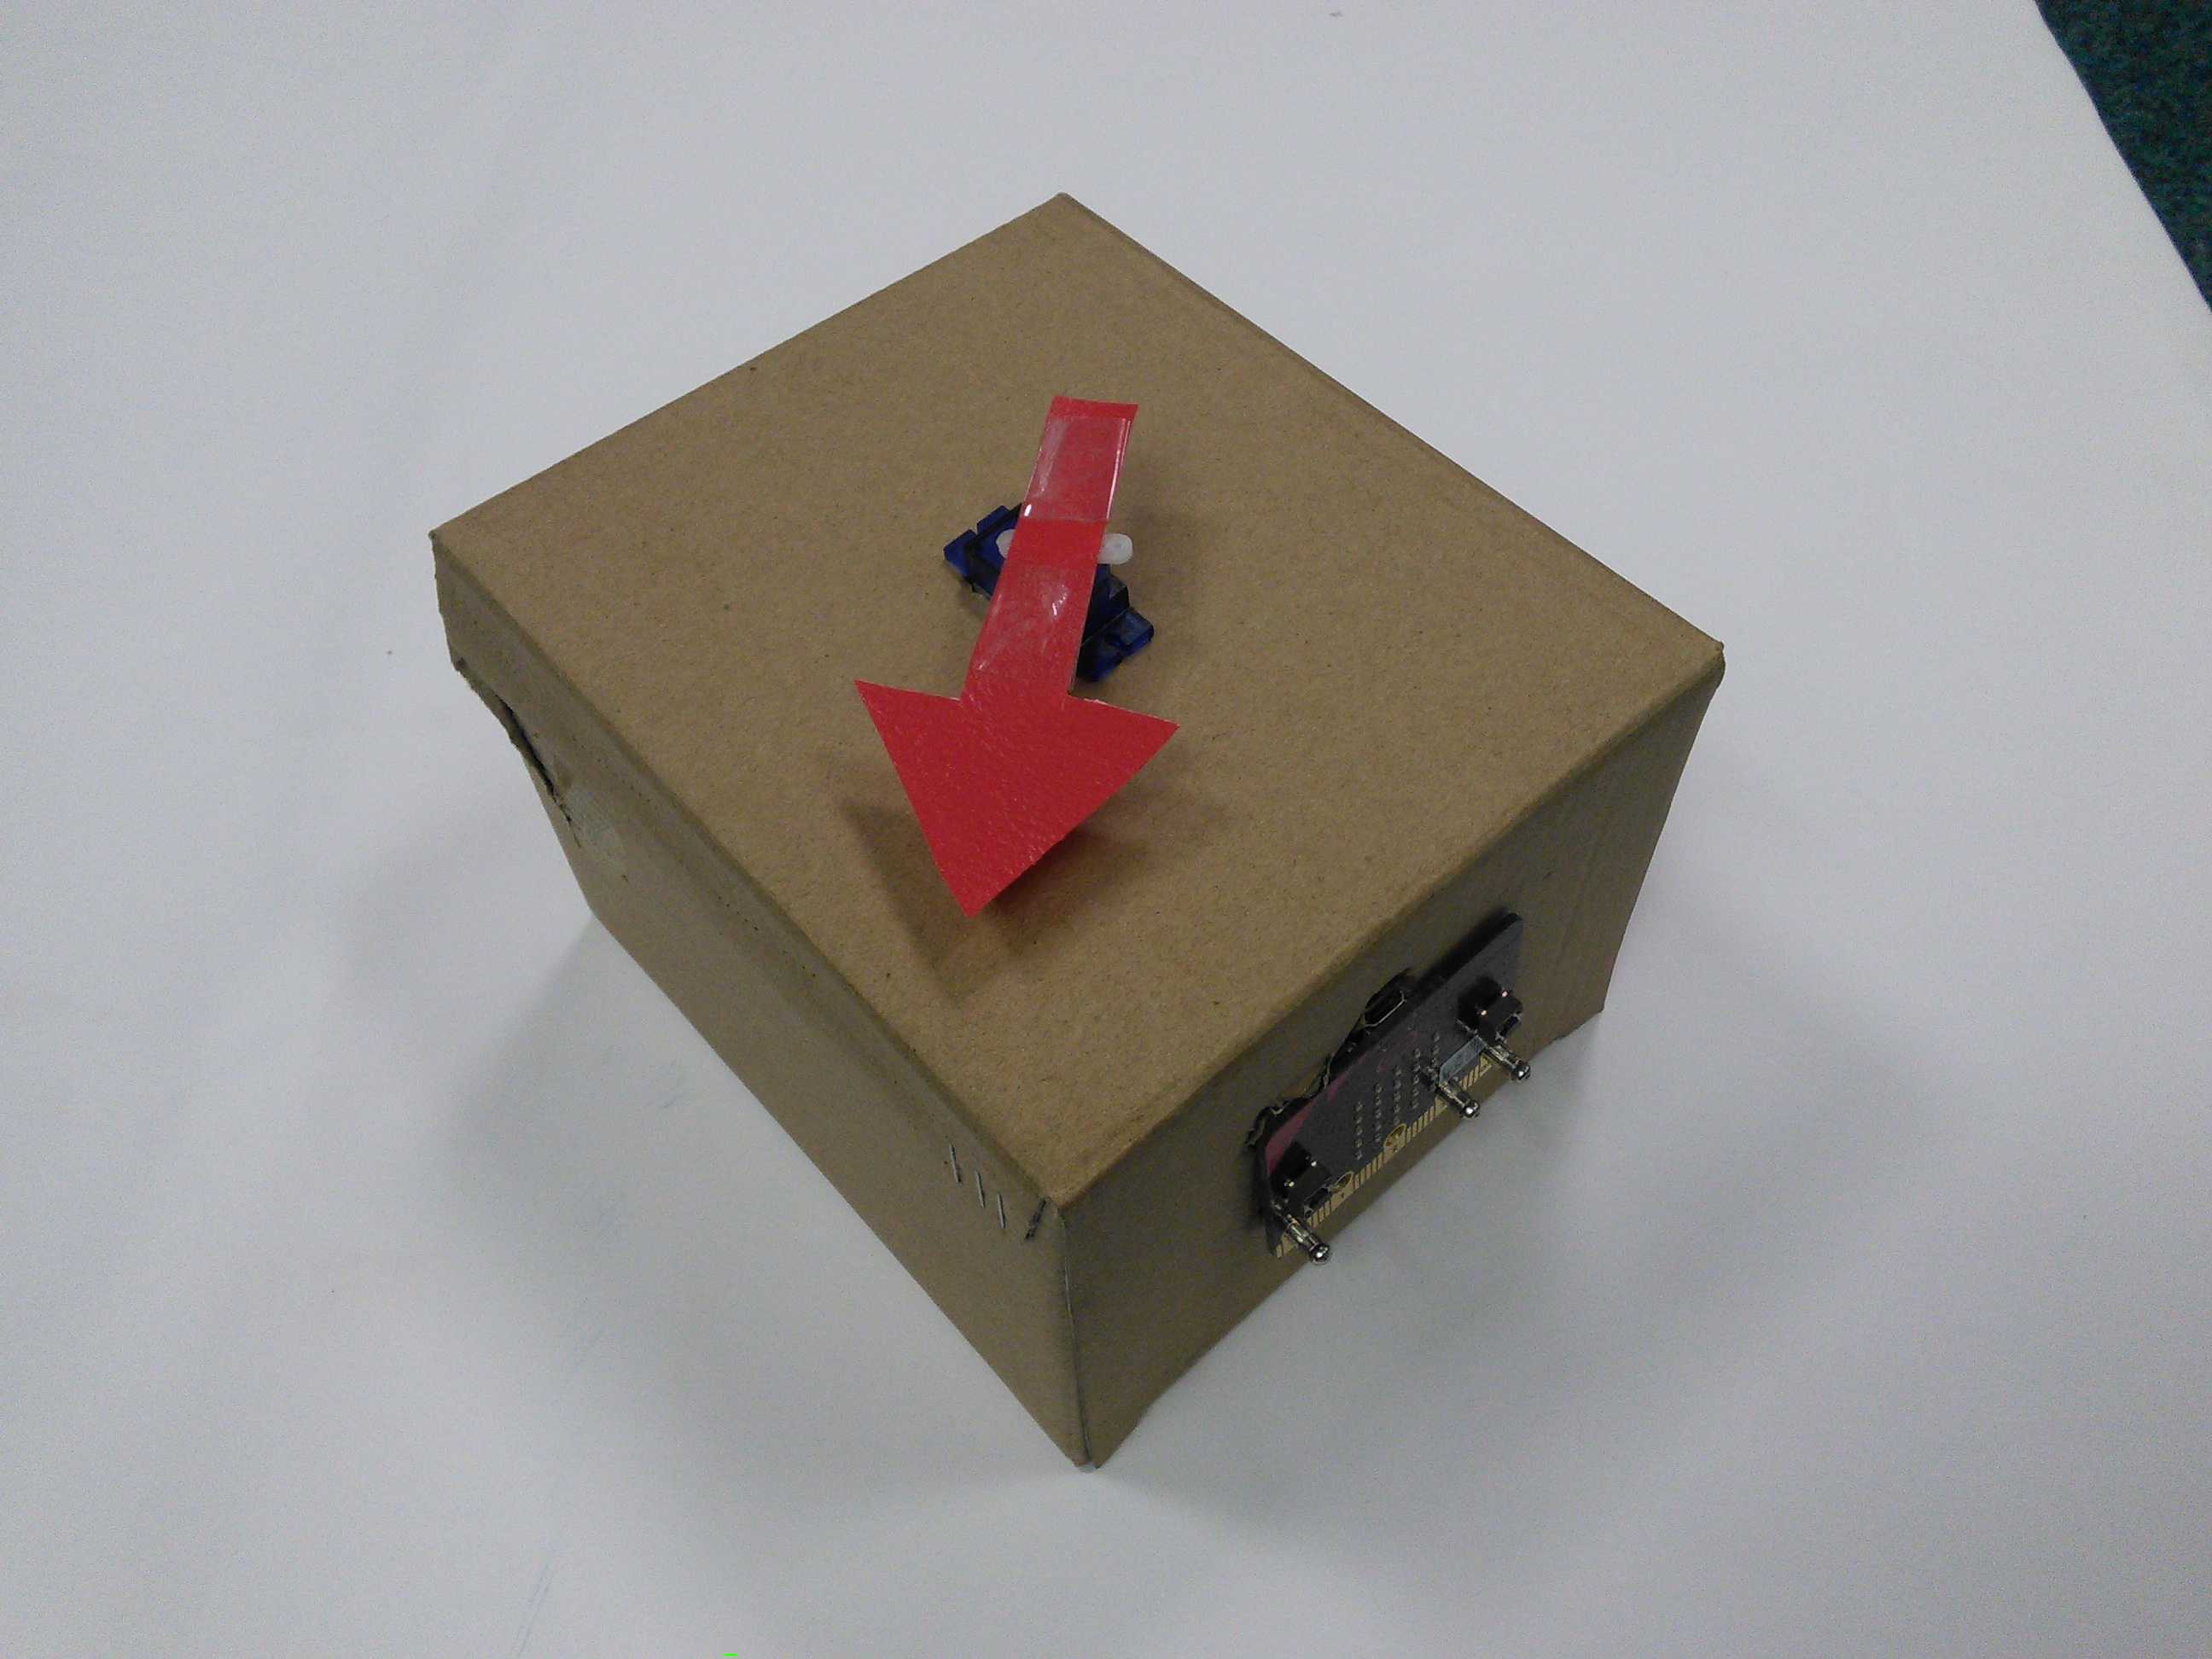
In this project we will be making a truth or dare game using a Microbit and a continuous servo. The game is an extension of the on-board version found on the official Microbit site. The project was designed to give non-coders the ability to make an exciting project where they could both improve their coding skills and express themselves through creative designs.
Demo Video
You will need:
- A BBC Microbit
- Microbit Battery Pack
- 2 AA Batteries
- A small empty cardboard box
- An FS90R continuous servo
- 3 banana plugs
- A cardboard or plastic arrow
- Selotape
- Scissors
- Screwdriver
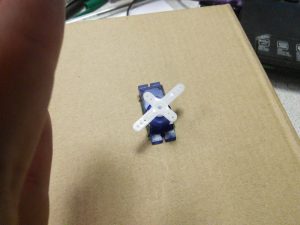
Step 1 - Prepare the servo
Step 1 – Strip the ends of the Servo wires and attach them to the banana crocodile clips.

Before
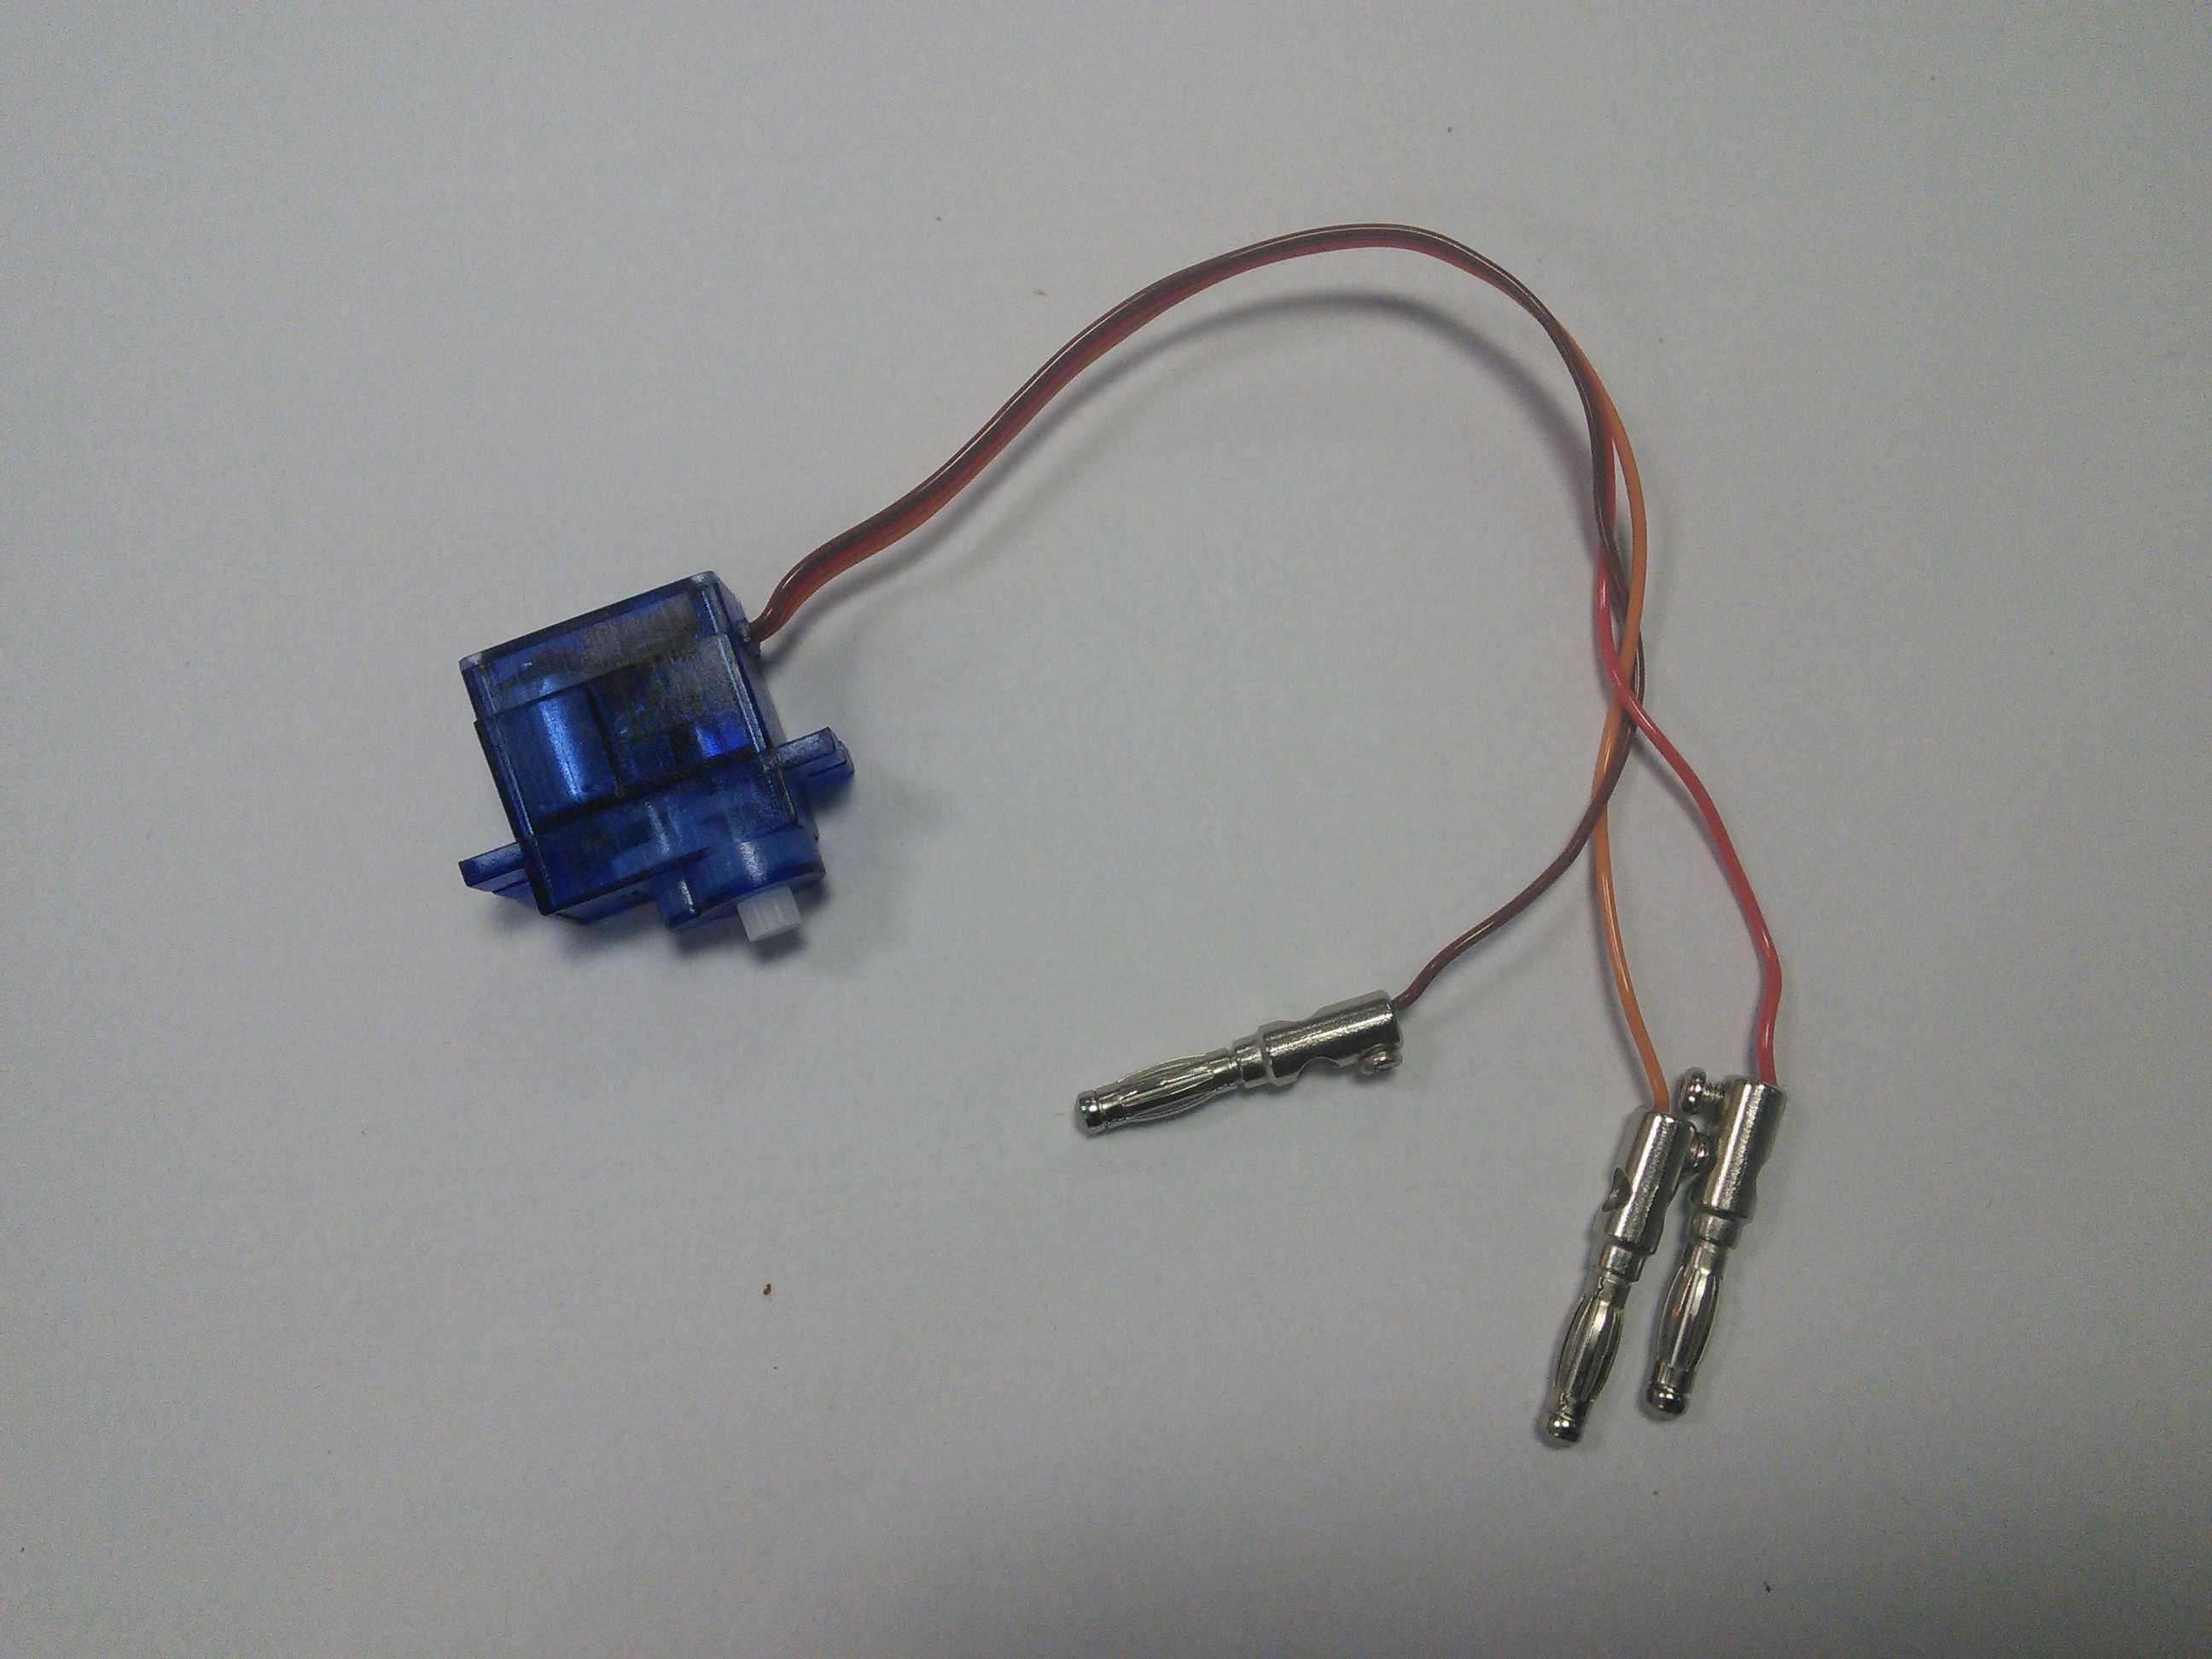
After
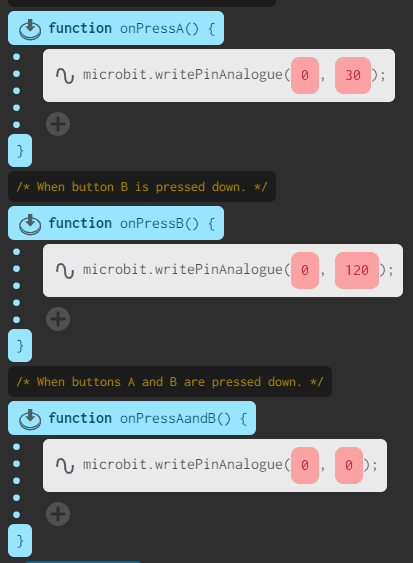
Step 2 - Test the servo
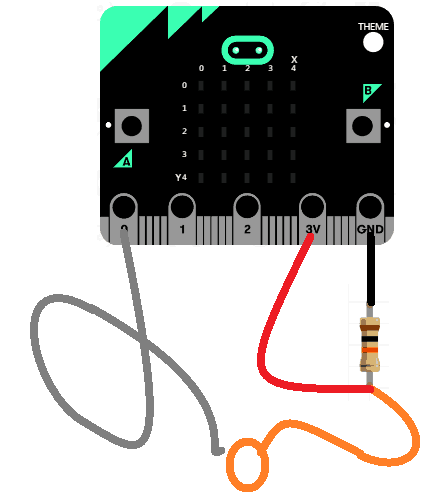
Connect your servo to the Microbit and run some test code to make sure it works.
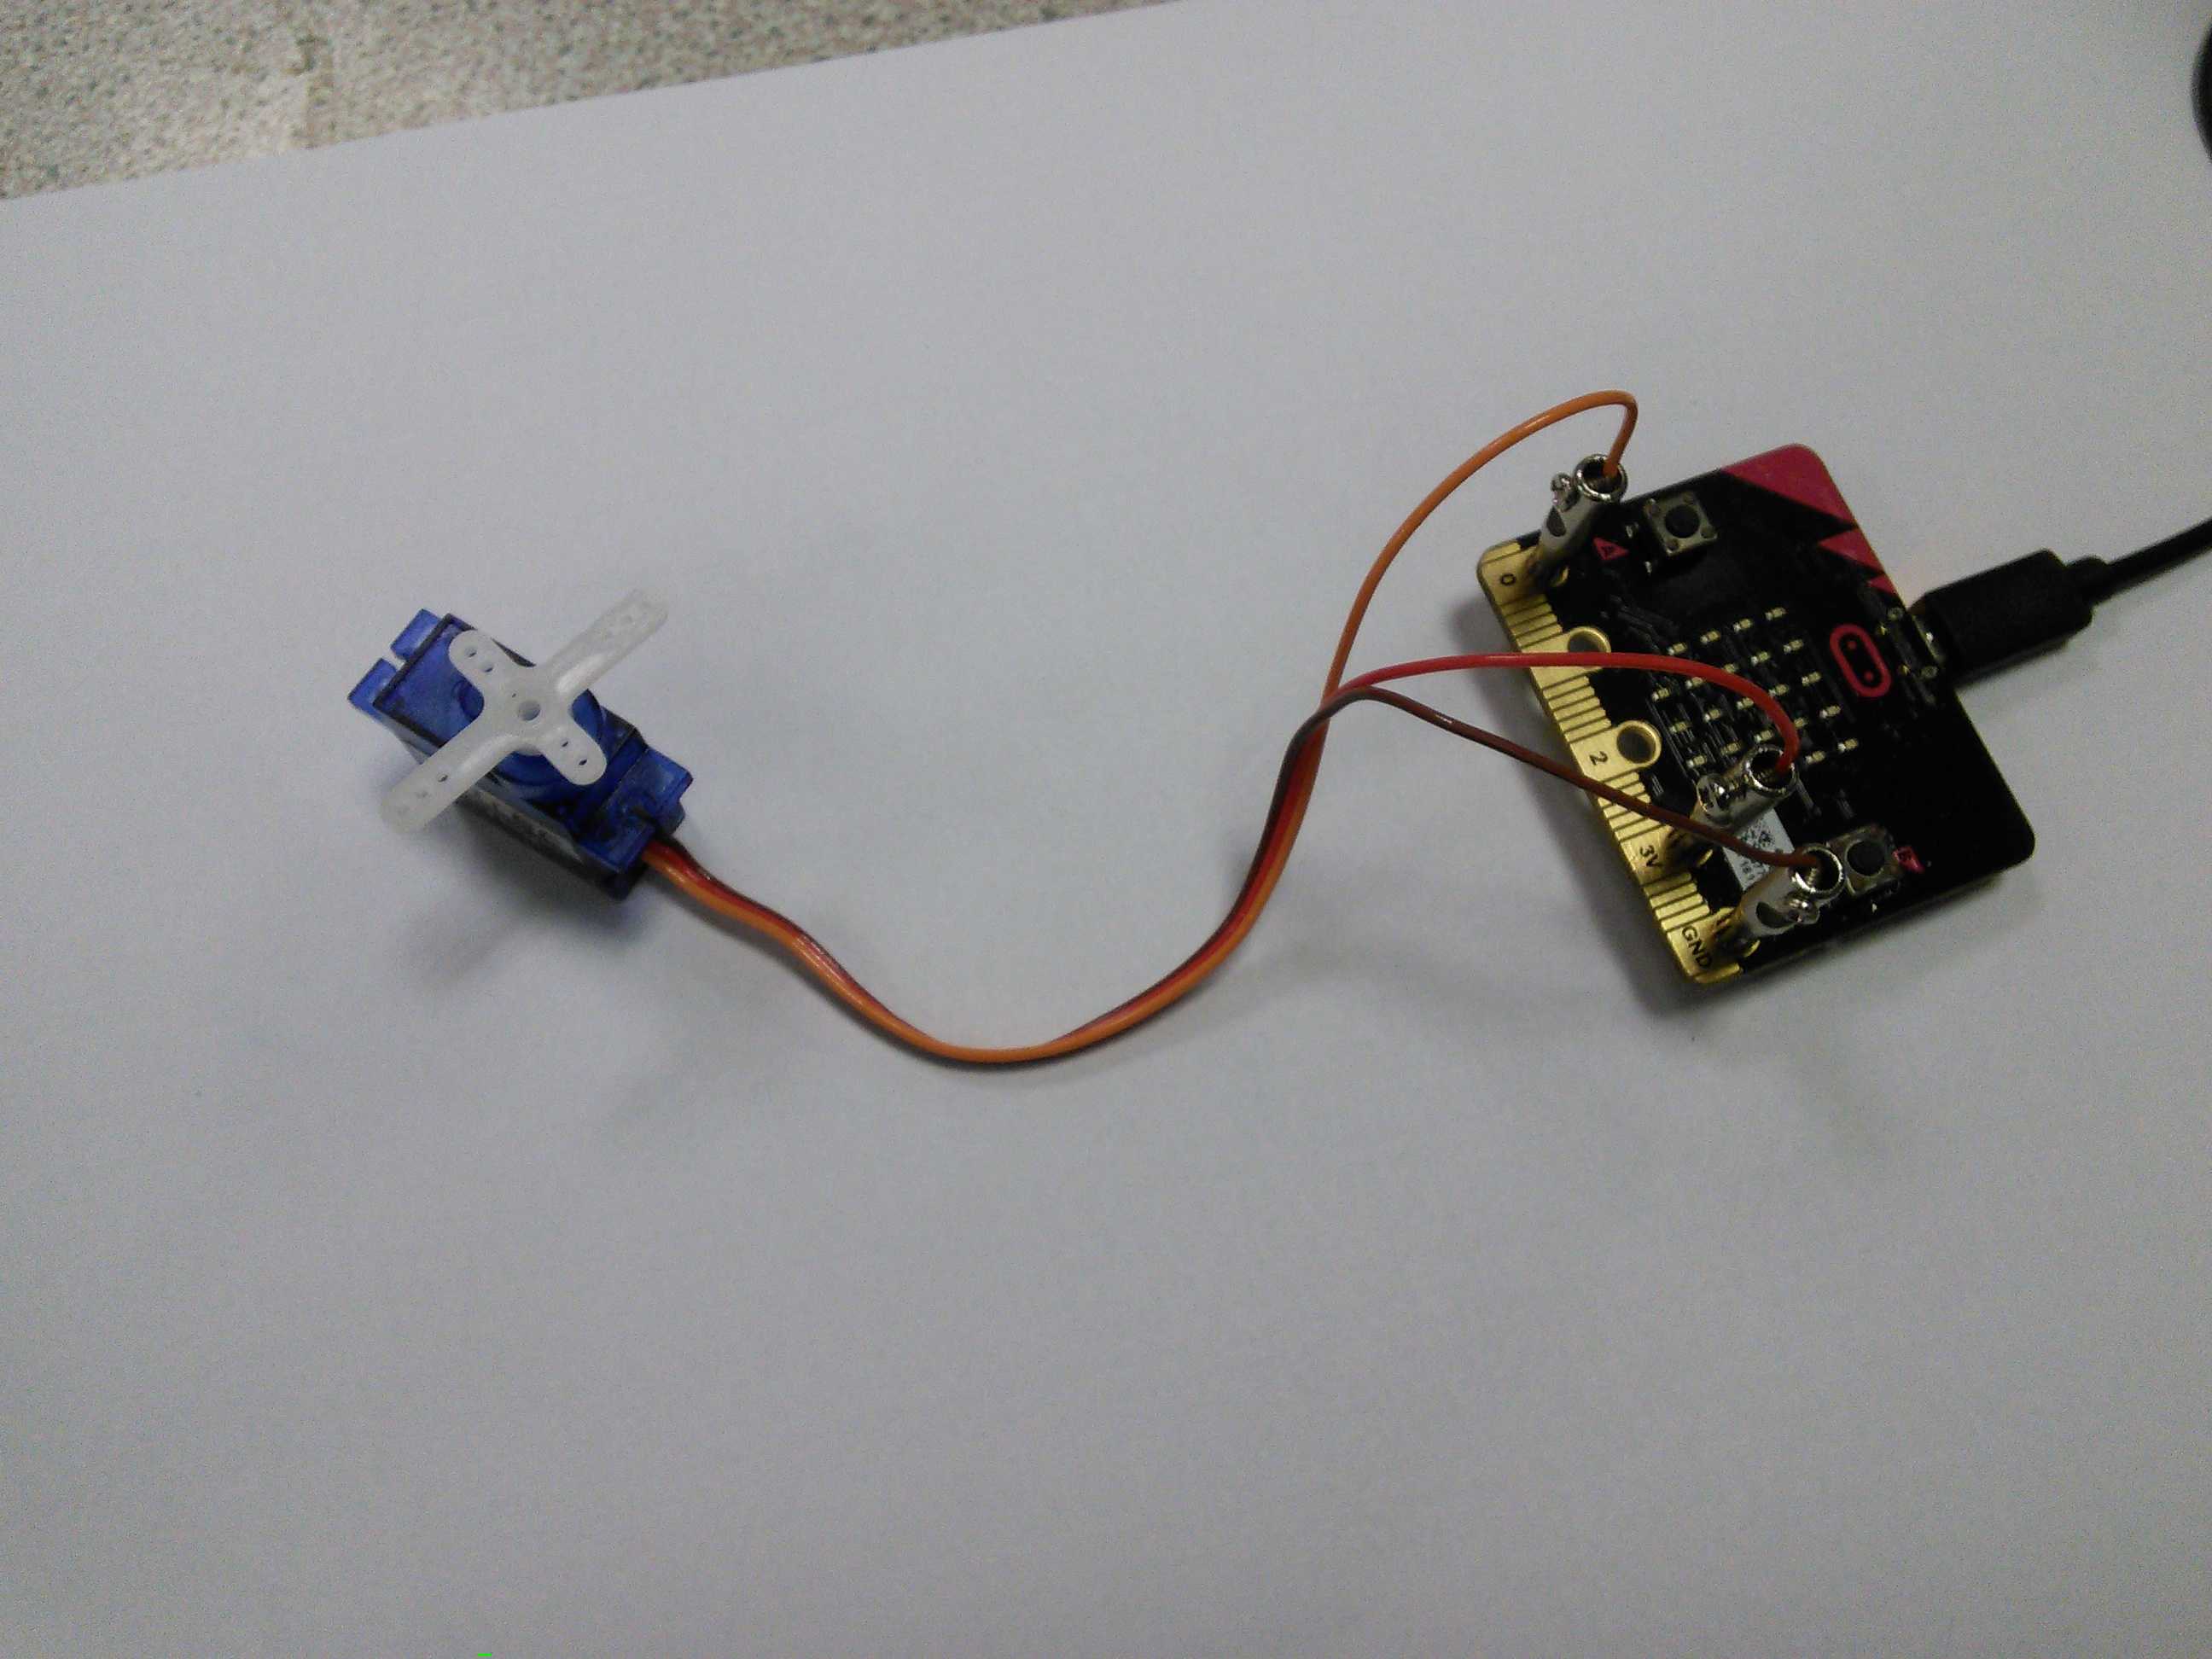
- Brown / Black – Ground GND
- Red – 3V
- Orange – Pin 0
Step 3 - Attach the servo
Create holes and add your spinner
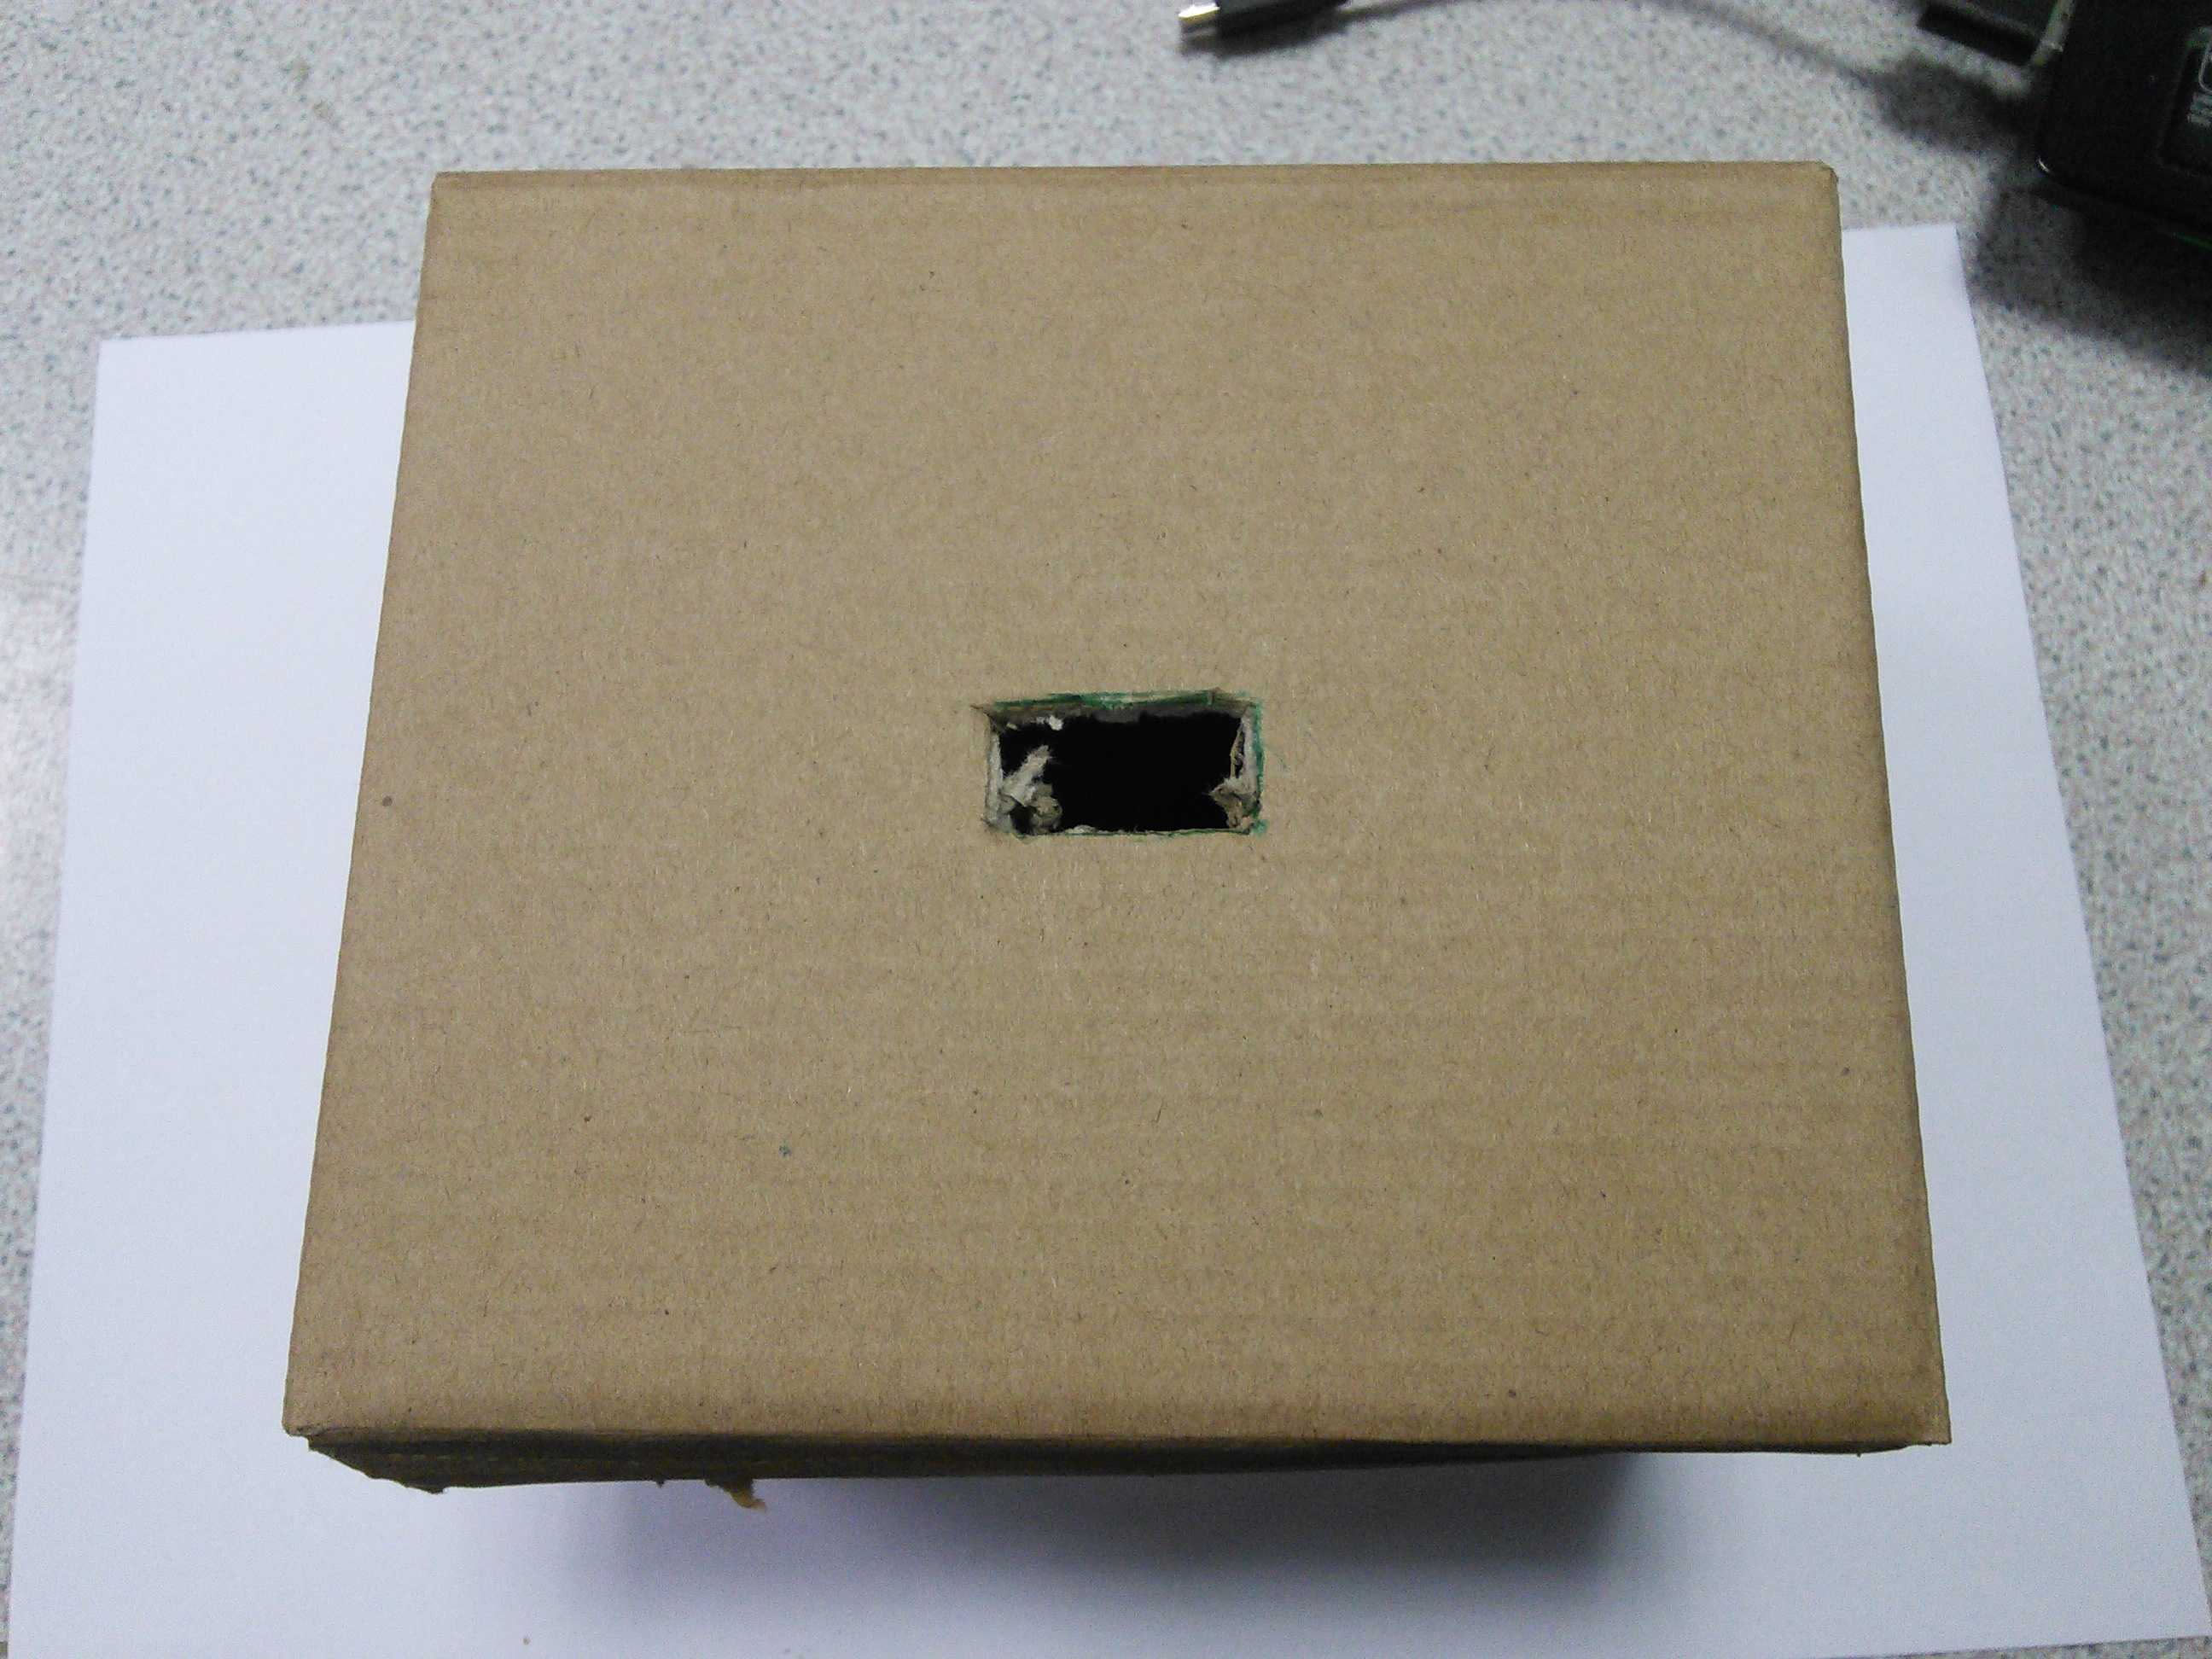
Cut a hole for the spinner
Step 4 - attach the Microbit
Cut holes and add your Microbit
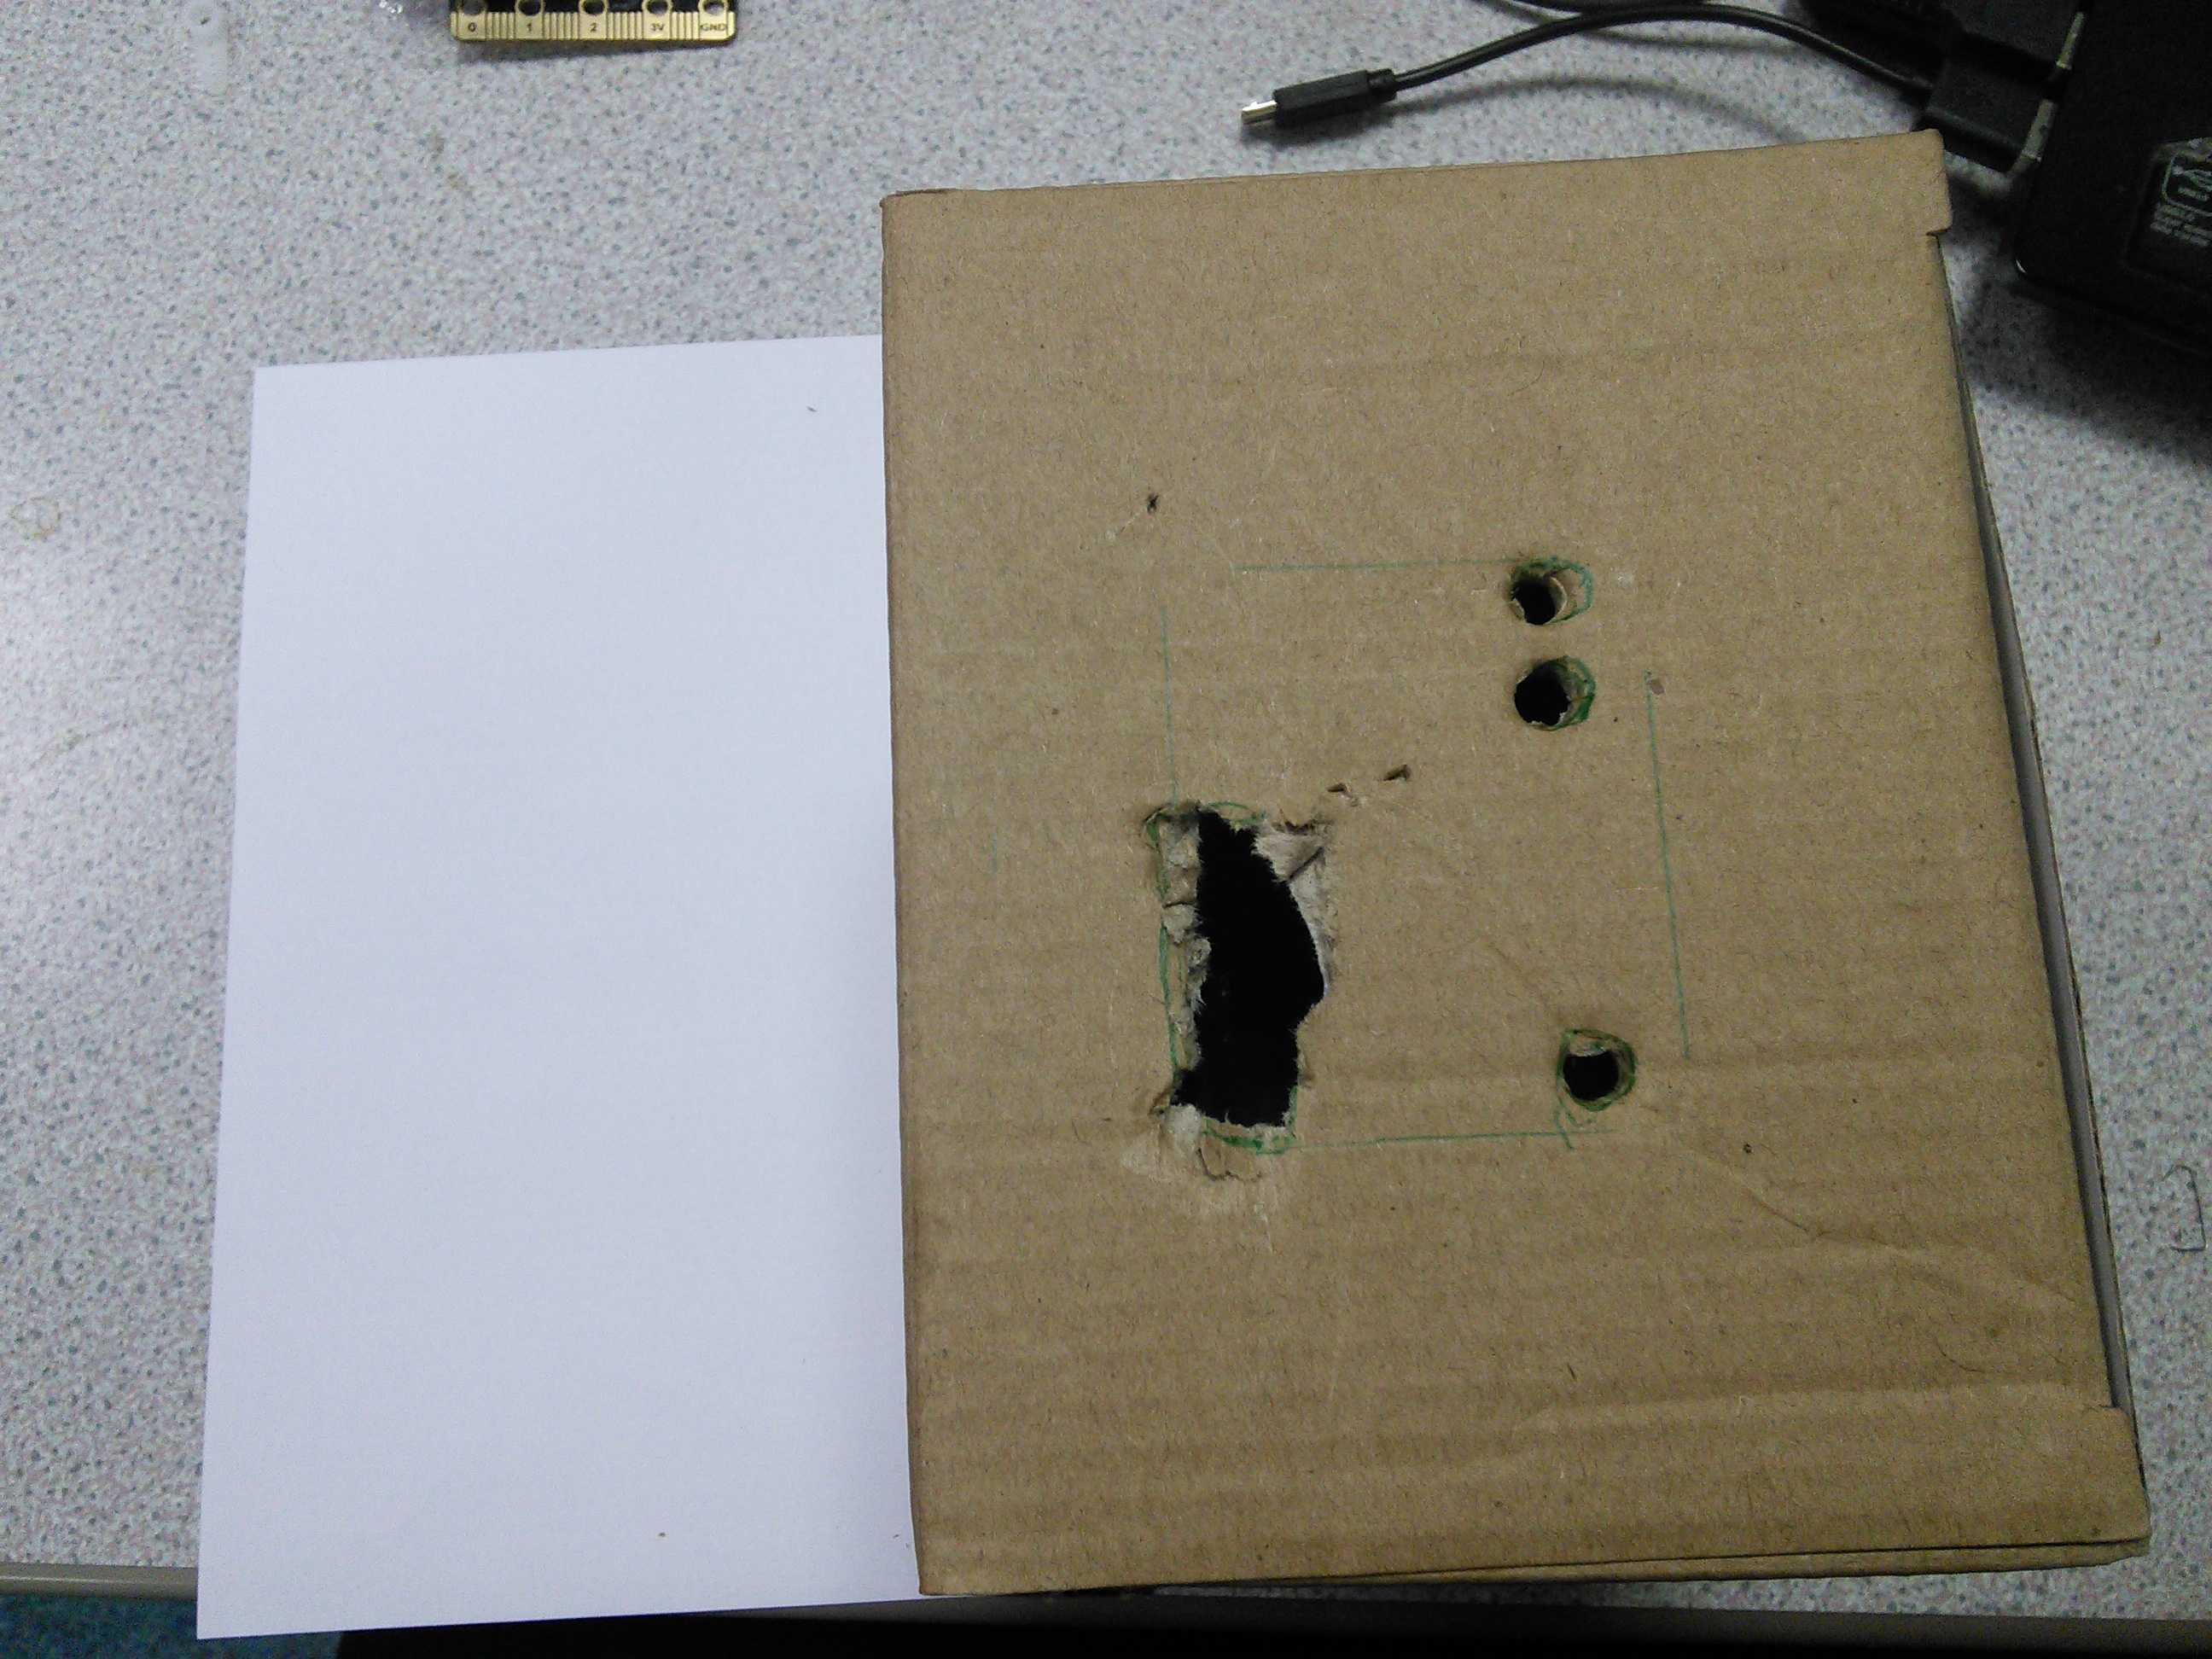
Cut holes for your Microbit
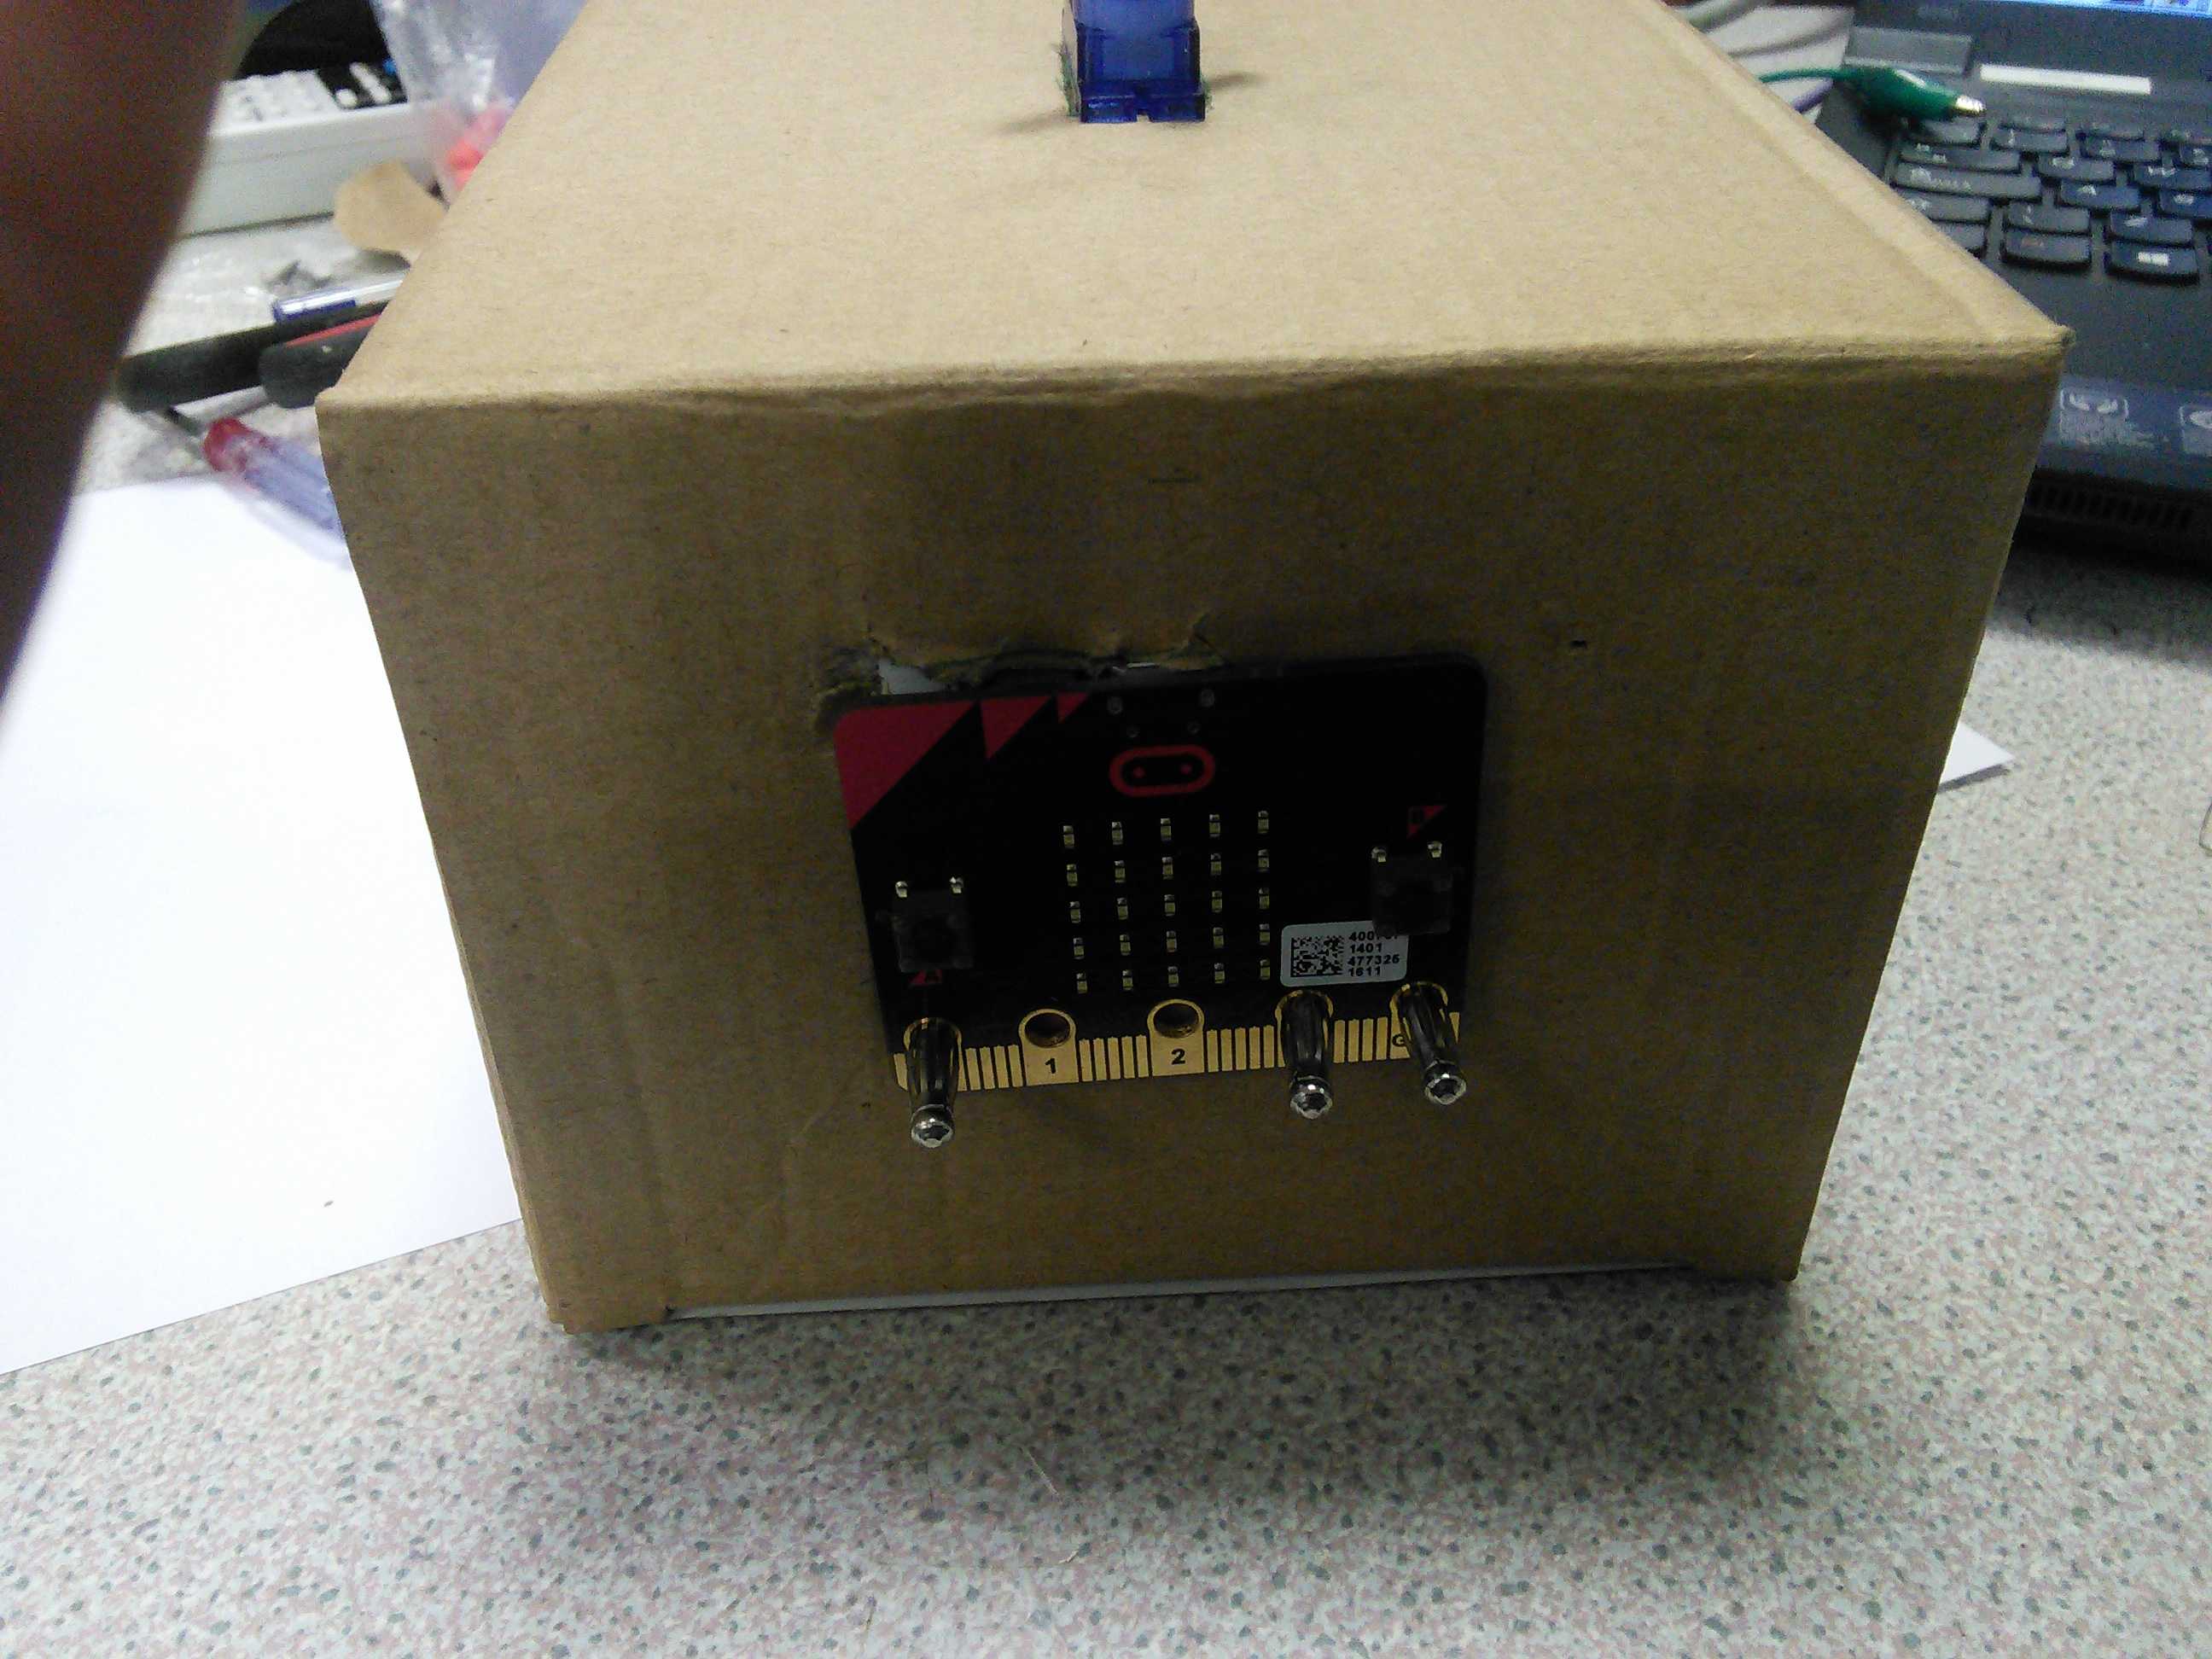
Attach your Microbit
Step 5 - attach the spinner
Cut out and attach your spinner

Attach your spinner to the Servo plastic thingy
Step 6 - Wire up your Microbit
Wire up your Microbit. Now attach your:
- Banana Clips
- Battery Pack


- The spinning arm could move in random directions or speed up / slow down over time.
- Instead of just displaying Truth/Dare your program to give the user a specific dare to do / truth to tell from a list of truths/dares.
- You could add a speaker / buzzer to the project and include sound effects.
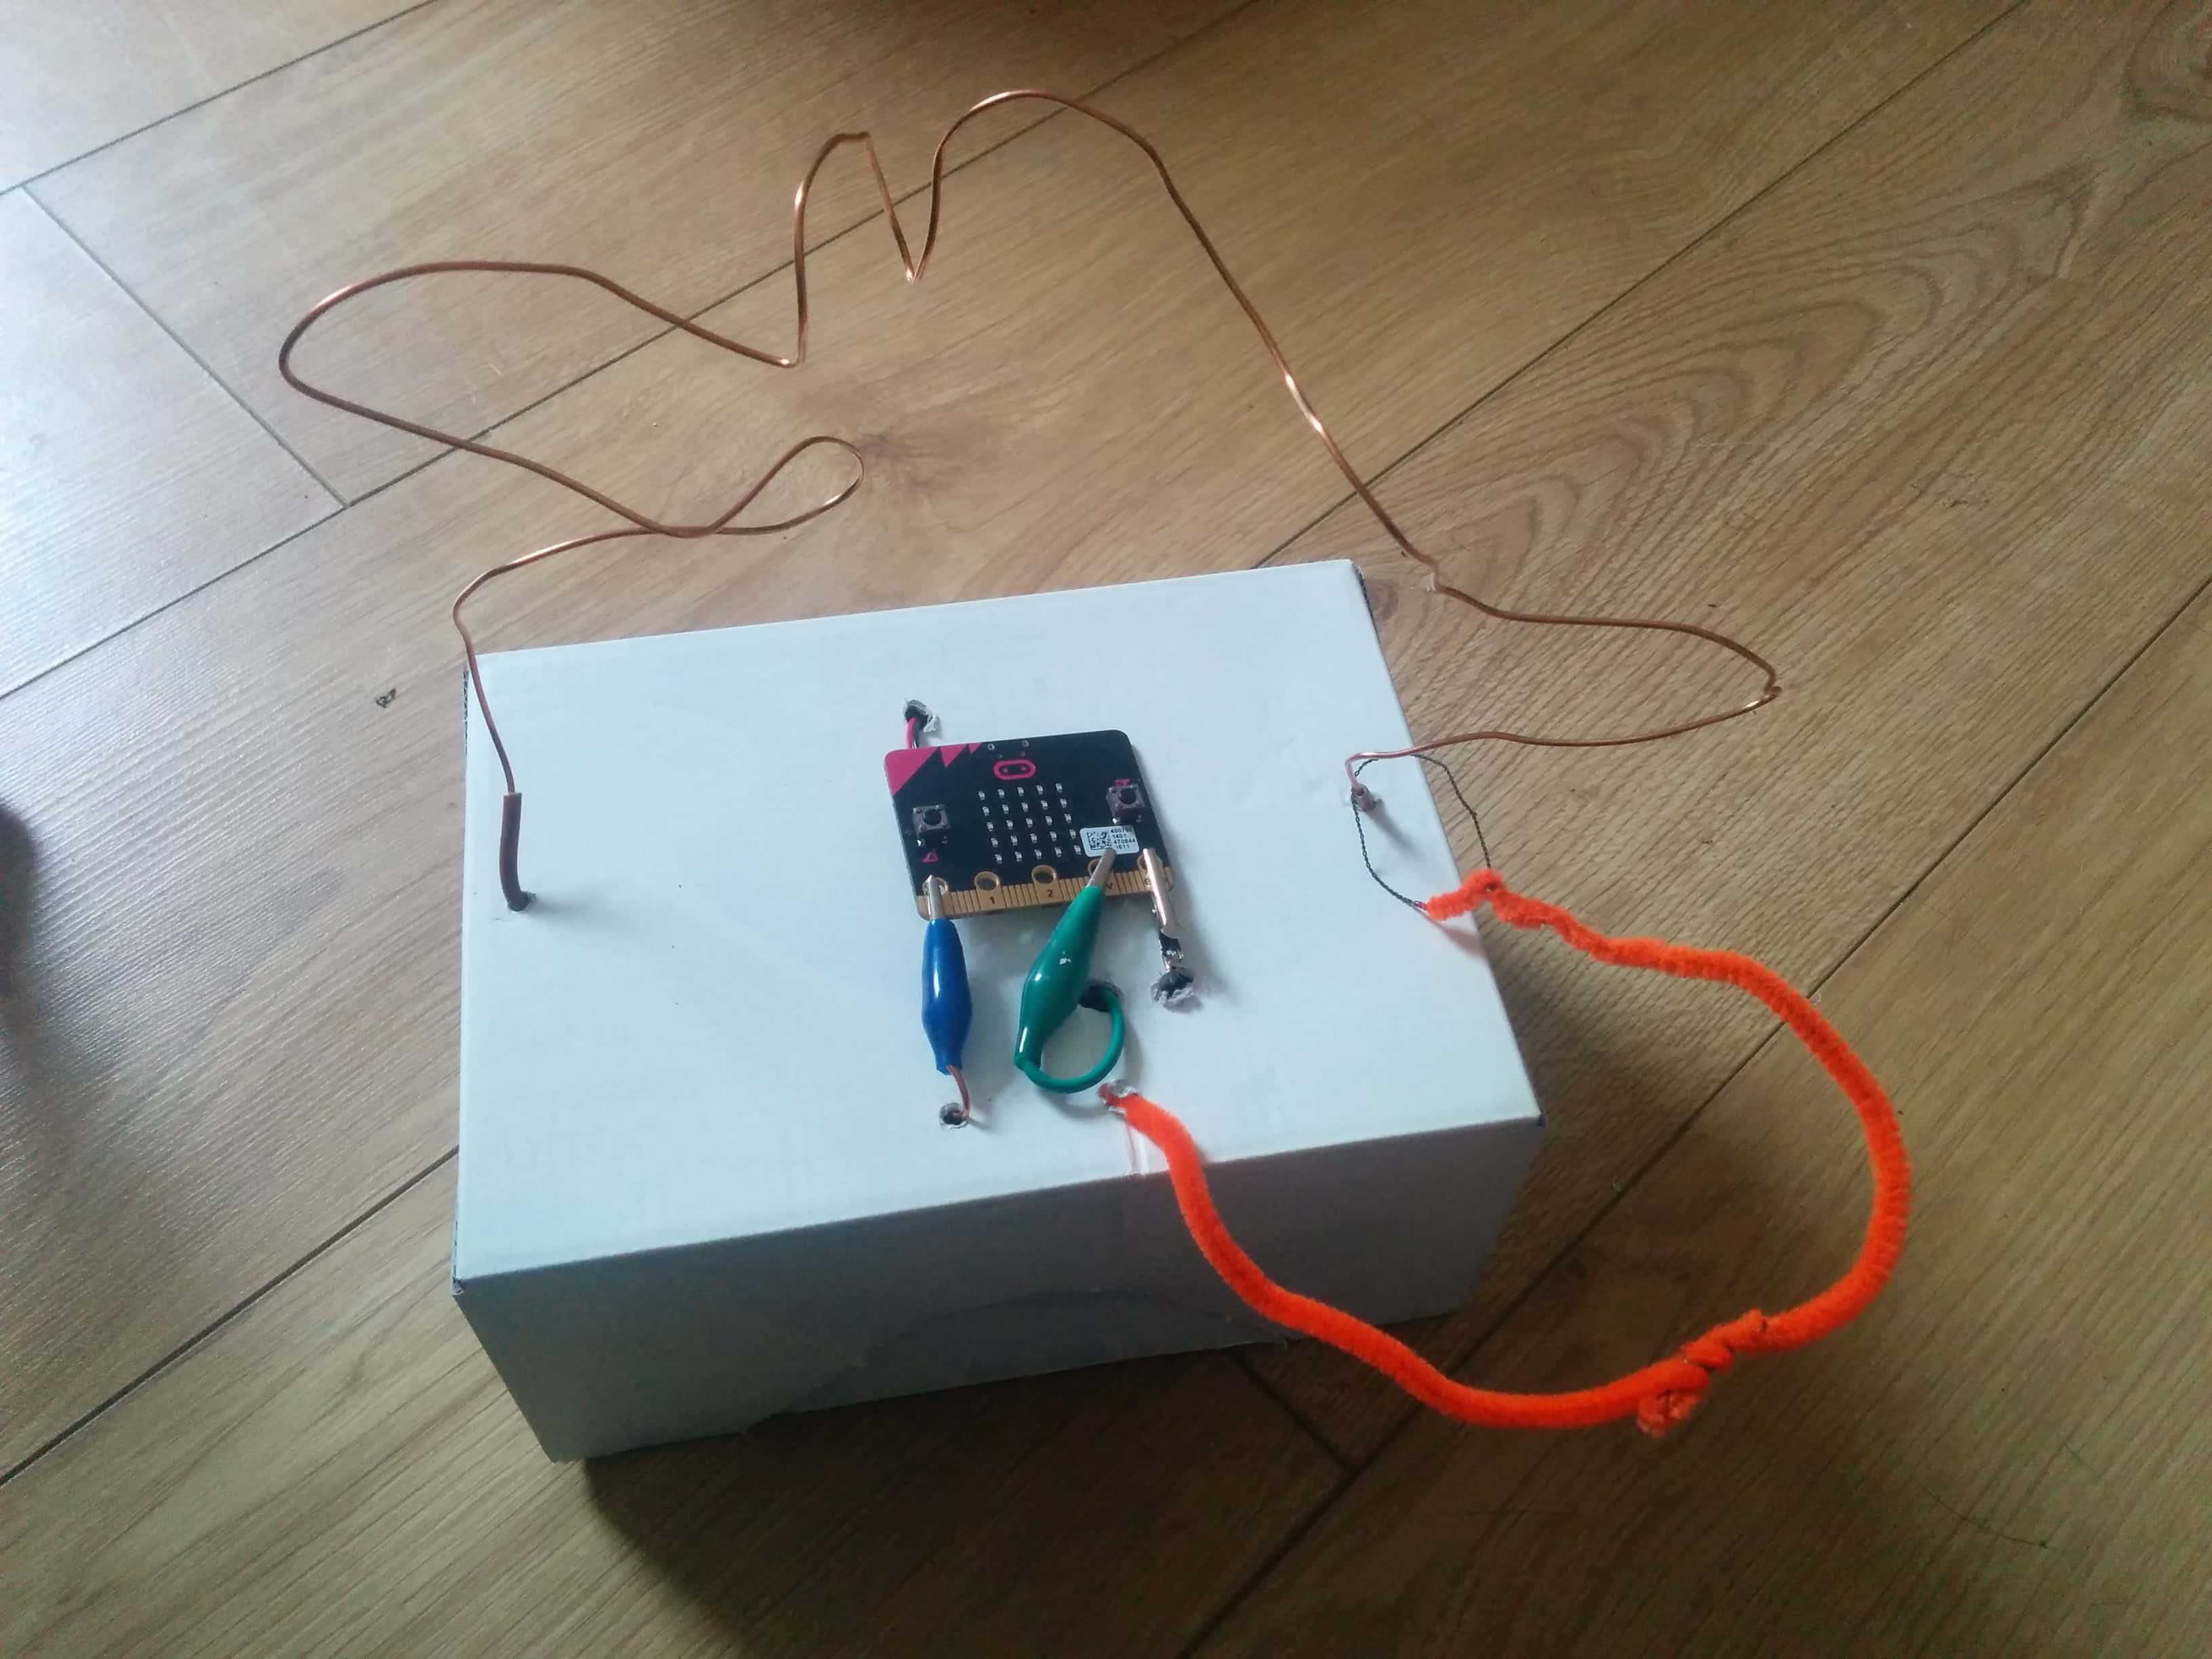
Microbit Steady Hand Game Tutorial
In this tutorial we will show you how to make a steady hand game, where the users has to navigate their way through a wire maze without touching the bare wire of the maze. This project is super easy to make and cheap too!
You will need:
- Microbit
- Microbit USB cable
- Battery pack
- pipe cleaners
- 1 metre of solid core wire
- Crocodile clips
- 10,000 Ohm Resistor
- A cardboard box (cat food box is good)
- Craft things to paint / decorate your box
Wiring up the circuit is really easy, you just need to make a Pull-up resistor circuit that will register an input of high when the wires are touching(when your controlled wire touches the maze wire) and registers a low when the two aren’t touching.
Here is a simple script that you can test to see if you have successfully wired up your Microbit! This code can also be used to test other projects that use a digital input.
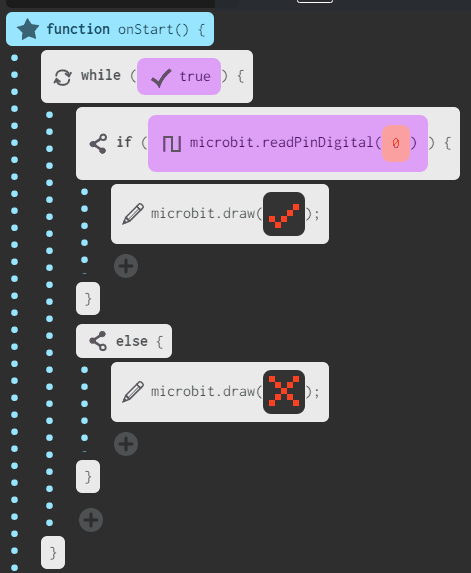
Here is the finished project – it’s just in need of some decoration!
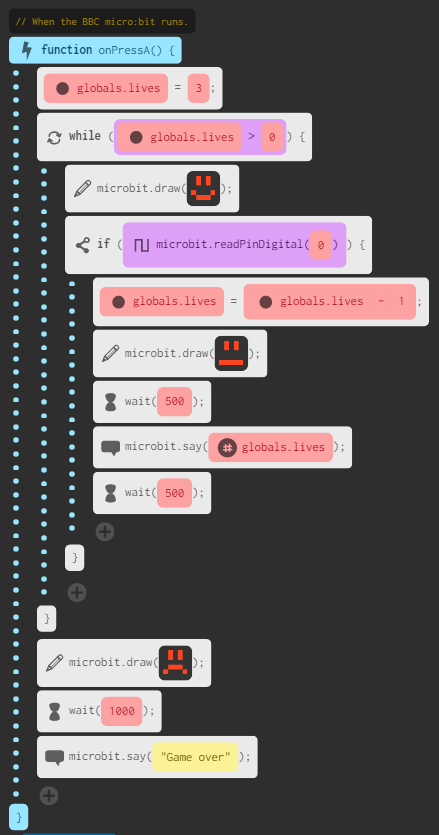
Here is the final code for the full project, coded using Javascript CodeKingdoms.
Take a look at the complete video for making the project, from start to finish.
Microbit mini radio controlled car tutorial
The aim of this tutorial is to show you how to create a mini radio controlled car using two Microbits and 2 servos. Using two servos instead of a robot car kit and motor-boards means that you can create a smaller and cheaper radio controlled car!
You will need:
- 2 Microbits
- 2 Battery Packs with batteries
- 1 USB Cable
- 2 Continuous servos
- 2 wheels
- 1 Bulldog clip
- Glue gun ( or pva/super glue)
- Soldering iron or 4 Crocodile clips
![IMG_20160704_135151[1]](https://learnlearn.uk/microbit/wp-content/uploads/sites/2/2016/07/IMG_20160704_1351511-e1467639347376.jpg)
The steps to make the car are as follows:
Step 1
Glue the servos to the base using a glue gun.
Step 2
Glue / Blue tack on the Bulldog clip on to the base for the wheel
Step 3
Solder / Crocodile clip the wires to the microbit.
Step 4
Tidy up the wiring!
Microbit mini radio controlled car – Sender Code
For this tutorial we can’t use CodeKingdoms because it doesn’t support Bluetooth radio direct. We need to use this site:
Codethemicrobit.com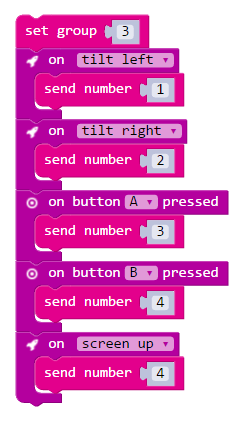
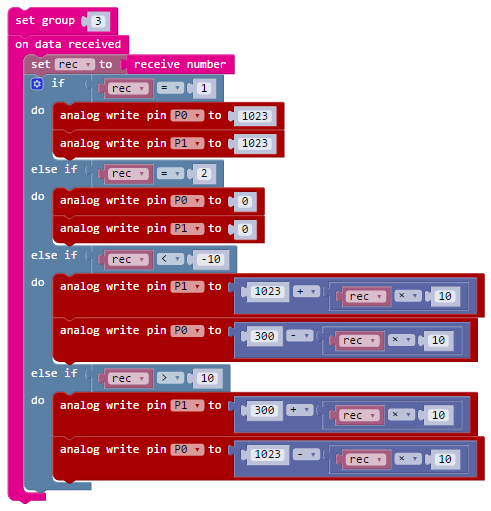
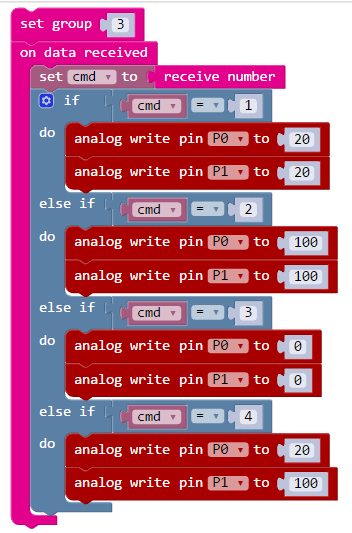
Microbit mini radio controlled car – Receiver Code
Once we have finished coding the sender unit, we need to code the receiver unit to listen for the instructions sent on group(channel) 3. When it receives an instruction it can then output to the relevant pin.
For full details on how servos work, take a look at this page.
- Improve the controls so that the car angle of turn is analogue, not digital
- Add a speed setting
- On car stop / start .
A page about self driving cars
Starter – video about the DARPA self driving car challenge.
Research based lesson, including:
Potential benefits
Potential drawbacks
Implications for laws and society.
http://www.recode.net/2016/10/5/13167364/google-self-driving-cars-2-million-miles
Posters
Posters are large printed documents (A4 or larger), usually fixed to a wall or building. They are used to:
- Advertise an event or product
- Spread a specific message
- Direct people to a specific location
- Put on your wall at home.
Flyers
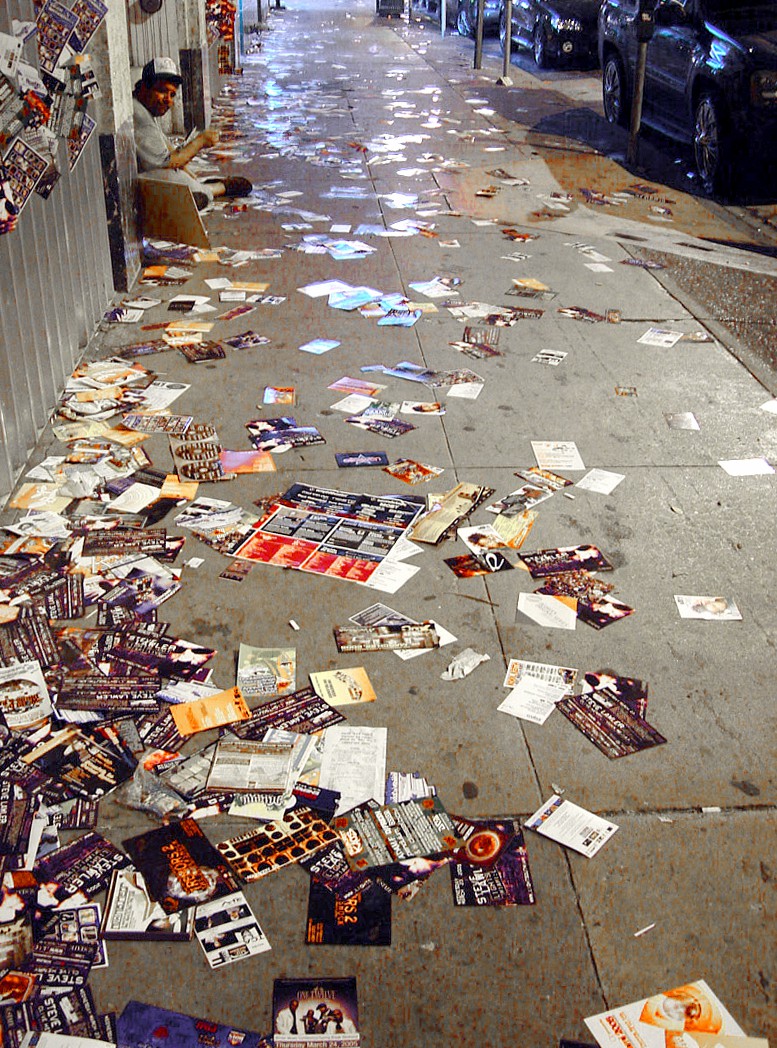
Flyers are smaller documents that are handed out to individuals as they are walking by, or left on desks/tables for people to pick up if they are interested in them. They are usually used to:
- Advertise promotions.
- Distribute discounts / special offers to encourage an immediate response
Animations
Cartoons and Animation
Traditionally, cartoon animations had to drawn by hand. frame by frame. This took a massive amount of time, patience and skill, and meant that animations could largely only be produced by professionals.
The invention of computer based animation has resulted in many of these difficulties being overcome.
Advantages of animation software
- Animations can be produced much more quickly and cheaply
- Animations can be work on by a whole team simultaneously
- Assets ( models, backgrounds) can be bought in, making the whole process much quicker and easier.
- Advanced 3D animation is vastly quicker and easier.
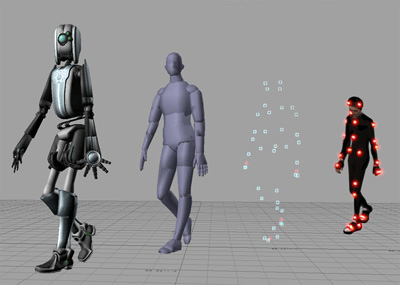
Disadvantages of animation software
Hand drawn animation is becoming a lost art form
Some types of animation can only be effectively done by hand ( studio ghibli)
Presentations

Presentations are generally used to communicate to an audience in a specific location, such as a classroom or business board room.
Advantages of presentations
- Gives structure to a lesson or briefing so you are less likely to forget part of what you are teaching.
- Allow a wider variety of media to be used than paper – sounds, animations, videos
- More interactive than paper – can be navigated, include embedded quizzes / polls
Disadvantages of presentation
- If overused can result in ‘Death by powerpoint”
- Less interactive than other media.
On-line Presentations
On-line presentations are growing massively in popularity. They can be combined with internet conference calls / VIOP technology to allows lessons to be conducted on-line.
Examples include:
- Prezi
- Google slides
Blended Presentations
Websites

Most organisations have their own websites and they are one of the most popular systems for communication, as they can contain:
- text
- images, sounds and animations
- videos
- maps
- interactive elements ( games, forms, vote systems,feedback)
Music Scores

Music can be composed and edited on a computer, using specialist software.
Advantages and Disadvantages
Advantages of electronic music scores
Quicker to compose and share music.
- Features include MIDI playback, so you can listen to your creations on the computer
- Compositions can be shared easily
Disadvantages of electronic music scores
- Music composition software can be expensive(e.g. Â Sibelious)
- Makes piracy and plagiarism easier
- Some music is hard to represent using software ( e.g. Flamenco)
Practice
Have a go at creating your own music score…
Newsletters
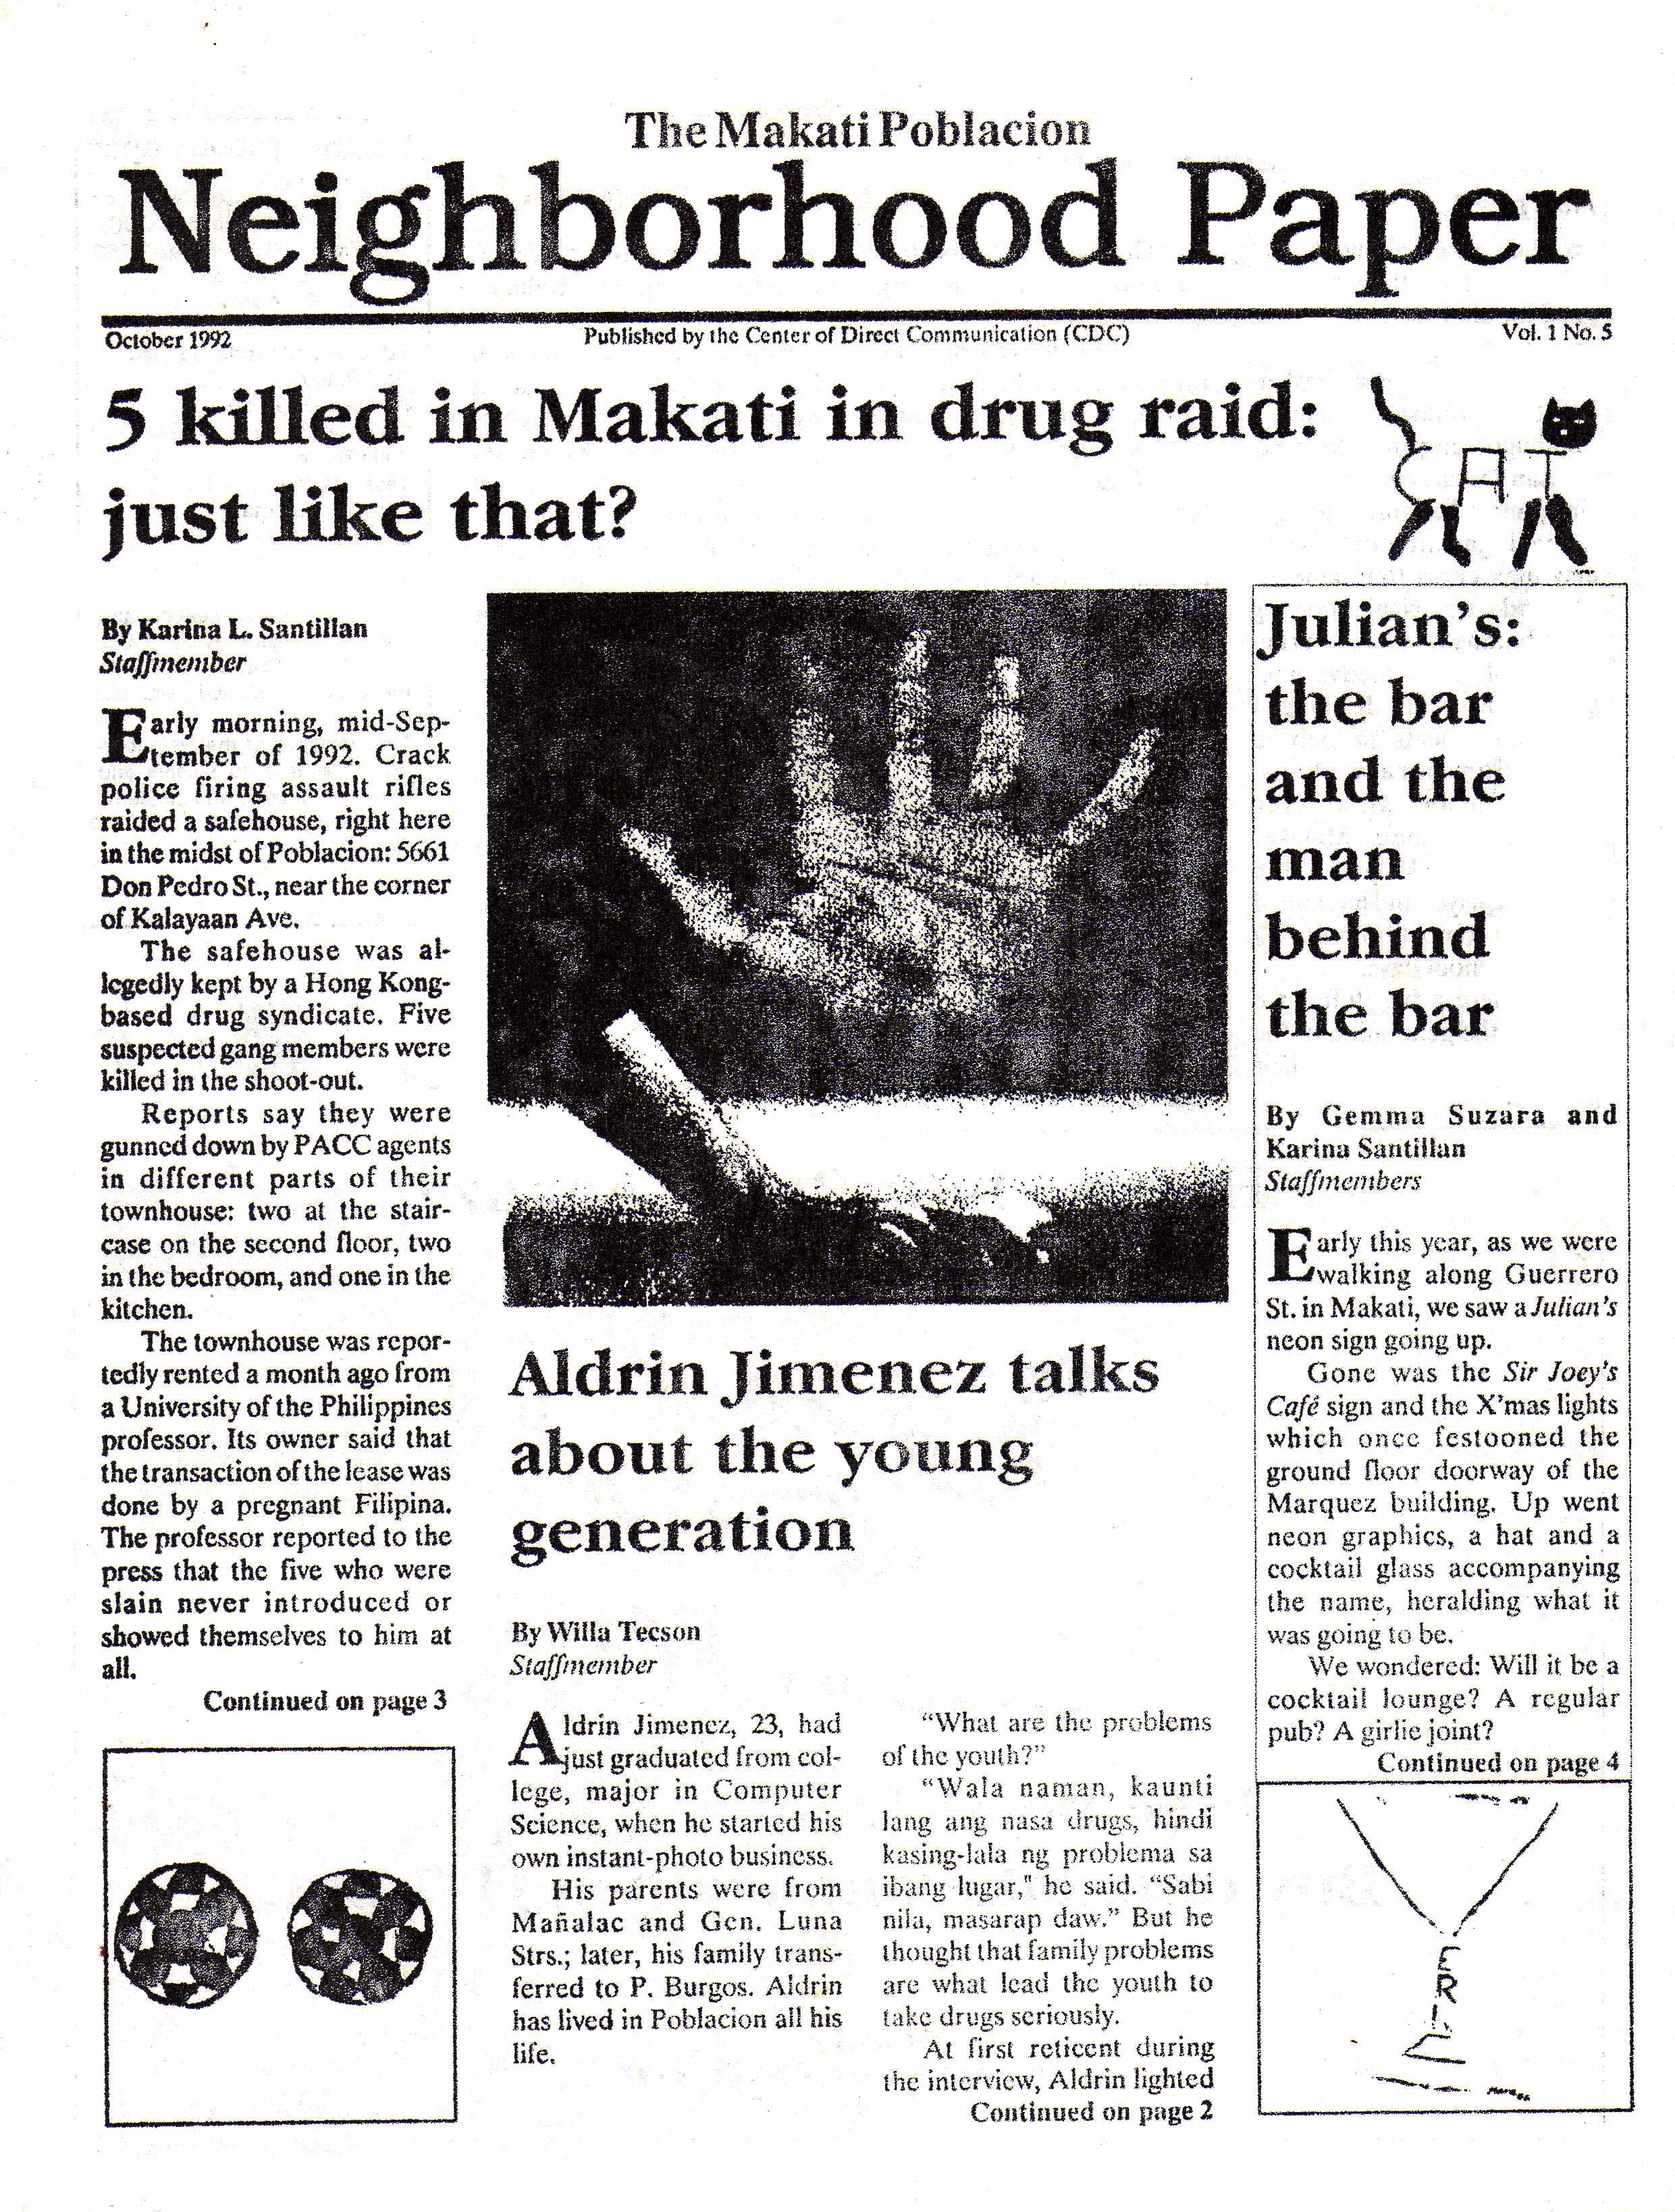
Newsletters are a form of communication that is released on a regular basis (weekly, monthly or termly)
They are used to keep people informed on a subject that they are interested in.
For example:
- Club newsletters detailing the new meeting
- School newsletters informing parents of recent and upcoming events.
- Community newsletters publicising fundraising events and targets.
- Effective way of targeting a specific audience (leaflet drops in a small village)
- Great for people who don’t have access to the internet
- Can get expensive to print and distribute
- Causes pollution – Many leaflets will just get binned
- Can only target people in a certain geographic area.
E-newsletters
More recently, many organisations have shifted from paper based newsletters to electronic newsletters. These are much quicker and easier to produce, as well as being much cheaper to distribute.
Example of  on-line newsletter publishing software:
Computer Assisted Translation
Computer assisted translation first began with the invention of electronic multilingual dictionaries, where the user would enter a word in one language and the small calculator sized device would return the translation of the word. These devices were a handy replacement for paper dictionaries but their usefulness ended there.
Over the last 25 years there has been a massive improvement in computer aided translation and in this page we will look at a few of the exciting technologies that have emerged, including near-instant:
- Webpage translation
- Document translation
- Audio translation

Computer Aided Translation
Instant webpage translation
Google and other websites now offer an instant translation service, where you type in the address of a website and they instantly translate the page, as if the site were written in your native language.
Extremely useful for:
- Ticket booking sites that don’t have an English language option
- Researching local areas in foreign countries
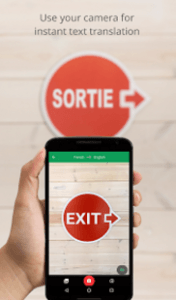
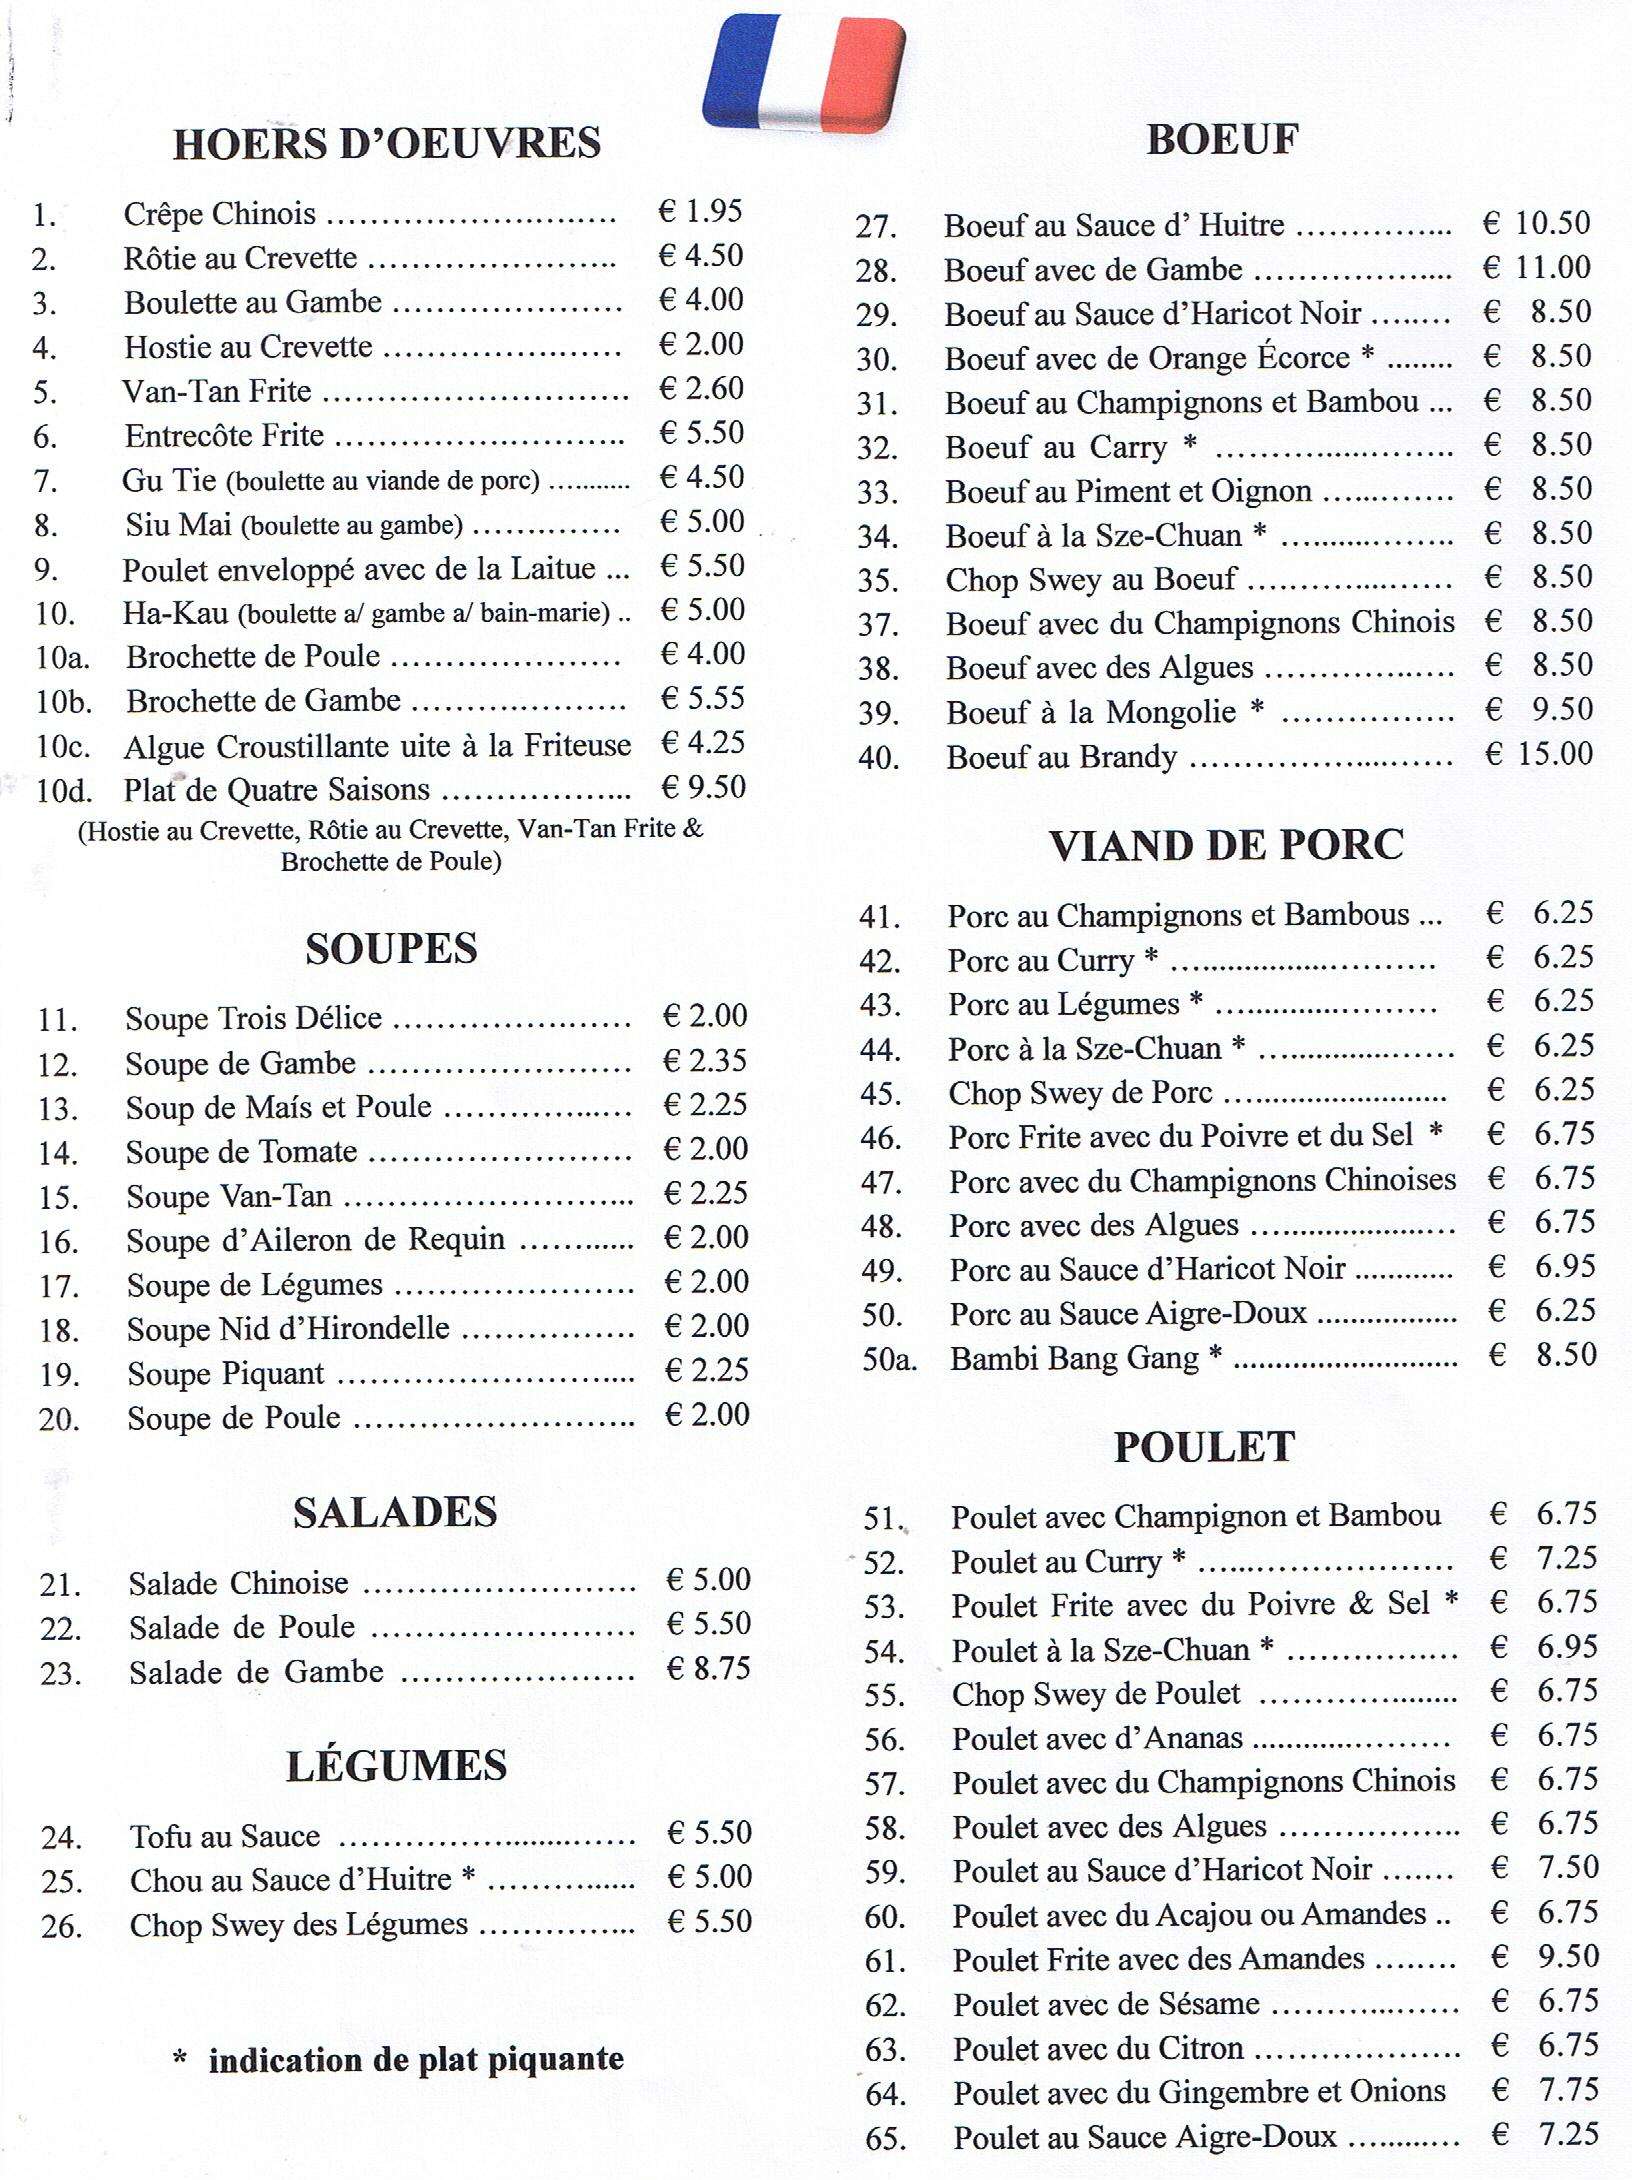
Hard copy (printed document) Translation
When you go on holiday abroad most hotels and tourist restaurants offer English language menus. However, as soon as you start to venture outside of the tourist areas, you will often find yourself sat in front of a menu where you have no idea what anything is! This is made even more difficult in places like Vietnam, Thailand and Japan, where the menu won’t even be written in the Roman alphabet!
This is often leads to ‘Lunch Roulette’, where you point at something on the menu and you see what you get. Sometimes this works out really well as you might find a new favourite dish, but sometimes you end up sat in front of a plate of chicken feet, finding that your appetite has deserted you (yes, this happened to me…)
Instant document translation apps allow you to point your camera at the menu and any text that is in front of you is instantly translate in to your own native language!
Live Audio Translation
Instant audio translation, where a person speaks in one language and the other person in the conversation in their native tongue, has long been the stuff of science fiction. Star Trek, Star Wars and Hitch Hiker’s Guide to the Galaxy have all featured the devices in one form or another. Science fiction is rapidly becoming science fact, with prototype devices now being developed, with some services being live tested at the recent Rio Olympics.
This is hardly surprising, given that the necessary technology is now available:
- Speech-to-text software
- Instant Translation software
- Text-to-speech software
- Smartphone hardware
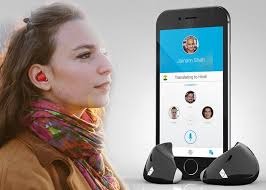
The likely translation process:
- Earpiece receives spoken French and records words spoken.
- Earpiece sends the recording to the phone app.
- The app uses speech-to-text software to decode the words in to French text.
- Translation software converts the French text to English
- Text-to-speech technology produces an audio file
- The app sends the sound recording to the earpiece
- The earpiece plays the sound like a normal set of earphones.
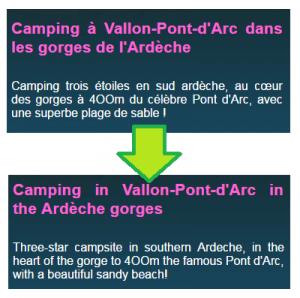
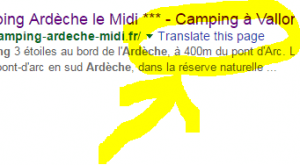
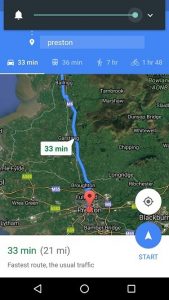
Activity 1 – Camping holiday planning
I recently planned a camping and canoeing holiday to the south of France in the region called the Ardeche (when you get the chance, go there it’s awesome!).
I didn’t want to go the a big international campsite, which all had an English language version of the site, so I used Google translate extensively to help me plan my trip.
Here is the web address of a campsite I was interested in.
http://www.camping-ardeche-midi.fr/
Using Google Translate, see if you can find out:
- How much does the shuttle to Vallon-Pont-d’Arc cost?
- How does it cost for 3 people with a caravan for the night?
- What activities can you do whilst canoeing down the river?
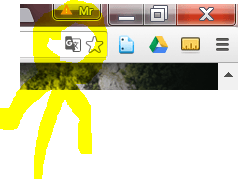
Google Translate button
Google search translate link
Activity 2
Translate a menu using Google Translate instant translation app.
- Download / Open / Print the Menu on the right hand side.
- Download the ‘Google Translate’ app from the app store.
- Use the instant translate service to translate the menu.
Questions
- How much is beef with Chinese Mushrooms
- What is item number 56?
- Which soup would you choose to have as a starter?
- What words doesn’t it translate well?
Find out more
- Introduction
- Smartphone vs Dedicated VR
- Gaming
- Education
- Medicine
- Military
- Engineering
- Advantages
- Disadvantages
- Quiz
- Find out more...
Virtual Reality
Like many of the other emerging technologies, virtual reality has long been a staple of science fiction. The movie ‘The Lawnmover Man’, among many other movies, was based entirely on the that premise.
Virtual Reality has actually been around for quite a while and has been working as a ‘functional product’ as early as the 1980s, but the technology never really took off, due problem with:
- Portability and Battey life issues
- Lags between head movement and image movement causing ‘motion sickness’ in many people.
- The prohibitive costs involved.
As such Virtual Reality remained as a novelty or specialist usage device until the last 5 years. On in the last 5 years has there been developed a computer that is:
- Highly portable
- Good battery life
- High resolution screen
- Built in motions sensors (accelerometers and magnetometers)
- High processing power to reduce latency.

Virtual Reality
What computer? Your smartphone of course!
Military Virtual Reality
The military has been interested in the use of Virtual Reality for over a decade. VR allows soliders to practice their skills on a virtual battlefield, immersing themselves in a highly realistic simulation that provides them with valuable experience, without the cost, dangers and organisational difficulties of practicing in a real environment.
Did you know?
When soldiers practice firing blank rounds in a mock battle, each round fired costs 50p? Even a small exercise involving a platoon of 30 troops can cost £10,000, just for couple of days practice.
![]()
America’s Army – an infantry simulator developed by the US army.
VR in Engineering
Advantages
Disadvantages
Quiz
Find out more
Introduction
Main Uses
Advantages
Disadvantages
Quiz
Find out more
Introduction
Main Uses
Advantages
Disadvantages
Quiz
Find out more
Introduction
Main Uses
Advantages
Disadvantages
Quiz
Find out more
What is artificial intelligence?
Artificial intelligence is the development of computer systems which can perform tasks that usually require human intelligence to complete.
Examples include:
- Speech recognition
- Translation
- Facial / image recognition
- Decision making
AI development is nothing new – as far back as 1997 IBM’s Deep Blue super computer beat chess master Gary Kasparov, but the systems that have been developed in the past have had very narrow and well defined parameters (each chess piece can only perform a very narrow set of moves and the objective of the game is very clear and never changes). Developing AI that can have a wider use is much more difficult.
BBC AI VIDEO”
Narrow AI
Most current AI systems are narrow AI. These systems perform one specific task very well, but they cannot perform other tasks at all. They can’t learn like humans do.
Examples of Narrow AI
- Air traffic control
- Chess game AI
- Facebook face recognition software.
General AI
The task of creating a general purpose AI is extreme difficult. The human brain is one of the most complex structures in the universe, and replicating its neural network functionality is incredibly difficult, if not impossible.
Also. if we do successfully develop General purpose AI, it is entirely possible that it could pose a danger to the human race (think terminator…)
Advantages
- AI can perform some jobs far better than humans can. This is incredibly useful for situations where there is little room for error ( e.g. Air traffic control)
- It would allow computers to perform difficult but repetitive jobs that humans do.
- AI robots in the home could help elderly people or people with disabilities.
Disadvantages
- If the AI makes a mistake accidentally, it could pose a danger to humans.
- As AI becomes more widespread, it will mean that many jobs for humans will be lost(e.g. translation jobs)
- If AI develops beyond the capability of human beings, it could mean the end of mankind.
Quiz
Find out more
Wearable Computers
Wearable computers are not a new concept, as far back as the 1960s Start Trek characters were wearing a variety of the devices – however the concept has only just begun to take off as a viable concept in the lasst 5 years due to advances in:
- Battery technology allowing sufficient battery life to make the products useful.
- Minaturisation
Common types of wearable computers include:
- Smart Watches (Pebble, IWatch)
- Fitness Trackers (Fitbit)
- Smart glasses (Google Glass)
- Virtual and Augmented Reality Glasses

Main uses
Wearable computers are mainly used for:
- Supplementing the notifications from mobile phones to keep track of social media and appointments
- Tracking health and fitness, such as heart rate, sleep patterns and step counts
- Providing addition data about the user’s surroundings through the use of augment reality googles.
- Providing an immersive virtual experience using virtual reality.

Advantages
The advantages of wearable technology include:
- Ultra portable
- Allow the user to operate a computer ‘hands-free’. THis is very useful for surgeons who can see data whilst operating.
- Less likely to lose / damage than a phone
- More discreet than a phone for checking email / notifications
- Can monitor fitness and health easily
Disadvantages
The disadvantages of wearable technology include:
- Very small screen so limited interaction possible
- Poor battery life for most devices
- Low processing power, so a limited number of applications.
- Cameras and recording devices can cause privacy concerns.
Tablet PCs
A tablet PC is a small, touch screen device that is usually rectangular in shape.
Tablets contain few if any device connection ports ( such as USB ports) and so usually contain a wide range of integrated components, including:
- touch sensitive screen ( to replace mouse / keyboard / screen)
- speaker
- microphone
- camera
- battery
- Network connectivity ( Wifi / Bluetooth / 4G)
- A number of sensors, including – Direction sensor, tilt sensor, shake sensor.
Uses of Tablet PCs
- Tablet PCs were originally designed for casuals / business users to supplement their desktop and laptop machines, however rapid improvements in terms of processing speed, software availability and built quality have meant that many people are now choosing to replace their home desktop / laptop machines with tablet pcs.
- They are also very popular with small children and non IT-literate people, due to their intuitive designs and simple operating systems.
- Tablets are increasingly popular in restaurants and other commercial environments replacing pens and paper systems.
Advantages
- Very light and portable – easy to take with you when travelling
- Great for use in bed / on the sofa
- Long battery life ( up to 10 hours)
- Many connectivity options to increase their usefulness ( e.g. casting a screen to a tv/monitor)
- Can be used as a GPS device for satellite navigation
Disadvantages
- Easy to steal
- No mouse/keyboard makes them of limited use to power users.
- Difficult to repair
- Almost impossible to upgrade a component.
- Not compatible with a wide range of business and legacy software.
Introduction
Smart-phones
The smart phone is a smaller version of a tablet pc, combined with the added functionality of a mobile phone (calling /text messaging)
The main difference between a normal phone and a smart phone is that a smart phone has internet connectivity.
Smart phones are mainly used for:
- Calling  / messaging
- Mobile internet browsing
- Camera / Video Camera functionality
- GPS Navigation services

GPS
GPS Navigation
Most modern smart phones can be used as Satellite navigation systems. The two common types of satellite navigation uses are:
In-car satellite systems giving the user directions when driving.
- Directions and time to destination
- Live traffic information and diversion suggestions
Can you think of any advantages and disadvantages? Click to see how many you got!
Advantages
- No need to buy a separate sat-nav system
- You always have your phone with you, less likely to forget it than remembering a separate system, or for unexpected journeys
- Always up to date as are updated automatically by your phone
- Integrate with other services, such as Google maps.
Disadvantages
- Sometimes not as accurate as other systems.
- Usually rely on a working internet connection for the duration of the journey
Smart Control
Smartphone smart home control
Smart phones can be used to control a number of different devices in a smart home, even when you are away from home.
Example smart systems include:
- security
- heating
- lights
- cookers
- baths
- entertainment
.jpg)
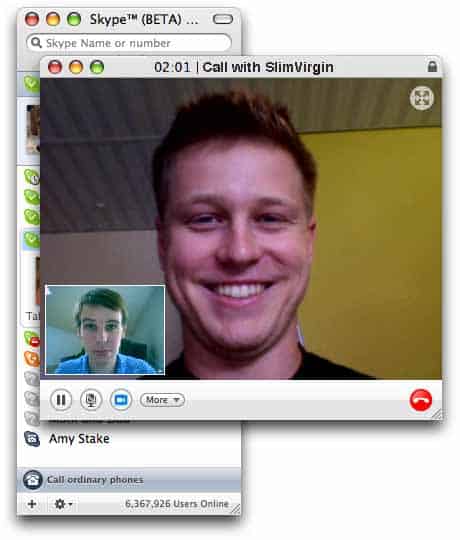
Video Calls
Video Calls
Many modern smart phones can be used for video calling, where the face of either or both the callers can be seen on the screen on the phone. Video calls require a 3G / 4G data connection with strong signal.
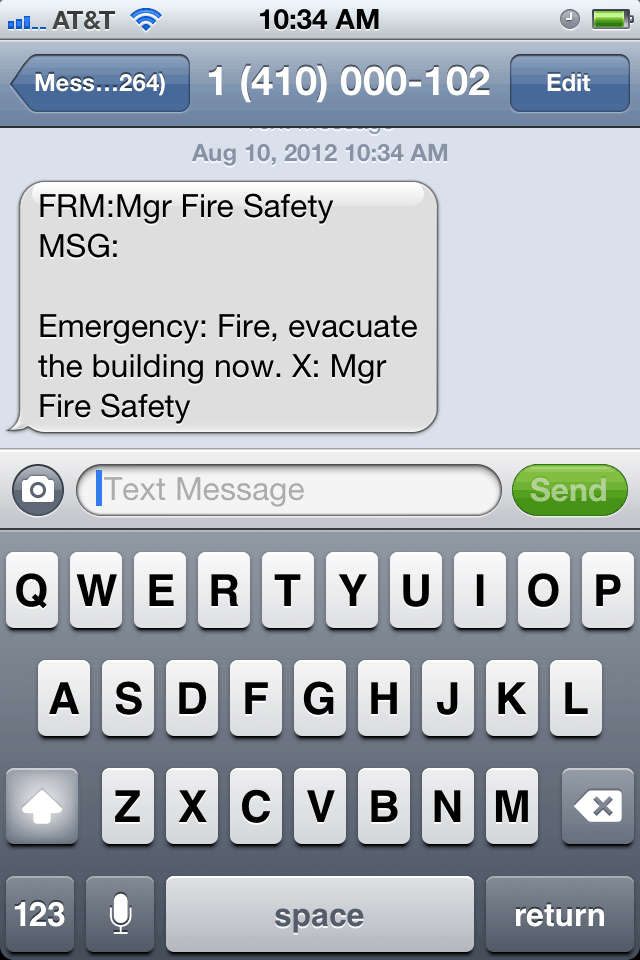
Text messaging
Text Messaging
Mobile phones and smart phones can be used to send standard text messages. These messages can usually be sent even if signal strength is poor.
Internet Messaging
Internet / Instant Messaging
AÂ variety of instant messaging services have be set up, these services often combine text messages
![]()
VOIP
Internet Telephony – VOIP
Internet Telephony is telephone communication via the internet. You make and receive telephone calls via your computer, and the data is transmitted over the internet, rather than directly down telephone lines.
![]()
- Usually free international internet to internet calls.
- Highly discounted internet to non-internet international calls
- No landline / mobile required.
- If you lose your phone you can still make calls
- Cheap video calling and video conferencing.
- Call quality depends on the speed of your internet connections.
- International calls can be quite ‘laggy’ and poor quality.
- requires a computer and broadband internet connection.
- Less portable than a mobile phone.
Pros and Cons
Advantages of smartphone computers
- Very portable
- Good battery life
- Convenient – always in your pocket when needed.
Disadvantages of smartphone computers
- More expensive than  a tablet pc for the same price
- Small screen size and no keyboard makes them of limited use for office / multimedia work
- Almost impossible to upgrade
- Prone to damage.
- Lower CPU and GPU speeds compared to other computer types.
Laptop Computer
A laptop is a portable version of a Desktop PC where all of the components and peripherals are included within the device itself. A laptop usually includes a:
- Screen
- Keyboard
- Touchpad
- Speakers
- Microphone
- Webcam
- Wireless / Wired networking
- USB Ports
- SD Card reader.
Uses of a laptop computer
- Laptops were originally invented as device that could be used instead of the office/home pc when the user was away from home.
- Very popular with businesses and professional who need work on the go whilst travelling and or community.
- Popular replacement for Desktop PCS in smaller homes or where the user wants to do work in bed / on the sofa.
- More recently many users have entirely replaced their home desktop pc with a laptop, due to improvements in processing power and screen size.
- Some laptops are marketed as ‘gaming laptops’ and include an top-end graphics card.
Adantages
- More portable than a Desktop PC
- Smaller profile, takes up less office space
- All required components are included in one package.
Disadvantages
- If a component breaks they can be difficult /expensive to repair
- Smaller screen size makes some uses impractical ( photo / video editing)
- They are more expensive for the price than desktop PCs in terms of computing power.
- Usually contain low-performance graphics cards meaning that you can’t play newer computer games
- Battery life isn’t always great

A desktop PC was, until recently the most widely used type of computer, though it has now been replace by the smart phone.
It usually consists of a number of separate components, including:
- A Base unit that contains the computer itself
- A separate monitor/screen
- A keyboard
- A mouse
A desktop PC is usually used for:
- Office work (word process, email, spreadsheets)
- PC Gaming
- Image and Video Editing
Desktop PCs:
- are usually very good value for money.
- contain top end components, that usually make them good, playing computer games or performing graphics intensive operations ( video editing)
- are cheap and easy to upgrade, giving them a long life.
- are difficult to steal
- contain a number of USB and PCI ports, which allow a wide range of peripherals to be connected to them.
Desktop PCs
- Aren’t very portable
- Take up a large amount of space
- Require the user to purchase a number of different peripherals such as speakers and webcams.
A super computer is usually a cluster of very powerful computers. They are stored in large buildings and kept cool be special refrigeration systems.
Super computers are used where very complex calculations are used or where massive data sets need to be processed within a specific time frame.
They are mainly used for:
- Weather forecasting
- Scientific experiments, such as the Genome project and protein folding.
- Mass surveillance, such as the American PRISM programme.
- Can perform far more calculations per second than any other computer type.
- Only machines capable of true AI
- Very expensive to develop, install and maintain
Image source – bit.ly/1iV45C0
Servers

A server is a type of computer that is most similar to a desktop pc. A server will consist of one ore more motherboards inside of a server rack. A server will usually have few external connections, with the exception of networking connections, normally in the form of an Ethernet port.
Uses of a server
A server is used to share and control a resources within a computer network. A server many perform one or more of the following functions:
- File sharing and access control
- Printer and other device sharing
- Internet and LAN access control
Advantages
A server allows:
- the sharing of hardware such as printers, so that multiple computers can use the same device.
- the tracking and management of devices, such as the use of printer credits to control how much people print.
- the use of a network storage and user profiles so that a user can log on to any computer in a network and they will have access to their storage.
- network backup and recovery of files, so that individual users are not required to implement their own backup polity.
- network roll-out of software and operating system updates, saving technicians the time it would take to walk around and install software manually on each machine.
Disadvantages
- Expensive to set-up and maintain
- Requires expert knowledge to install and maintain
- If the serve goes down then the whole network will go down
Microcontrollers / Embedded Computers
.jpg)
A micro-controller is a credit card ( or smaller ) sized computer that is usually used without a keyboard, mouse or other general input/output device.
They were originally manufacture for use in embedded projects, but have since become vastly more widely popular with the create of the Arduino and Raspberry Pi maker computers.
Uses of Micro-controllers
Micro-controllers are mainly:
- Embedded inside of other devices ( such as TVs, fridges, vacuum cleaners,etc) to turn them in to ‘smart’ devices.
- Used by the maker community for hobby projects and prototyping.
- Used within schools for educational purposes.
- Used by scientists as field measurement platforms to monitor the weather, animal behavior or other environmental concerns.
Advantages
- Very small, allowing them to be embedded in other devices
- Low power consumption makes the useful for battery / solar powered projects.
- Cheap to produce, meaning they can be widely adopted.
Disadvantages
- Usually consist of low performance components, which means they have limited use as a general purpose PCs.
- They often can only be used for their specific purpose and usually cannot be upgraded.
 Optical Characters is a technology that lets you convert different type of documents, such as a scanned printer documents, PDF files or images captured/taken by digital camera into editable and searchable. It is widely used for passports, bank statements, invoices, business cards, computerised receipt.
Advantages
- Cheaper than paying someone or a business to pay to manually enter large amounts of text for you.
- It’s generally faster than someone else manually entering all of the text.
- The latest software of Optical Character Reader can recreate tables and original layout.
Disadvantages
- Not 100% accurate, there are likely to be some mistakes made during the process.
- All documents need to be checked over carefully and then manually corrected.
- If the original documents is of poor quality or the handwriting may be difficult to read, more mistakes will occur.
- Not worth doing it for small amounts of text.
Alternatives
The alternatives to an OCR or Optical Character Reader you can use your hand and hand write all of the text out, this will leave not as much mistakes as the actual software. People will usually use OCR if they have a lot of information to copy out, if not they will usually hand write it out.
What it is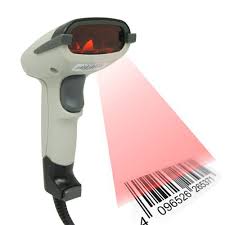
A barcode reader or barcode scanner is an electronic device that reads printed barcodes to a computer, by translating optical impulses into electrical ones. It consists of a light source, a lens and a light sensor.
Uses
They are used commercially in supermarkets for scanning items at the checkout. Other uses include for healthcare and in factories.
Advantages
- Reduces the chance of human error as all the employee has to do is scan an object’s barcode to get the information they need.
- They help keep track of inventory.
- They save time as simply scanning items is quicker than typing the information by hand.
Disadvantages
- They can break down, just like computers which would leave you without for doing inventory checks.
- They cost money – from £50 up to a few hundred pounds, but you get what you pay for.
Alternatives
QR code readers could be an alternative.
Max Newiss and Lloyd Thompson
A ![]() tracker ball is computer cursor control device. The user can roll the ball to navigate around the screen.
tracker ball is computer cursor control device. The user can roll the ball to navigate around the screen.
The uses are:
- Controls the movement of a pointer on the screen.
Advantages are:
- They are ergonomic which makes them more comfortable to use.
- For people with wrist or forearm problems who can’t use a mouse.
- On smaller desk space.
Disadvantages are:
- Mainly moulded for right handed people.
- More expensive.
Alternatives are:
- Scroll wheel.
- Mouse.
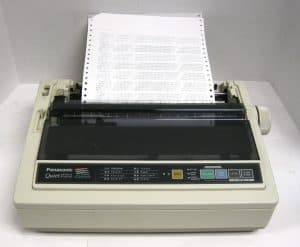 A dot matrix is a type of printer that produces characters and illustrations by striking pins against an ink ribbon to print closely spaced dots in the appropriate shape.
Advantages:
- They create carbon copies because the print head hits the paper with enough force that when carbonised paper is used the impact goes through to the second sheet.
- Low operating costs
- Will still work in harsh conditions such as factories or garages.
Disadvantages:
- No longer the cheapest printer
- Quality relatively poor and important documents are not suitable to give managers or customers
- Very slow- slowest out of all 3 printers
- Very noisy –you wouldn’t want this printing all day in the office
Alternatives:
These were the first type of printers to be used in schools or homes but nowadays they aren’t nearly as popular.
Instead of using these slow and noisy printers you could use laser printers to still print multiple pages.
Uses:
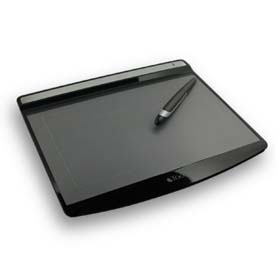
An input device consisting of a flat, pressure-sensitive pad which the user draws on or points at with a special stylus, to guide a pointer displayed on the screen. The graphics tablets are used to capture data or hand written signatures it can also be used to trace an image from a piece of paper which is taped or secured to the tablet surface . Capturing data in this way, by tracing or entering the corners of liner poly-lines or shapes, its called digitizer. Graphics tablets are normally used by graphic designers to create their work; it can also be used by photographers to edit photos.
Advantages:
It’s portable which means it can be used in different places because it can be carried around in a bag; the weight is light in comparison to a laptop. Using a graphics tablet allows the person using it to create much more accurate drawing instead of using a mouse to create an image.
Disadvantages:
Not suitable for clicking and selecting menus, it is also much more expensive than a mouse. It can only be used for editing/creating images.
Alternatives:
A mouse could be alternative devices because it allows you draw an image in a piece of software. A keyboard could also be used because you can enter commands to edit a image.
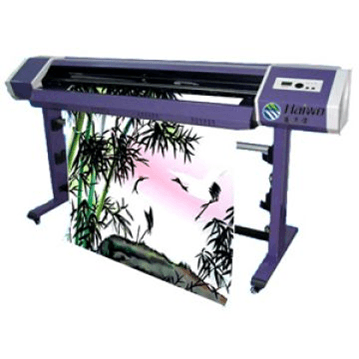
What it is:
Plotters are a specialist kind of printer which are able to draw high quality images on very large pieces of paper (for example 3 foot wide, by 10 foot long).
Uses:
They’re used in architecture, engineering and map making to draw plans of buildings, diagrams of machines or large scale maps. They can also be used for many other similar tasks.
Advantages:
· Drawings are of the same quality as if an expert drew them
· Larger sizes of paper can be used unlike with most printers
Disadvantages:
· Plotters are slower than printers as each line is drawn separately
· They’re most expensive than printers
Alternatives:
· Printing
· Draw by hand
By 3ll!e and b3n
Video card
A video card connects to the motherboard of a computer system and generates output images to display. Video cards are also refereed to as graphic cards. Video cards include a processing unit, memory, a cooling mechanism
A sensor is a device that converts a real-world property (e.g. temperature) into data that a computer can process
Examples:
| Sensor | What it Detects |
|---|---|
| Temperature | Temperature |
| Light | Light / dark |
| Pressure | Pressure (e.g. someone standing on it) |
| Moisture | Dampness / dryness |
| Water-level | How full / empty a container is |
| Movement | Movement nearby |
| Proximity | How close / far something is |
| Switch or button | If something is touching / pressing it |
ICT Lounge
The ICT Lounge is a great site with lots of revision resources.
Looking for free online lesson plans and resources for the ICT IGCSE course? Check out the ‘Topics’ menu above.
PIN Pad
What is it?
A PIN pad is a device which allows a debit/credit card owner to place their card into the device and enter the card’s PIN. Once the PIN is entered, money can be drawn from the account or be used to pay for items being purchased.
How does it work?
The card is placed into the PIN Pad which then accesses the card’s chip reader. Once the card has been accepted, the user enters their four-digit PIN. If the PIN is correct then money can be drawn from the account or pay for items being purchased.
Advantages:
- The time taken to pay is shortened as the exact amount needed is given
- Helps reduce robbery at tills as less money is in the till
- PIN numbers help prevent fraud involving lost and stolen cards
Disadvantages:
- Risk of others seeing the card’s PIN
- Those travelling in countries which don’t use Chip and PIN may have a problem accessing their money
Chip Reader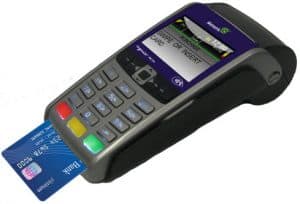

What it is?
Credit and Debit cards now include ‘Chip and PIN’ which include electrical connections the card makes with the reader. A chip reader is the actual place where you put your credit/debit card in order to pay for something.
How does it work?
When the card is swiped at the till, it picks up information from a microchip embedded within the card that can check if the PIN number you enter is correct. You can tell if a card is ‘Chip and Pin’ by looking for a small rectangle of gold contacts on its surface (this is what the chip reader is).
Advantages:
- PIN Pads have a special hardware and software security features to make sure your PIN is erased if someone tries to tamper with the devices
- You need both the chip and the PIN to make successful transactions in store
Disadvantages:
- Cards are easily cloned, and people can be careless when using their PIN
Jasmine Chu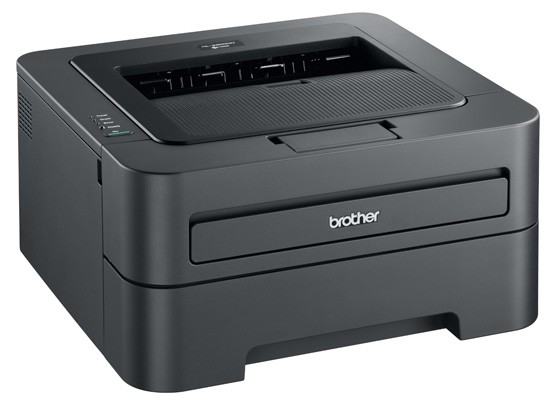 rms & Amy Davies
A printer which prints using powdered ink, called toner. Toner is fused onto paper by heat and pressure. They work through electronically charging a piece of paper with the digital images selected for printing.
Uses
- In workplaces
- Printing high quality
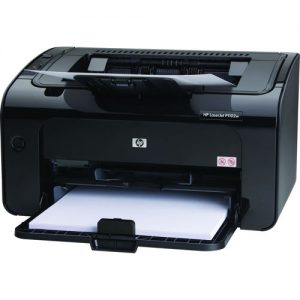
- Home printer
Advantages
- High quality printouts- better than ink jet or dot matrix printers
- Fast printouts- faster than ink jet or dot matrix printers
- Prints very quietly- quieter than ink jet or dot matrix printers
- Cost per page is low- cheaper than ink jet or dot matrix printers
- Much more efficient than ink jet printers- capable of producing several thousand prints from one toner cartridge
Disadvantages
- Most expensive printer to buy especially colour lasers
- Toner is more expensive than ink jet cartridges
- Expensive to repair- lots of complex equipment inside
- Fairly bulky- larger than ink jet printers
- Can’t use continuous or multi-part stationary to create carbon copies like you can with a dot-matrix printer
- They are more suited to printing text rather than graphics
- They tend to produce images that have a shiny, artificial look
Alternatives
- Ink jet printer
- Dot matrix printer
Introduction
In this tutorial we walk through the process of making a simple guessing game. Basic steps to follow are:
- Display and introduction to the user.
- Tell them how many seconds they need to wait before pressing enter
- Wait until the user presses enter
- Calculate the difference and tell them how well they did
Remember! If you are feeling confident, see if you can have a go at coding the game without watching the tutorial! You can always fall back on the tutorial if you get to a difficult bit!
Video Tutorial
Here is the full video tutorial. Make sure you listen to, as well as watch, the video as I explain how things work and why I did things the way I did them
Youtube Blocked, Click here for the Google Drive Version
Full Code
Stretch Challenges
- Add an option to choose the difficult level, with the harder option having a longer wait time.
- Add a high score table to your game where the player name and score is saved to a high score txt file (or database/csv/pickle file!)
Rock, Paper, Scissors Game Tutorial
The aim of this walk through is to show you how you can create a simple rock,paper,scissors game. In this game the user and computer each pick from either rock, paper or scissors and depending on their choice either the computer or the user wins (or its a draw!).
- Rock beats scissors
- Scissors beats paper
- Paper beats rock
- The same choice is a draw.
The game will be played over 5 rounds and at the winner will be the one who has won the most rounds.

Rock,Scissor Paper
Video Tutorial
Can’t access Youtube? Click here for the Google Drive Version
Here is the full video tutorial for you to follow. Make sure you watch and listen to the video, don’t just copy the code, as I explain as I go along why I have chosen to use each different technique.
Can’t access YouTube? Click here for the Google Drive Version
Full Code Listing
Here is the full code listing for if you need help with debugging. Remember to watch and listen to the video, don’t just copy the code, you will learn far more!
Python Shopping List Program Tutorial
The aim of this walk-through tutorial is to show you to create a simple shopping list program using Python.
You will learn:
- How to use procedures(def) to seperate your program into different parts. This makes your program more efficient, easy to read and easy to debug.
- How to create, add to and delete items from lists.
- How to backup your list to a text file, so that you can retrieve your list even after you have closed your Python program.
Video tutorial
Here is the full video tutorial, make sure you follow the full tutorial, don’t just copy the code, as you will learn much more by listening in and following along.
Finished Source Code
Challenge Interactive story
Bronze
Write a short interactive story with 3 screens and options to move between each screen
Silver
Your program should allow the users to enter either a full word or just the first letter for the location to go to
Gold
The program should validate the user’s input and ensure they only enter valid options.
Python Calorie Tracker Tutorial
The aim of this lesson is practice some of the skills you have learnt so far, by making a calorie consumption tracker.
For this program, unlike previous programs, we are not going to do a lot of planning, because the program is going to evolve as we code it, so instead we are going to develop my program through a series of versions – coding the program until it gets to a certain level, then using ‘save as’ to move on to the next version.
Version 1 – Basic functionality
- Ask the user to input their calorie intake for a period of 7 days at a time.
- For each week display the total amount of calories consumed, the average and the days where most/least were consumed.
Version 2 – Input Validation & Advice
- If the users inputs invalid data, get them to input it again.
- If the user is eating too much or too little, give them a warning.
Version 3 – Data for 4 weeks
- Display the calorie intake values for the last 4 weeks in total.
Version 4 – Persistent File Storage
- The data should be stored in a text file for persistent storage.

Version 1 – Basic functionality
For this we can start out and write a simple program the performs all the required functions for objective 1, and it could look a bit like this:
Version 1a (inefficient version)
This program works, but it is really quite inefficient and so it needs to be changed! remember that for the programming projects at GCSE level, in order to get full marks your program needs to be efficient!
Version 1b (efficient version)
Here we have swapped the 7 inputs for 1 input and put all the values in to a list. This will help us later on when we come to display the values for each day.
Version 2 – Input validation and advice
Version one of the program is already looking good, but it at the moment it is not very robust. If you enter anything other than a number in to the program it breaks.
If the user enters a ridiculous number ( such as -50 or 200000), it just happily accepts the number. To fix this, we need to use a function. This is will allow us to improve our program with the minimum amount of fuss and maximum benefit.
The getCalories() function
Edited code in the main file.
Final code version 2
Version 4 – Persistent Data Storage in a file
Our program is now working quite well, but there is a problem! Whenever we close our program, we lose all our data and have to start again… This is no good. What we need is a way to save our data that is stored in the month list. The quickiest and most ‘Pythonesque’ way of doing this is to use pickle.
Using pickle is quite easy and is broken down in to 2 steps.
Step 1 – Loading your data from a pickle file
To load our data from a pickle file is easy-peasy. We just need a couple of lines of code.
Step 2 – Saving your data
Saving pickle files is even easier, just one line of code!
Final Code
Here is the final code!
Improving the program
We now have a fully working program, but there are still a few improvements to make!
- On the main screen, when we are asked to input the input the week number we want to edit, the input is not validated (checked that it only contains 1,2,3 or 4). We can now write a function (similar to the getCalories() function) that only allows valid input.
- We could add the option to clear all data from the database.
- We could add an option to display the monthly average calories consume
Python Rock Paper Scissors Game
Planning
The first thing that I always do before coding a larger program is plan my game. I usually get out a piece of paper and sketch out my ideas for the different functions, variables and the user interface (the text screen).
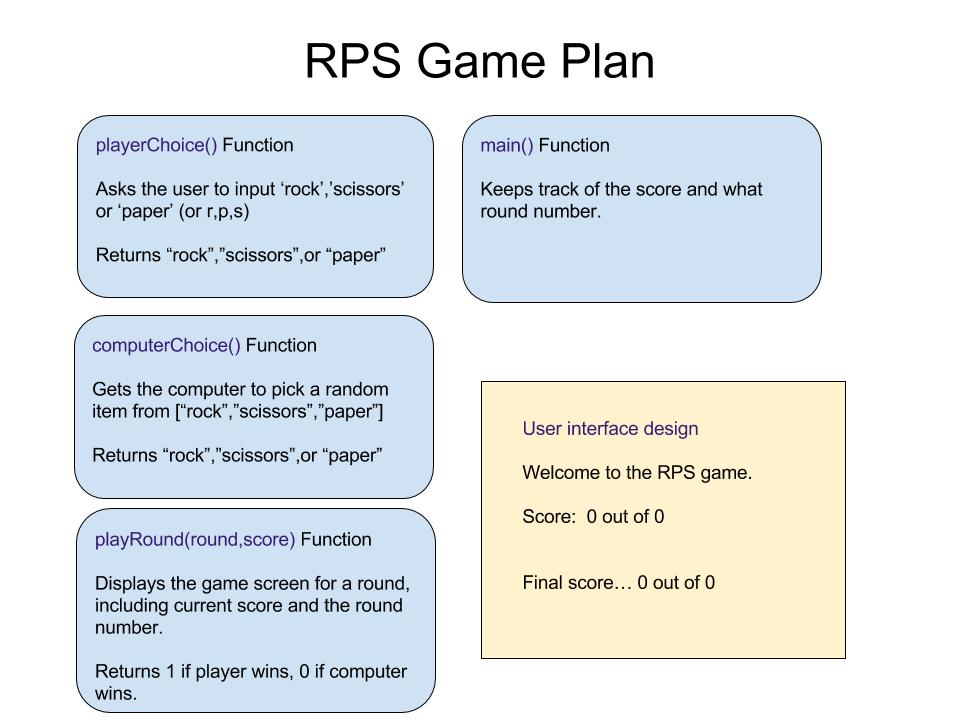
Click to view full size
Player Choice Function
The first function that we are going to develop is the playerChoice() function.
This function will:
- Ask the user for an input
- Check if it is an acceptable input
- If it isn’t repeat the process of asking
- If it is, return either rock, scissors or paper.
Computer Choice Function
The next function we will create is the computer choice function
This function will:
- Pick a random choice from the list [“rock”,”paper”,”scissors”]
- Return the choice
Play a round function
The next part of our program is the play a round function. Here we will start to combine the other functions to make a basic working version of the game.
Main Function
Finally we pull the whole thing together with a main function. The job of this function is to:
- Run the code for each round
- Keep track of the round
- Keep track of the score
- Print out the final score
Complete Game Code
Create the deck of cards
This first thing we need to do is create a deck of cards. In order to make a deck of cards we must first understand what a deck of cards is.
A pack is made up of 52 cards (excluding jokers)
Each card in the deck has three attributes:
- Its name
- 1,2,3,4,5,6,7,8,9,10,jack,queen,king
- Its value:
- 1,2,3,4,5,6,7,8,9,10,11,12,13
- Its suit:
- Spades, Diamonds,Hearts,Clubs.
In Python it is easy to create this full deck of cards using 2 lists and a couple of for loops:
Here we have created a list of 52 cards, with each card consisting of a tuple of 2 values:
(name,suit)
Create the helper functions
Once we have created the deck of cards it is useful to create a few helper functions to deal with the pack.
- getRealName – This returns the card’s full name in a human readable form
- getValue – This return’s the card’s value, useful for calculations
Full script
Main Screen Design
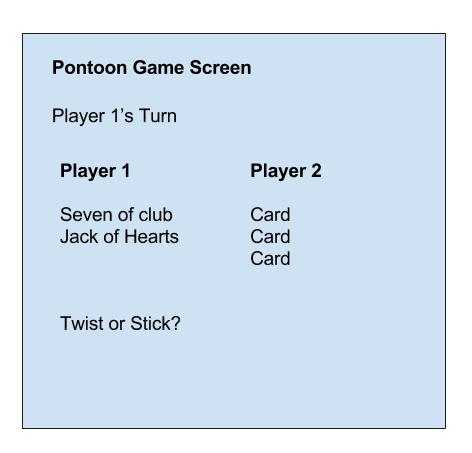
Creating the mainScreen
In order to create the main game screen we first need to come up with a plan! You can have a look at my plan to the right of the screen.
Required Functions & Data Structures
From the plan I can see that I am going to need:
Functions
- A MainScreen() function
- A function to display whose turn it is
- A function to display each player’s hand
- A function to get input from the player
- A function to calculate & display who is the winner / loser.
- A function to calculate a player’s score.
Variables
- playerTurn variable to keep track of whose turn it is.
- A round variable to see if it is round one or 2.
Data Structures
- A list for each player to contain the cards that they have been dealt.
- 1. Plan
- 2. Framework
- 3. Display the hangman
- 4. Letter Input
- 5. Display Used Letters
- 6. Fill in blanks
- 7. Winning/losing
Step 1 – Make a plan.
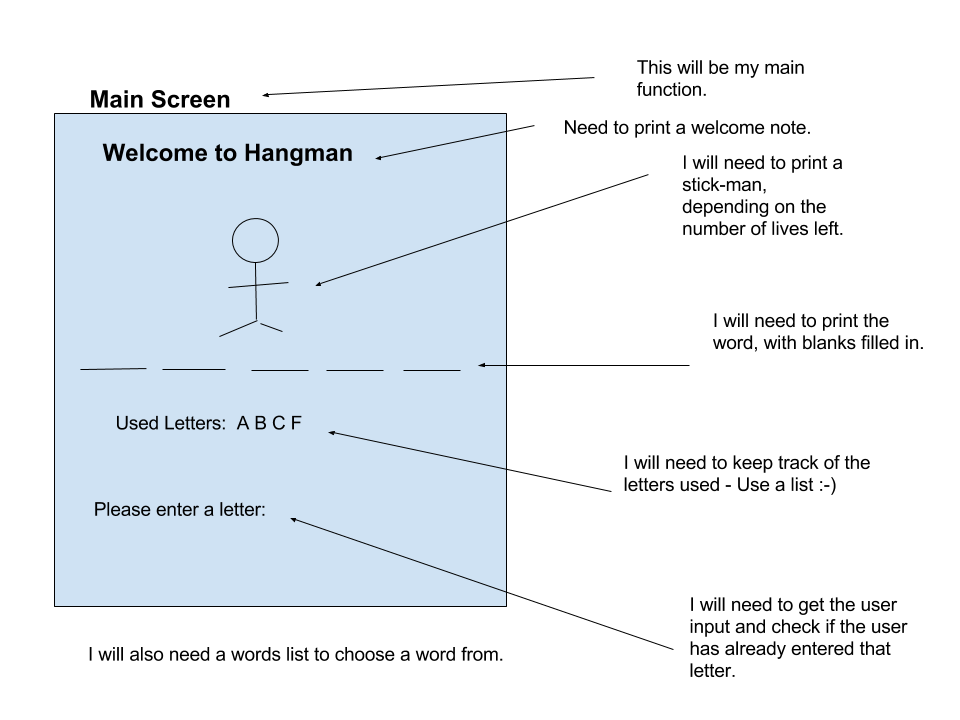
The first thing I always do when designing a new program for the first time is I draw up a plan of what my game is going to look like. I then come up with a list of as many variables, data structures and functions that I can think of that I might want to use in my game.
Here is my plan!
From my plan it became clear that I would need at least the following:
Variables
- The Lives left ( lives)
- The chosen word (chosenWord)
Data Structures
- A List of possbile words to pick from ( wordsList)
- A list of letters that have been used
- A list of stick men icons for each stage in the hangman hanging
Functions
- A main screen to display the words, hangman etc (mainScreen).
- Display the hangman graphic (drawStickMan)
- Display the hidden word / blanks (drawTheWord)
- Display the used words (showUsedLetters)
- A letter input screen
From this I can already start to build the framework for my program. I start by creating the welcome screen function and the lists.
Step 2 – Create the framework
Now I’ve got a plan, I can take the plan and produce a basic outline of the game. From the drawing of the plan I can see that I am going to need a mainScreen function and this mainScreen function needs to display all of the main elements. Rather than try and code everything inside that one function I have created lots of little functions. This makes my code easier to read and maintain!
At the moment none of the functions work, they just display some placeholder text on the screen to show that they are there!
Making the graphic.
Step 3 – Display the hangman graphic
In order to make the stickman we are going to use a simplified version of ascii art. This is the type of artwork that can be found on many old text games. Some of this art is very impressive but we are just creating a simple version for ours!.
Our first hangman
Creating hangman artwork is easy. We put our designs in a string and move on to a new line for each line.
\n\ – This is an escape sequence that puts in a newline in the string and tells Python that we want to carry on with our string on the next line.
Combine the graphics in to a list
Combining the hangman graphics
So we have created one hangman graphic, but how do we combine all the different graphics together and how do we animate them?
Well the easiest way is just to put all the graphics together in a list and then just use indexing [], e.g. stickmen[4] , that will get the fifth element in the list, which should be the fifth graphic!
Next I need to display a stick figure that changes depending on how many lives the user has left!
The clever thing about this script is that however many lives you have left, you can just use stickmen[lives] and it will get the correct graphic to display!
Adding the graphic to our program.
Adding the hangman graphic to the program is easy.
You just need to add the full hangmen list to your file and then swap your existing drawStickMan function with this version. Now you program will automatically draw the correct graphic, based on the the number of lives that the player has left!
Step 4 – Get letter inputs
The next step is to getting letter input from the user.
We could just use the input function and add the letter to the list but this has a number of problems:
- The user might duplicate an existing letter
- The user might enter an invalid character (e.g. 4)
- The user might enter multiple characters (e.g. fg)
- The user might enter letters in uppercase ( e.g. F)
- The user might just press enter without typing anything.
We need to create a function that can cope with all of these problems.
A working version should:
- Keep asking the user until they enter a valid, unused letter.
- It must then add a lowercase version of the letter to the usedLettersList.
How do we achieve this? Well this is where our separate functions come in handy. Any time the user enters and invalid, simply refresh the screen by running mainScreen() and start again. Any time the user enters a valid entry, add that letter to the letters list, change the number of lives and rerun the mainScreen()!
Step 4 – Display the used letters
We now need to show the letters that have been used. Fortunately this is super easy! Just swap you function for this one!
Step 5 – Fill in the blank letters
We now need to fill in the blanks. This is nice and easy, just create empty list. For each letter in the chosenWord, if the letter is in the list of usedLetters, append the letter to the word list, otherwise append an underscore _.
Finally print out a cleaned up version of the new list.
Step 6 – Checking if the player has won or lost
Finally we just need to have mechanism where the game ends, dependent on one of two conditions:
- The player runs out of lives
- The player correctly guesses the entire word
The game needs to end and display a suitable message.
Here is the check win /lose script.
You will also need to add the checkWinLost function to the top of your mainScreen() function
(none found)
Welcome to My Blog. This is your first post. Edit or delete it, then start blogging!
Welcome to Mr West. This is your first post. Edit or delete it, then start blogging!
A clone of the classic Chuckie Egg platformer game where you have to go around collecting eggs whilst avoiding the birds! This was one of the first games I played on my Amstrad 464, many decades ago and one that inspired me to learn to code!
Demo Game
Youtube Tutorial
Here is the link to the template to follow along with the Youtube Video.
Introduction
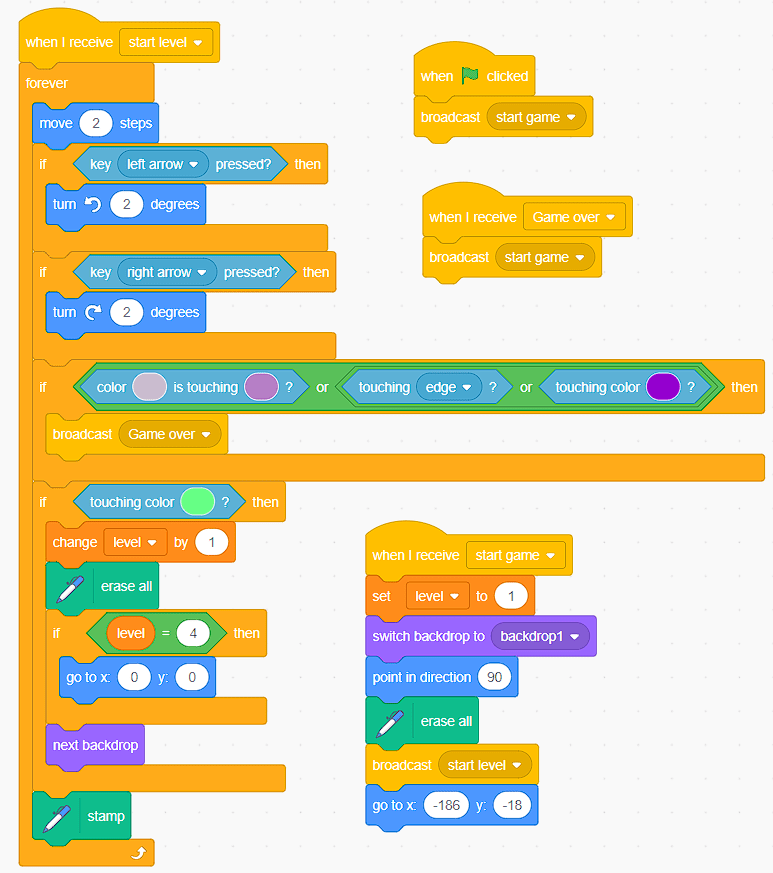
Welcome to the Turn the Worm Scratch 3 game tutorial. This game is easy to make and has very simple controls but it is quite addictive. I’m sure you’ll love it.
The object of the game is to dodge the purple lines and navigate your worm to the green dot which is the door the next level. Each level gets more and more difficult!
Demo Game
Have a go at a simple demo of the basic game that you are going to make!
Tutorial Video
Here is the tutorial video for you to follow.
YouTube blocked at school? Watch the Google Drive Version instead.
Worm Code
Here is the worm code if you need to it check your code as you follow along with the tutorial.
Moving Bar Code
Here is the code for the moving bar
Extension Challenges
If you have finished the tutorial video as want a few extra challenges, here are so ways you can improve your game:
- Add more levels
- Add power-up hearts
- Add sound effects / music to your video
- Keep track of the player’s score (time alive) and save it as a high score using cloud variables!
Intro
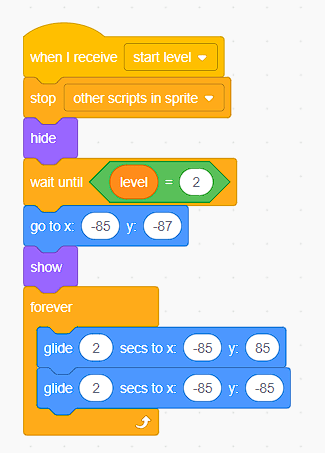
Space Race 2 player retro game Scratch Tutorial
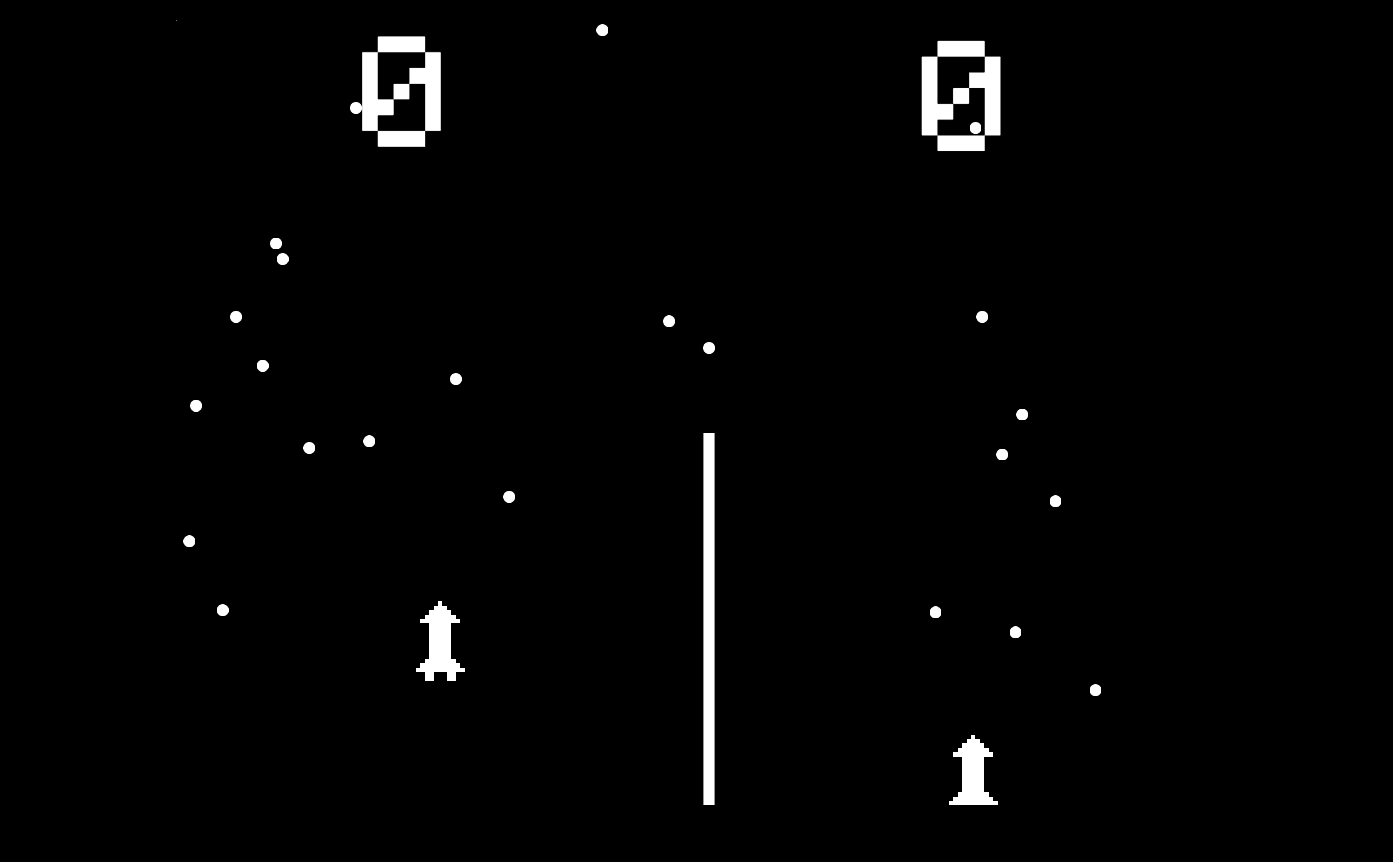
In this video tutorial we will be showing you how to create a clone of the 1973 classic, space race, by Atari. It’s a wonderful 2 player game that you can code in Scratch, simple but fun to play.
Demo
Demo Game
Here is a demo game for the 2 player Scratch game that you will learn how to create. Click on the green flag and have a go yourself.
Video
Video Tutorial
Here is the video for the 2 player Scratch game tutorial, just watch it and code along with me.
Can access YouTube? Then watch the Google Drive Version Here.
Spaceship Sprite
Spaceship Sprite

Here is the the space ship sprite for you to download.
Alternatively you can create your own sprite by using the online pixel sprite editor, Piskel.
Challenge yourself!
Extra Challenges
Have you finished this 2 player Scratch tutorial and want to add more to your project? Here are some improvements that you could make to your game to make it even better!
Add some background music to the game
Add a start menu
Add a difficulty option at the start of the game so that the players can choose how fast the asteroids go and how many asteroids appear on the screen.
Introduction
Retro 2 Player Snake-like Game (Blockade) Scratch 3 Tutorial
- 20 Minute Tutorial
- 2 Players
- Features loops, variables and the pen tool
In this Scratch tutorial we look at how to make a clone of Gremlin’s 1975 game ‘Blockade’, which was a 2 player predecessor to the Snake game that appeared on Nokia phones in the 1990s. This Scratch tutorial is quick and easy to make and is great for beginners. It’s also a really simple but fun game to play with a friend, so grab a friend and get coding!
Game Demo
Game Demo
Here is a playable demo game for the Scratch tutorial you will be following. Grab a friend and have a play!
Player 1 Keys – WASD ~~~ Player 2 Keys – Arrow Keys
Tutorial Video
Tutorial Video
Here is the video for the Scratch 3 tutorial for how to make a clone of Blockade / 2 player snake.
Player 1 Code
Player 1 Code
Here is the simple code for player 1 one if you need it at any point to check against your code as you follow the video.
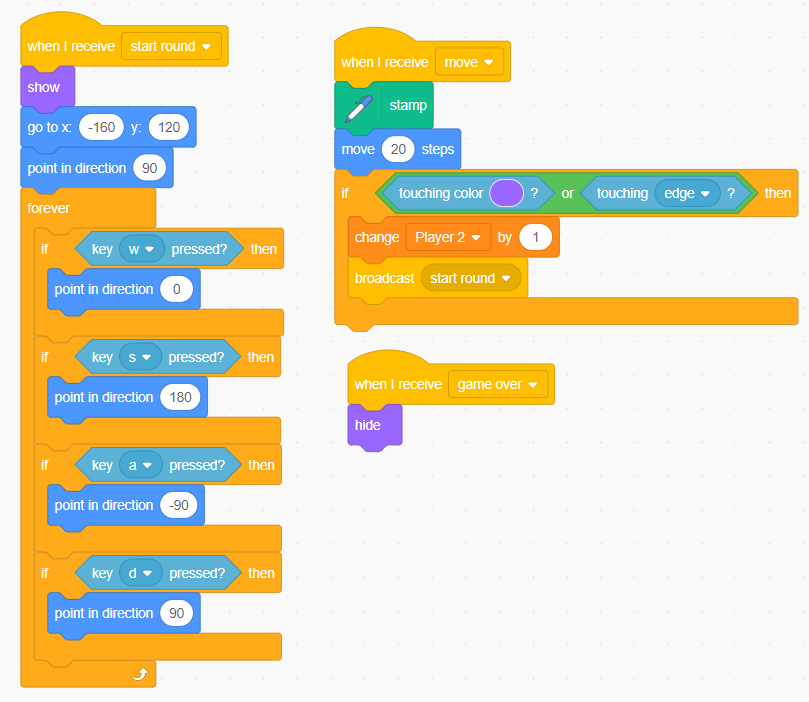
Player 2 Code
Player 2 Code
Here is the player 2 code. Player 2’s code is pretty much identical to player 1’s except for the different control keys and that if the player crashes then other player is awarded a point.
Stage Code
Stage Code
Here is the stage code our Scratch tutorial. The stage controls the overall game and keeps track of the score to see if a player has won.
Intro
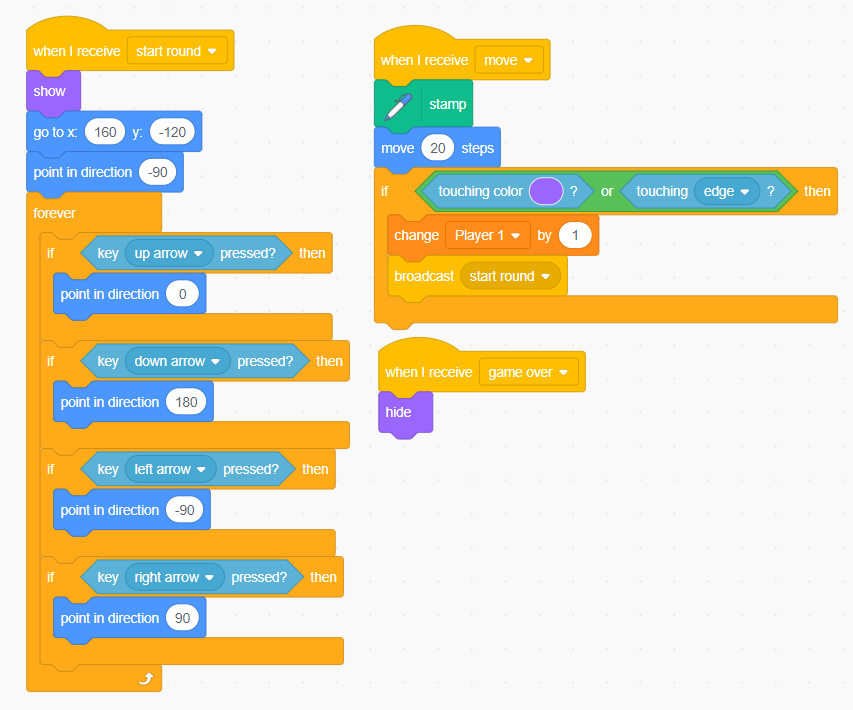
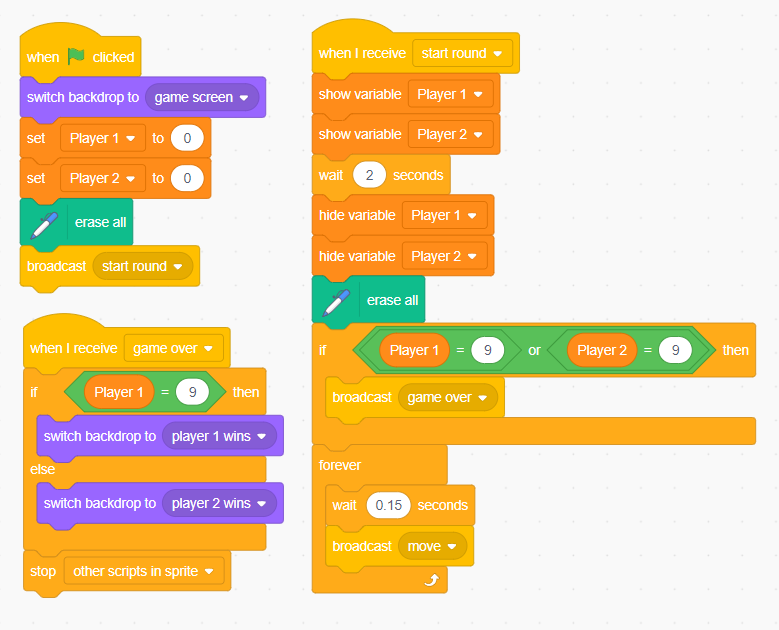
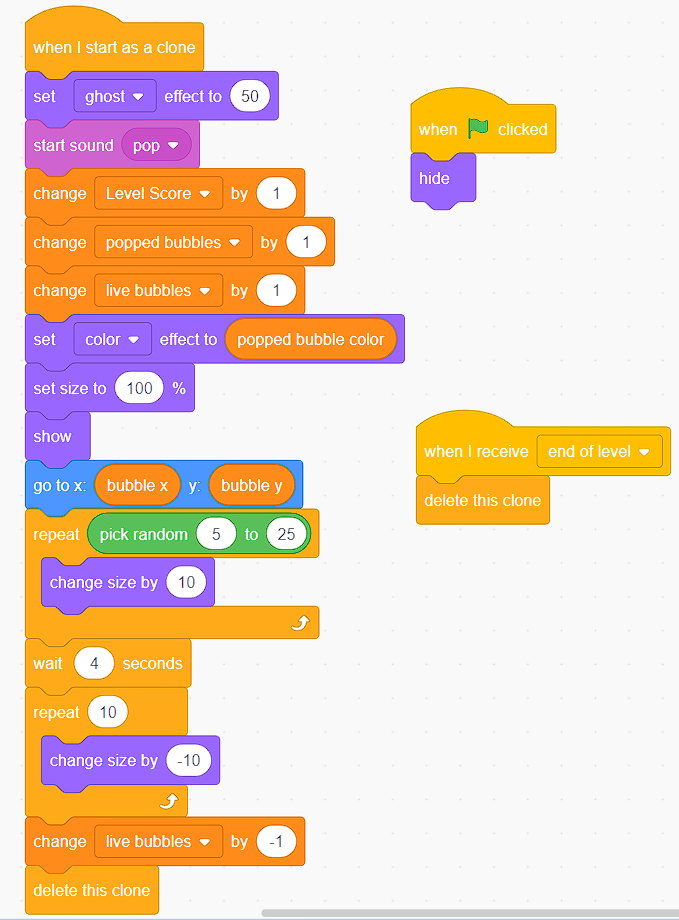
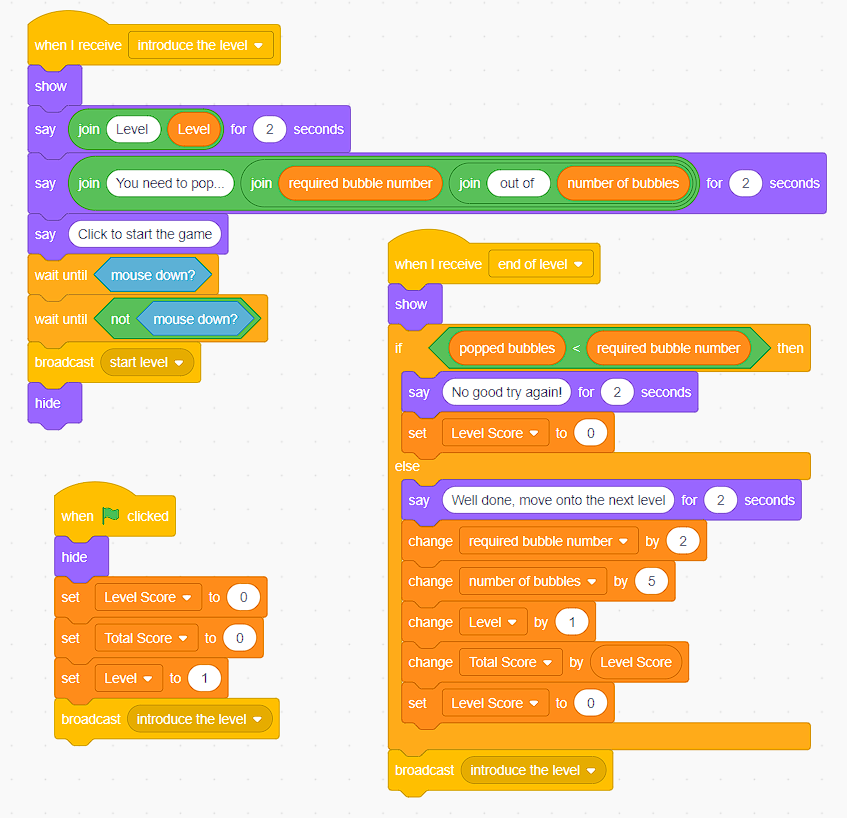
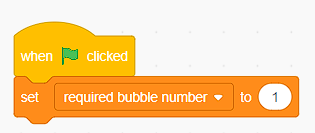
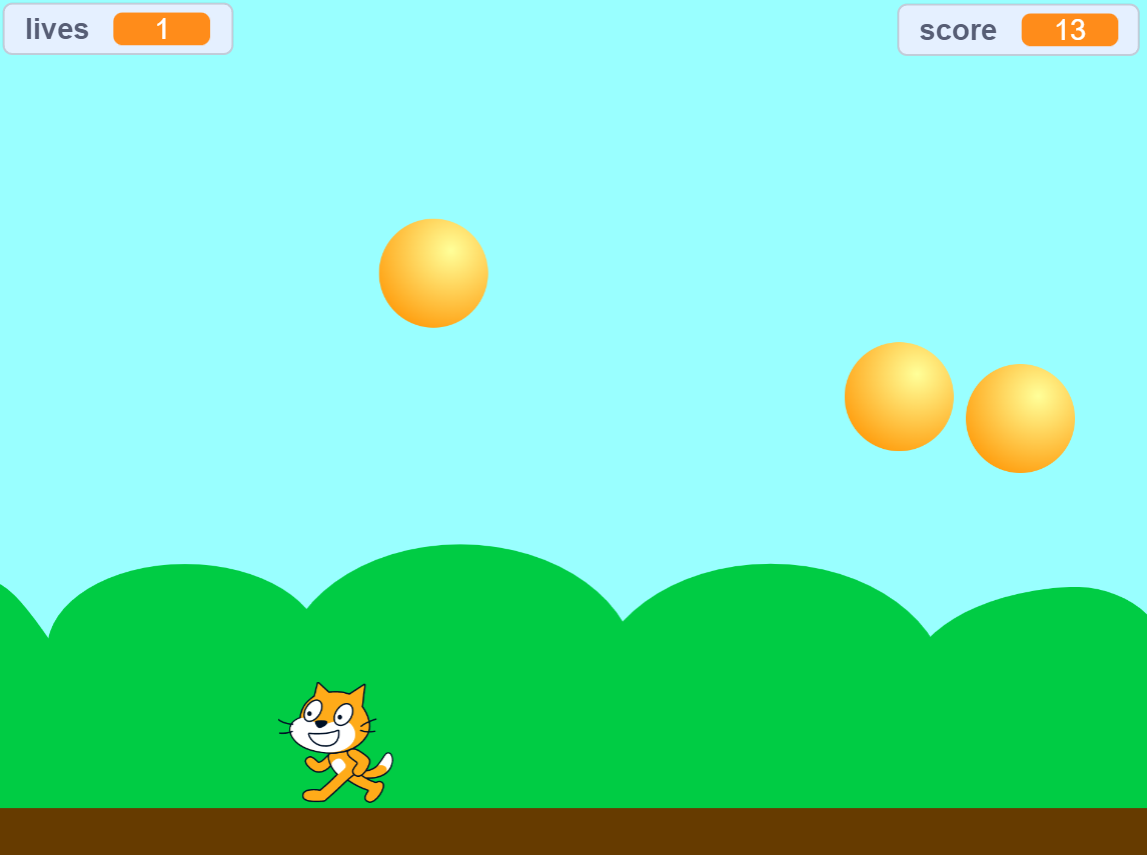
Bubble Popping Scratch Game Tutorial

I found this game whilst browsing the web the day and loved it so much that I decided to make my own version! The objective is simple, just place a bubble where you think the other bubbles will crash into it and pop as many bubbles as you can :-). A great little game that teaches you about a number of different Scratch topics, including:
- Loops
- Cloning
- Sprite interaction
- Passing values between sprites
Demo
Demo Game
Video Tutorial
Video Tutorial
Player Code
Player Code
The code for the player in this Scratch tutorial is pretty simple, and focuses on following the mouse.
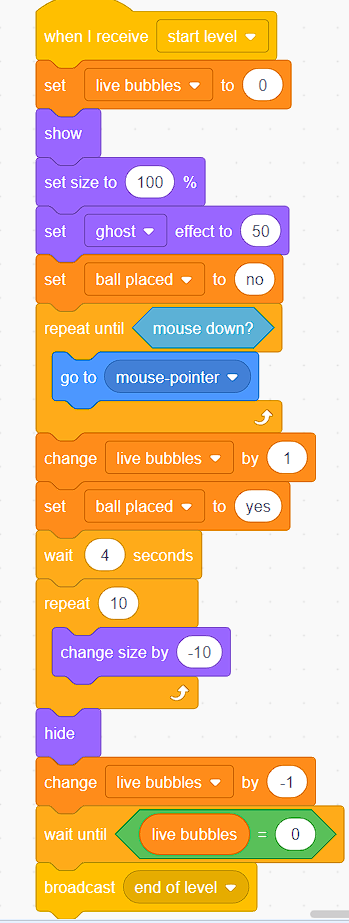
Bubble Code
Bubble Code
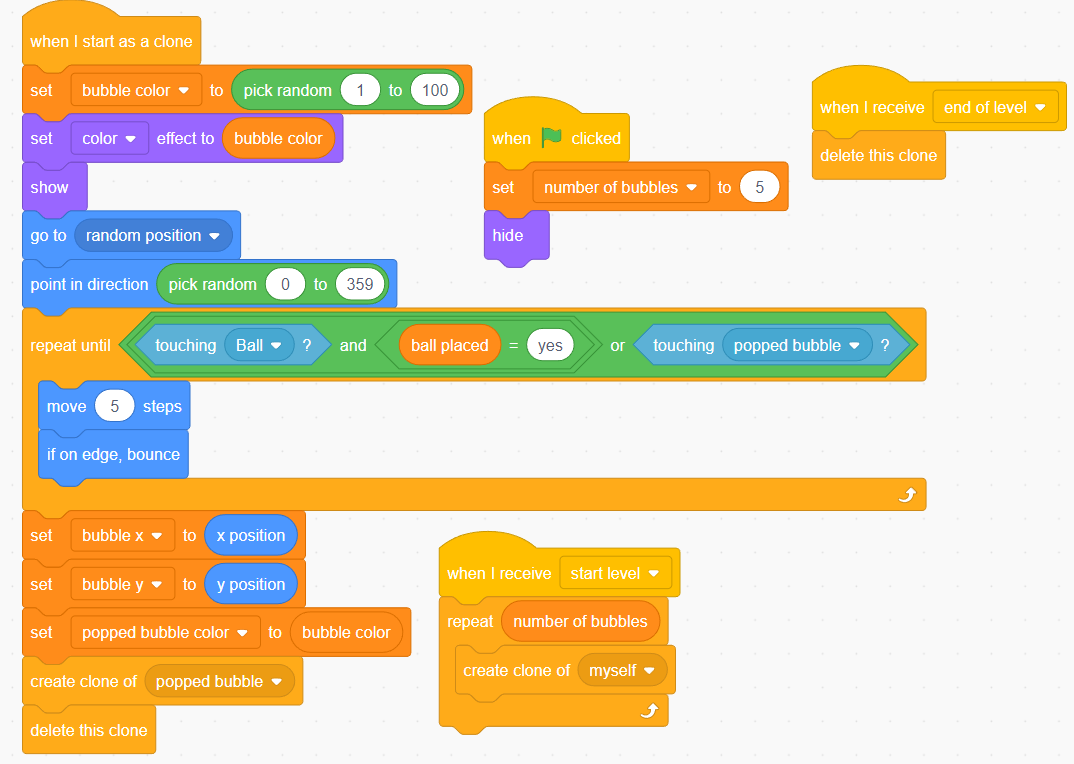
Exploded Bubble
Exploded Bubble Code
Gobo
Gobo Code
Stage
Stage Code
Introduction
Dodge Ball Game Tutorial
In this beginner’s Scratch tutorial we look at how you can create a dodge ball style game. It’s an easy and fun game for beginner Scratches make and it introduces a number of coding techniques.
- Loops
- Variables
- Coordinates
- Motion
Demo Game
Demo Game
Tutorial Video
Tutorial Video
Cat Code
Cat Code

Ball Code
Ball Code
Stage Code
Stage Code
Introduction
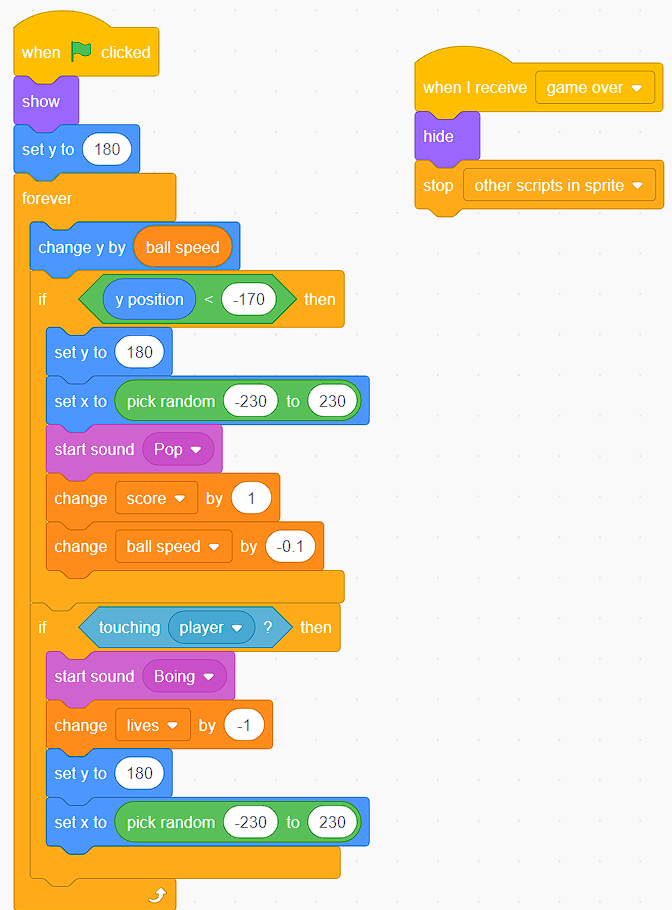
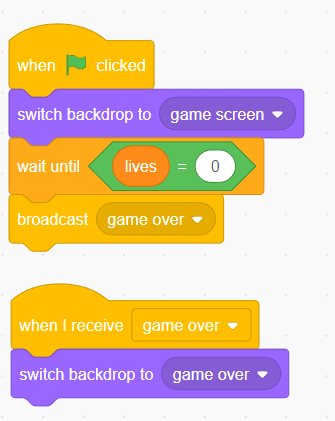
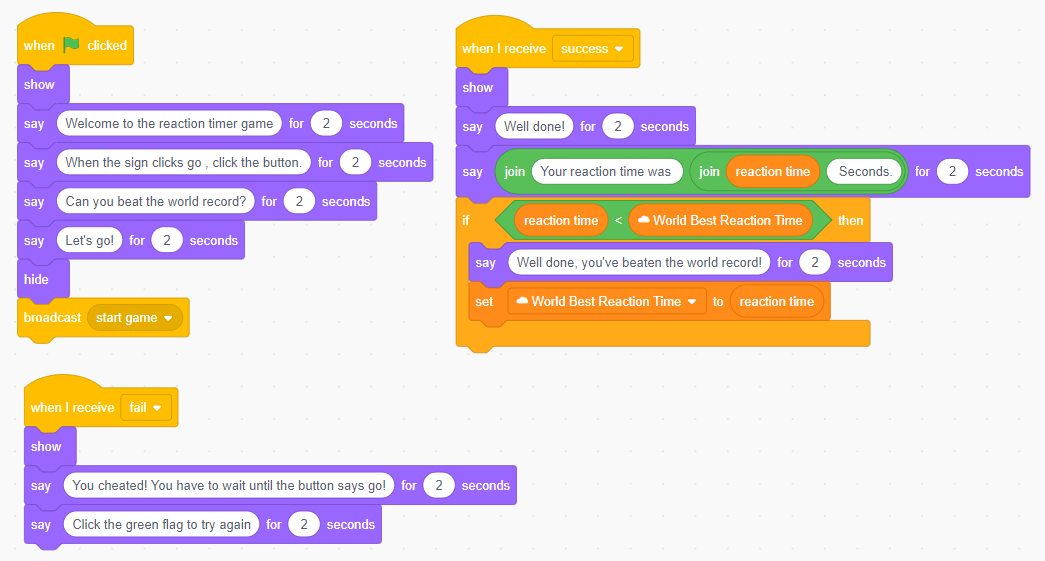
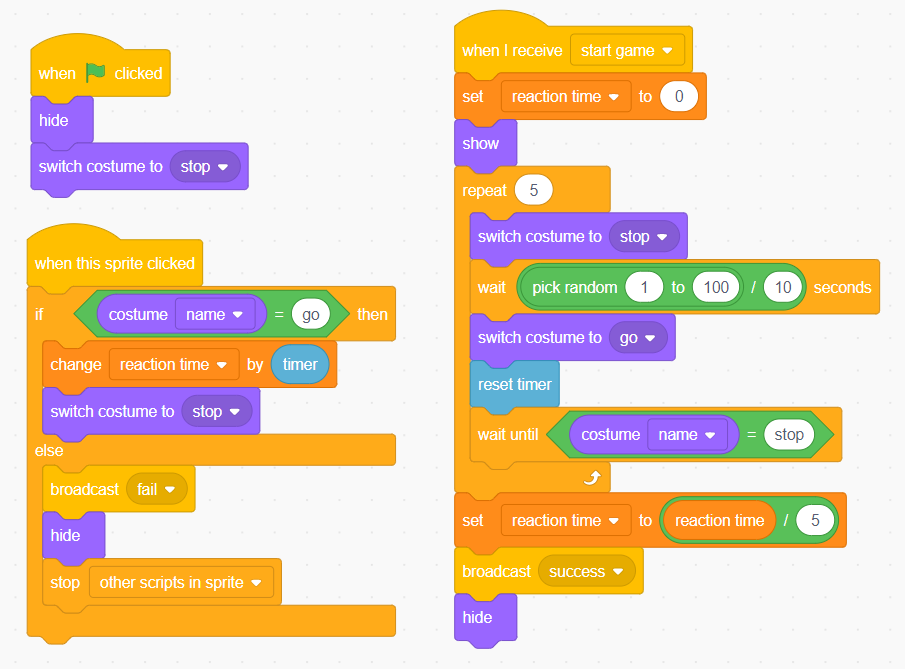
Reaction Time Scratch Tutorial
Test your reactions and learn to code Scratch in this easy to follow tutorial video! A great fun game that’s simple to make but surprisingly addictive!
Demo Game
Demo Game
Have a play on the demo to see what you will be making today! Can you beat the world record score?
Tutorial Video
Tutorial Video
Here is the tutorial video.
YouTube blocked at school? Watch the Google Drive version instead.
Cat Code
Cat Code
Try not to use this code if you can avoid it! but it’s here if your project isn’t working and you can’t fix it! 🙂
Click to view full size
Button Code
Button Code
Click to view full size
Challenges
Extension Challenges
Finished following the tutorial? Have a go at these extension challenges 🙂
- Try adding some sound effects to your game for when the button is clicked
- Try adding music to your game, with special music for if you beat the world high score
- Create custom feedback if they have a good reaction time (within 30 milliseconds of the world’s best time maybe?)
Introduction
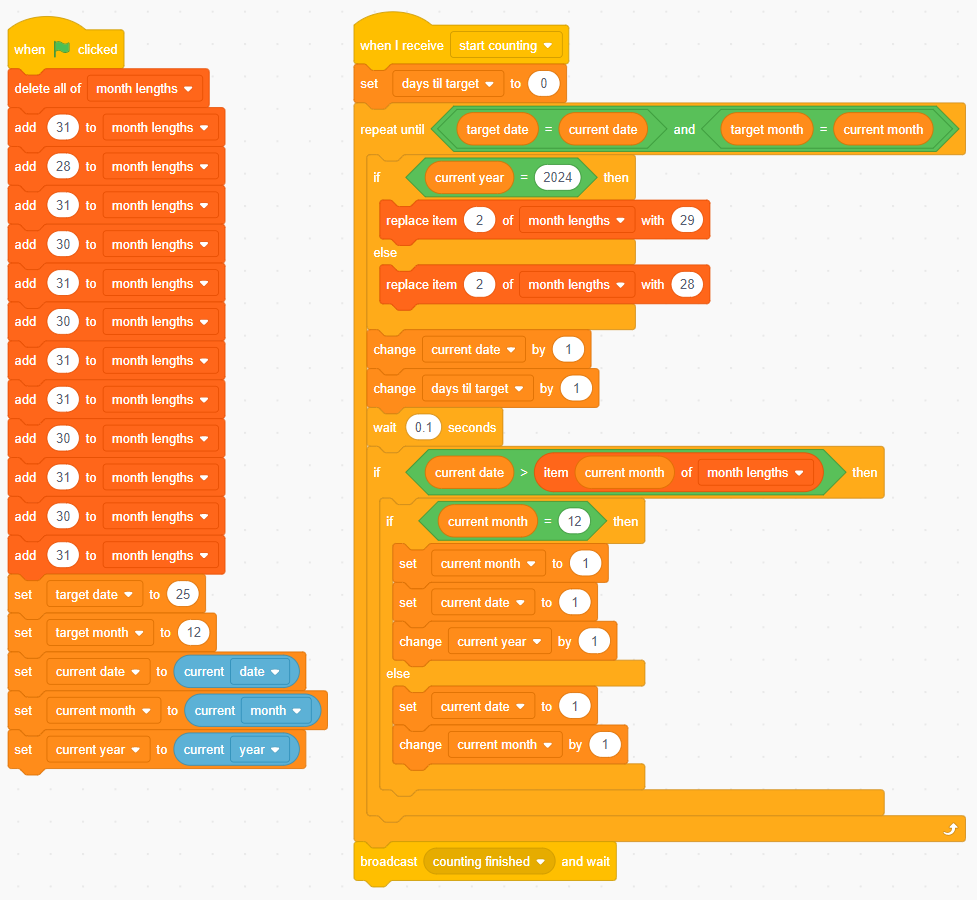
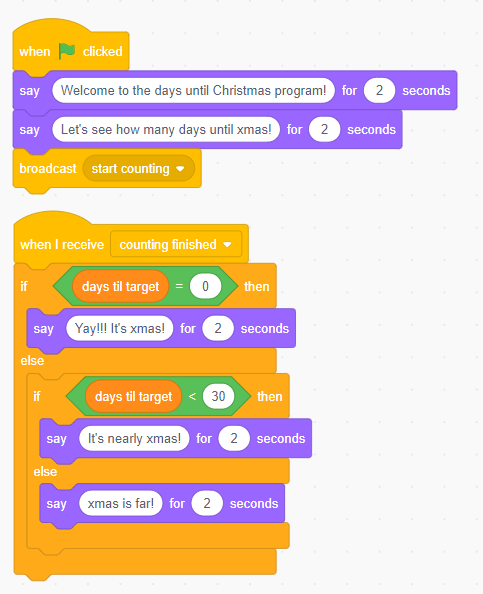
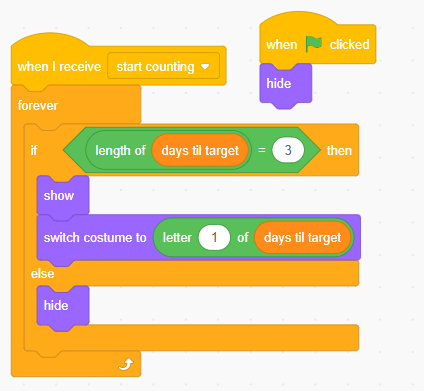
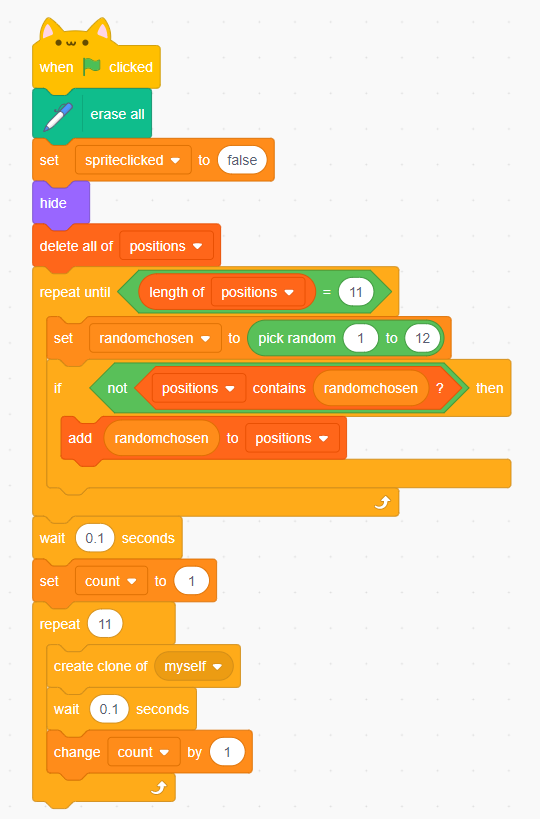
Christmas Countdown Scratch Animation
In this Scratch tutorial you will learn how to make a Christmas themed animation so that you can send it to family and friends as an electronic Christmas card. It shows you how you can use Scratch to automatically calculate how many days until Christmas.
Demo Game
Demo Game
Video Tutorial
Stage Code
Stage Code
Penguin
Penguin
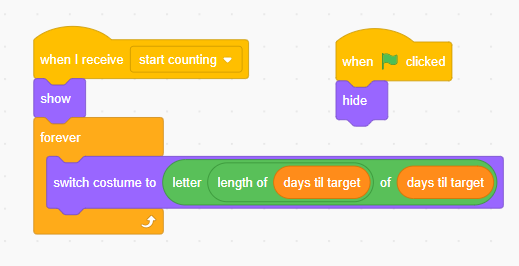
Numbers
Numbers
Ones
Tens
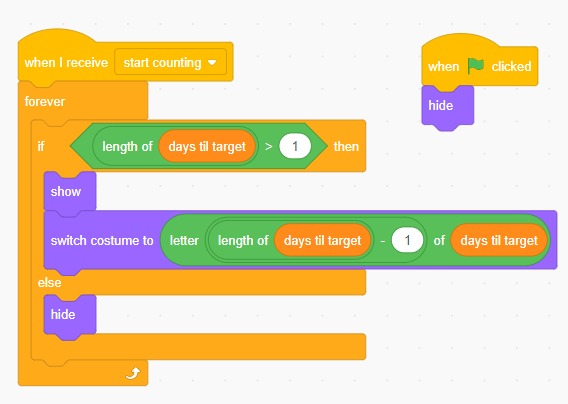
Hundreds
Reindeer
Reindeer
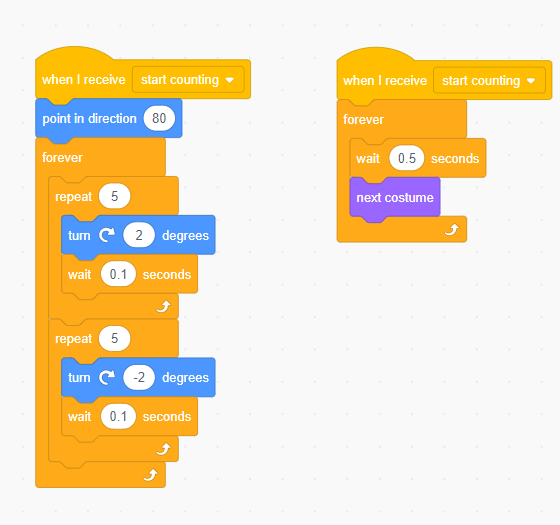
Snow
Snow

Intro
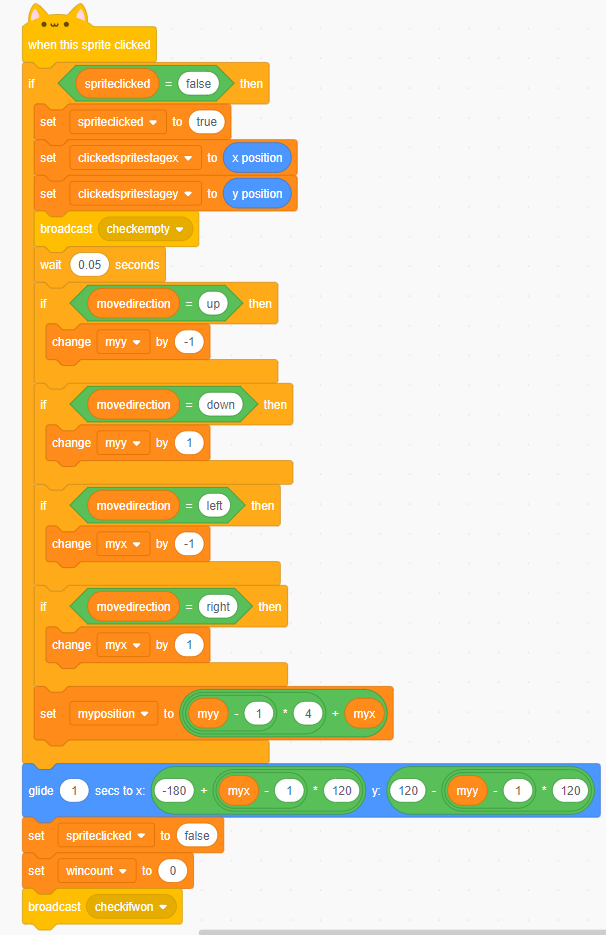
Scratch Tile Slider Game Tutorial

In this tutorial you will learn how to create your own slider game just like the game that I used to play as a child, before my parents bought a Nintendo SNES and I could play real games!
Slide the jumbled up pieces around until you have a complete image.
Demo
Demo Project
Have a go at this picture slider game that I made using Scratch.
Tutorial Video
Start
Tile Start Button Code
Tile Clicked
When Tile Clicked Code
Tile Extras
Extra Tile Code
Purple Dot
Purple Dot Empty Space Checker Code
![]()
Win Sprite
Win Sprite Code
![]()
(none found)
Welcome to My Blog. This is your first post. Edit or delete it, then start blogging!
Duke of Edinburgh Silver Routes
Here are three of the routes we use for the DoE award. These routes are mostly suitable for silvers or keen bronze groups. The walks have relatively simple navigation and mostly have good road links for observation. Mobile signal is largely good with 20% dead spots.
Campsites
Both have indoor areas available for teaching / accommodation.

Motorbike – 21km ( 8 hours)
This northern loop takes the students up north of Waddecar and clockwise following the inside of the Fair Snape Fell horse-shoe and then back just north of Beacon Fell.
Grids
- 561 441
- 543 431
- 537 449
- 546 466
- 573 472
- 589 447
- 597443
- 572 433
- 561 441
Observation Checkpoints
- Cobble Hey – 536449 ( also acafe)
- Bleasedale Tower – 561462 (can be accessed by car from entrance at 572446)
- Higher Core – 496439
- Heatherway – 570432 (access near by car at 570 430)
Cafes
- Cobble hey ( 536449)
- Beacon Fell (564 426)
Notes
None
Pigeon – 17km
A southwestern loop that follows the river Brock down towards the M6 motorway, then circles back via Beacon Fell.
Grids
- 561 441
- 549 431
- 523 409
- 542 397
- 565 408
- 565 447
- 561 441
Observation Checkpoints
- Brockmill – 549 431 (Great little picnic site in summer, but busy and parking can be difficult – get there early)
- Matshead – 528 408 (15 minutes walk from Barton Grange Cafe under the motorway)
- Billborrow Hall Farm 520397 ( alternative to previous if you don’t fancy walking!)
- Green Man Pub – 546 400
- Ashes farmhouse 564 408 (good obs point for weaker teams to make sure not taken the wrong path!)
- Beacon fell Visitor center – 564 426 (great for a brew and cake, closes at 5pm)
Cafes
- Cobble hey ( 536449)
- Barton Grange Garden Center ( 510 407)
Notes
River can be hazardous after heavy rain but generally very low
Bat – 17km
A southeastern loop that takes you north of beacon fell towards Longridge fell, then down back around the south of the fell and finally back over the top.
Grids
- 561 441
- 578426
- 606 416
- 577396
- 565422
- 561 441
Observation Points
- Heatherway – 570432 (access near by car at 570 430)
- Wallclough – 605 415
- Elmridge/Countess – 595404
- Rd nr White Moss Gate – 596396
- Barn Fold Farm – 57 5411
- Beacon fell Visitor center – 564 426 (great for a brew and cake, closes at 5pm)
Notes
- Footpath at 590 423 has been moved to just left (2 metres) of the house gates and there is no visible FP sign. Students may accidentally take the path to the right of the gate and go the wrong way.
- Few / no FP signs from Crow Trees to White Moss Gate. Expect delays.
- Stream crossing required at 574 398. Low risk in low wayer. Will require risk assessing by staff in the morning if heavy rain / heavy rain forecast.
Welcome to Mr West. This is your first post. Edit or delete it, then start blogging!
Welcome to My Blog. This is your first post. Edit or delete it, then start blogging!
Welcome to My Blog. This is your first post. Edit or delete it, then start blogging!
Welcome to My Blog. This is your first post. Edit or delete it, then start blogging!
Welcome to My Blog. This is your first post. Edit or delete it, then start blogging!
Welcome to My Blog. This is your first post. Edit or delete it, then start blogging!
Welcome to My Blog. This is your first post. Edit or delete it, then start blogging!
Welcome to My Blog. This is your first post. Edit or delete it, then start blogging!
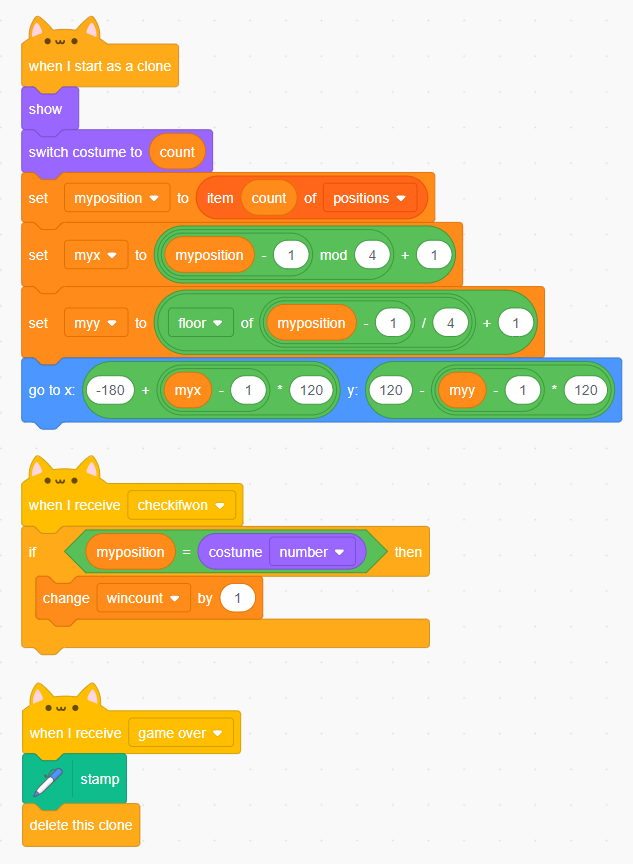
In this tutorial I show you how to create a working clock in MineCraft Education Edition using Blocks based coding. You can set the clock to display the In-game time or the real world time.
Video Tutorial
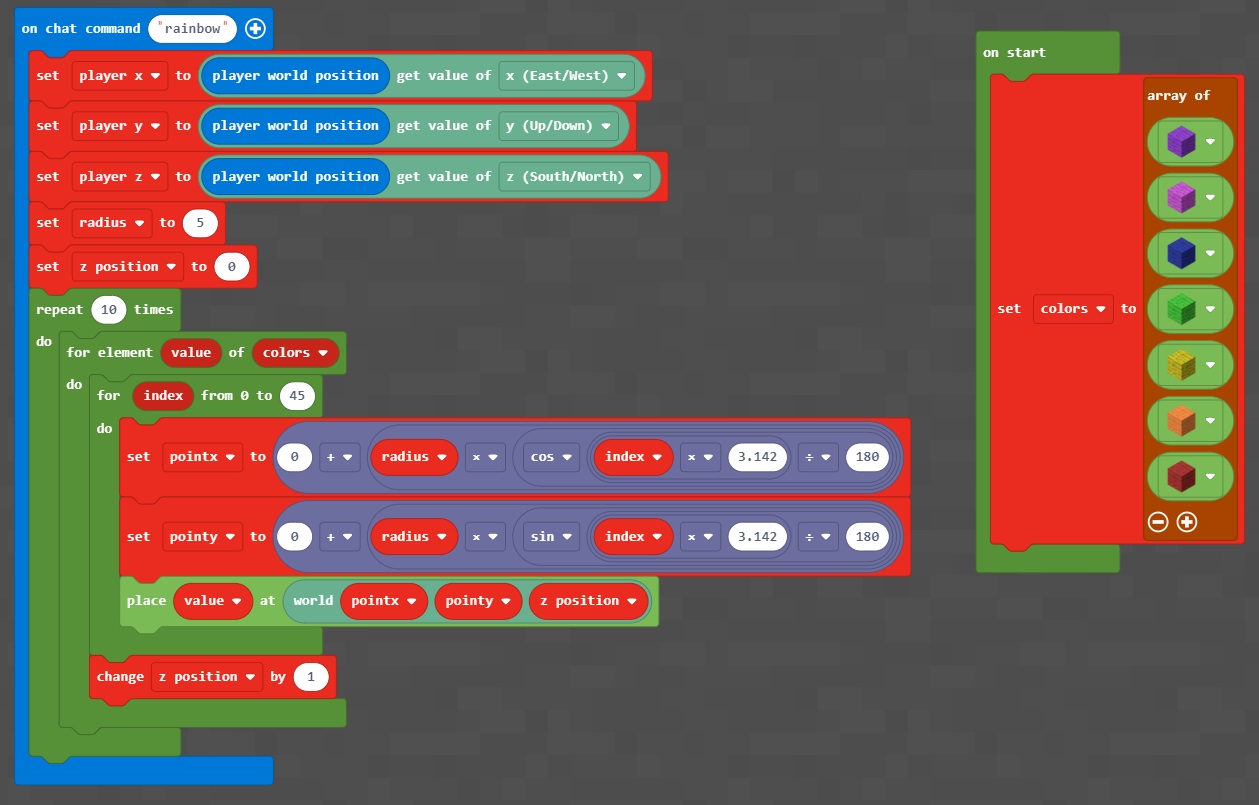
Here is the video tutorial for how to code a rainbow to appear in MineCraft Education Edition.
Tutorial
Rainbow Code Blocks
Here are the code blocks used to create the project.
In this video tutorial I show you how to code an erupting volcano use blocks based coding.
Tutorial Video
Blocks Code
Here are the code blocks used to build the volcano if you need them for reference.
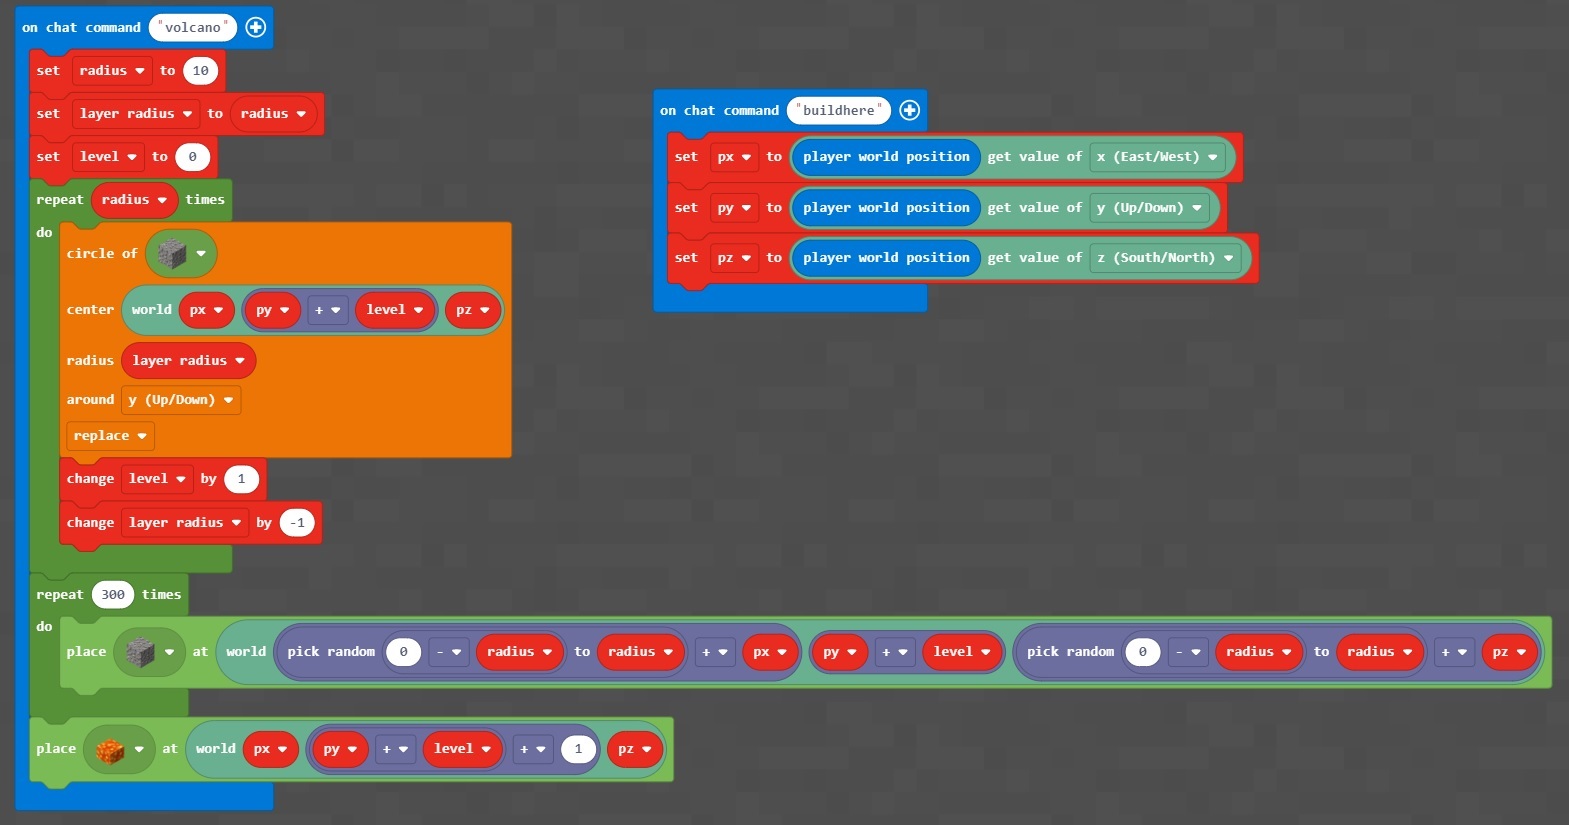
Click for full size image
In this tutorial for MineCraft Education Edition we look at how we can used code to create ourselves a house in Minecraft wherever we are!
Tutorial Video
In this tutorial I show you how you can create your own moving platform game in Co Spaces Pro using beginner friendly block based coding. The game contains a number of great features, including:
- Moving Platforms
- Obstacles
- Multiple Levels
- A time limit for each level
Demo Project
Take a look at the demo project below to see the game in action. It uses normal FPS style controls (WASD and space bar)
Video Tutorial
Here is the video tutorial, It will take about an hour to follow all the instructions and complete the CoSpaces game tutorial. If YouTube is blocked in your school then you can also access the tutorial using Google Drive Here.
Extension Challenges
Finished the tutorial and want to do more?Here are some things that you can do to make your project even better:
- Add some sound effects and background music.
- Add more levels to your game.
- Add some of your own obstacles, such as platforms that fall when you stand on them, objects that send you back to the start if you touch them.
- Add some of your own custom designed 3D models using the free TinkerCAD online. Take a look at this tutorial on how to import TinketCAD models.
Tutorial 1 – Getting start with your first game
How to create your first game in RPG Maker VX Ace Lite. It’s a free piece of game making software available on Steam.
Tutorial 2 – Moving from map to map
How to add more maps to your game and change screens when you enter a building / dungeon etc.
Tutorial 3 – Making you first quest
How to make a simple quest where you talk to people and collect items.
Tutorial 4 – Customising your characters
How to change the appearance of your characters and edit their class.
Introduction
In this tutorial video we show you how to make a simple teleporter in Minecraft using Python coding. Your player will be able to walk on to a block and be instantly transported to a set location, and back again if needed!
Tutorial Video
Here is the tutorial video, as always make sure that you watch and listen to the video, rather than just copying the code, as you learn far more if you do!
Stretch Challenges
Finished your teleporter and want to make it even better? Here are some ideas!
- Code a for glass surround for each end of your teleporter so that it looks like something out of star trek.
- Create a teleporter that sends you between 3 locations, instead of 2, in a triangle.
Full Code
Here is the full code for the project. Make sure that you watch the video and work through, it’s far more effective than just copying the cod for helping you to learn!
Introduction
In this longer tutorial we walk through steps needed to recreate the Flappybird game using Minecraft and Python. A great project that can be achieved in about 60 lines of code!
Tutorial Video
Here is the full tutorial video. Make sure that you listen to the video as well as watching as I talk through all the steps and decisions I went through to code the project!
Full Code
Here is the full code I used in the Project. I have made a slight change to a couple of lines from what the original code was, just to iron out a couple of bugs!
Introduction
In this video tutorial you learn how to code a castle in Minecraft, using Python coding.
This tutorial shows you the power and simplicity of loops, as well as the the benefit of putting your code in to functions so that you do have to code the same thing over and over again.
In order to complete this tutorial you need to use either:
- Raspberry Pi with NOOBs installed (No extra things need installing)
- A Windows pc with Minecraft and Forge install. See this page for how to install forge.
Video Tutorial
Here is the full Minecraft Python tutorial. Make sure you watch and listen to the video as it explains quite a lot as well as just adding code!
Stretch Challenges
Finished the tutorial? Here are a few challenges to add to your project!
- Add a Keep in the centre of the castle
- Add a moat
- Add a working drawbridge
- Add some houses outside or inside your castle.
Subscribe
Like my tutorials? Make sure you click the subscribe link for more videos! 🙂
Full Code
Here is the full code below. Make sure that you watch the video, don’t just copy the code below, you will learn much much more!
Introduction
In this video tutorial we walk you through the process of creating a rainbow in the Minecraft world using a bit of maths(not much I promise!) and the MineCraft wool colours. A great beginner’s tutorial that helps demonstrate the power of for loops :-).
Video Tutorial
Full Code
Welcome to My Blog. This is your first post. Edit or delete it, then start blogging!
Two simple methods for how to calculate the area of a regular hexagon.
https://www.onlinemathlearning.com/transformation-games.html
http://www.sciencekids.co.nz/gamesactivities/math/transformation.html
Advanced worksheet take stuff from?
Welcome to My Blog. This is your first post. Edit or delete it, then start blogging!
Welcome to My Blog. This is your first post. Edit or delete it, then start blogging!
Welcome to My Blog. This is your first post. Edit or delete it, then start blogging!
Welcome to My Blog. This is your first post. Edit or delete it, then start blogging!
Internal Factors
Internal Factors that affect CPU performance
Clock speed of the processor
The CPU executes 1 instruction per ‘tick’ of the CPU clock. A typical CPU clock speed is 2GHz (2 billion ticks per second!). The faster the clock speed the more instructions per second the CPU can process.
Number of cores
Most modern CPUs are multi-core, meaning effectively they have more than one processor per CPU. For each extra core the maximum number of instructions increased
e.g. 1.2 GHz Quad-core
4 x 1.2 = 4.8 GHz total.
Size & Speed of the CPU Cache
The CPU contains its own on board area of RAM-like volatile memory called the Cache (the is where the registers are stored). The larger the cache, the more data that can be stored without accessing storage external to the CPU (e.g. the RAM or HDD storage). The faster the cache speed the faster data can be sent to the processor.
Type of architecture
Some architecture types such as RISC architectures support techniques such as pipelining, which can increase the effective number of executed instructions per second.
External Factors
External Factors that affect CPU performance
RAM size and speed
The faster the RAM memory that quicker data can be sent to / retrieved from the CPU, which means less idle time for the CPU. The larger the RAM the more data can be loaded from the slower secondary storage( such as HDD / SSD) and so also less idle time for the CPU.
HDD / SSD speed
The CPU spends a lot of time waiting for data to be loaded from the secondary storage. The faster the read/write speed of these devices, the less time the CPU will be sitting IDLE.
GPU Speed
The CPU often offloads intensive graphics processing tasks to the GPU and then waits for the GPU to process the tasks. The faster the GPU speed, the less time the CPU sits idle.
Resources
Welcome to My Blog. This is your first post. Edit or delete it, then start blogging!
Welcome to My Blog. This is your first post. Edit or delete it, then start blogging!
(none found)
Check out learnlearn’s new ChatGPT powered revision tool for Computer Science, ICT and more. You can find the link to the free resource generator here.
Generate:
- Flashcards
- Loopcards
- Kahoots
- Presentations
- Quizzes
- wordsearches
- Crosswords
- and more!
It’s still very much in Beta so feedback is more than welcome, just pop a comment on my most recent video on my channel about teaching in the era of chatGPT
The rise and rise of Large Large Models have caught the education world largely by surprise and left teachers and exam boards scrambling to catch up. There are many uncertainties as to where the technology is going to lead us, but one thing is certain – it’s here to stay!
The biggest concern for many professionals is how to control the use of AI, so that we can be confident that a student’s work is there own. There’s no magic bullet for this, but here are a few tips to reduce the likelihood of plagiarism in students work and achieve successful assessment in the age of AI and ChatGPT.
Include reference to recent events when setting assignments

Most Large Language Models (LLMs) take a long time to train and so most don’t contain up to date information. This means that students are going to struggle to use ChatGPT and other models to copy their entire essay. You can take advantage of this by including essay titles that reference recent events.
Examples
- What were that causes and consequences of last week’s earthquake in New Guinea
- Compare yesterday’s vote in parliament with similar votes in the last 2 years
Make reference to events personal to the student/school

ChatGPT’s access to Social Media is severely restricted, since most this data is behind paywalls and sign-in walls. This means that it will most likely provide limited, incorrect or fabricated responses. When thinking of assignments try to bring in a personal element that reduces the chances of work being plagiarized. It’s also likely to make the assignment more fun and meaningful!
Examples
- Discuss how the laws of supply and demand affected you on a recent family trip
Make reference to local events, business and organisations

LLMs are great for well known, widely referenced topics, but when an assignment is based around a local business or organisation it will tend to struggle!
Examples
- Compare the marketing strategies of Peter’s Blinds with the local fish and chip shop
Use paper-based/online assignments for high stakes testing

LLMs currently can’t yet yet convincinly on paper and so students will have no choice but to write their answers! If you use a one shot approach to assignments, where students aren’t allowed to erase/alter their work then plagiarized work should be easy enough to spot and few students are able to write whole sides of A4 without making mistakes.
Example
- Write one side on A4 on the significance of AI in education. Do not use cross your work or use an eraser pen.
Use craft based assignments for added engagement

Another great strategy is to issue create craft or poster making assignments. These types of resources can’t be copied from ChatGPT and as an added bonus they are great fun and highly engaging for the students!
Example
- Create a poster demonstrating each of the steps in the product life cycle
Do you any tips of your own?
These are the top tips so far. Do you have any tips of your own that you would like me to add to the post? If so head over to my Youtube channel and add a comment on the video and I’ll get them added!
Running CPD at school?
Are you a teacher running CPD at school for other teachers? Feel free to use & adapt my Google slides presentation

Introduction
In this post we look at how you can combine ChatGPT and Python to create Powerpoint files automatically.
Getting Started
Before we can start coding we need to do a few things first:
1 Install the Python PPTX module
Install python-pptx (and dependencies)
2. Install the OpenAI Python Module
3. Sign up for the API and generate an API Key
Sign up for the OpenAI API here
Tutorial Video
Project Source Code
Here is the full source code for reference as you follow along with the video.
import openai, json
from pptx import Presentation
openai.api_key = "YOUR_API_KEY_HERE"

presentation_title = input("What do you want to make a presentation about?")

query_json = """"{
    "input_text": "[[QUERY]]",
    "output_format": "json",
    "json_structure": {
        "slides":"{{presentation_slides}}"
       }
    }"""

question = "Generate a 10 slide presentation for the topic. Produce 50 to 60 words per slide. " + presentation_title + ".Each slide should have a  {{header}}, {{content}}. The final slide should be a list of discussion questions. Return as JSON."

prompt = query_json.replace("[[QUERY]]",question)
print(prompt)
completion = openai.ChatCompletion.create(model = "gpt-3.5-turbo", messages =[{"role":"user","content":prompt}])
response = completion.choices[0].message.content

print(response)

r = json.loads(response)

slide_data = r["slides"]

prs = Presentation()

for slide in slide_data:
    slide_layout = prs.slide_layouts[1]
    new_slide = prs.slides.add_slide(slide_layout)

    if slide['header']:
        title = new_slide.shapes.title
        title.text = slide['header']

    if slide['content']:
       shapes = new_slide.shapes
       body_shape = shapes.placeholders[1]
       tf = body_shape.text_frame
       tf.text = slide['content']
       tf.fit_text(font_family="Calibri", max_size=18, bold=True)

prs.save("output.pptx")
Welcome to My Blog. This is your first post. Edit or delete it, then start blogging!
Welcome to My Blog. This is your first post. Edit or delete it, then start blogging!